# Welcome

Welcome to StayOnHire Docs — A place where your team can learn about StayOnHire features and details with a simple search.

<table data-view="cards"><thead><tr><th></th><th></th><th></th><th data-hidden data-card-target data-type="content-ref"></th><th data-hidden data-card-cover data-type="files"></th></tr></thead><tbody><tr><td>Setup Checklist</td><td></td><td></td><td><a href="/getting-started/company-setup">Setup</a></td><td></td></tr><tr><td>Install the Mobile App</td><td></td><td></td><td><a href="/getting-started/apps">Apps</a></td><td></td></tr><tr><td>Xero Integration</td><td></td><td></td><td><a href="/integrations/xero">Xero</a></td><td></td></tr><tr><td>Forum / Discussions</td><td></td><td></td><td><a href="https://github.com/orgs/stayonhire/discussions">https://github.com/orgs/stayonhire/discussions</a></td><td></td></tr><tr><td>Status / App Health</td><td></td><td></td><td><a href="https://stayonhire.statuspage.io/">https://stayonhire.statuspage.io/</a></td><td></td></tr><tr><td>Blog</td><td></td><td></td><td><a href="https://www.stayonhire.com/blog">https://www.stayonhire.com/blog</a></td><td></td></tr></tbody></table>

{% embed url="<https://www.stayonhire.com>" %}
StayOnHire Website
{% endembed %}


# Setup

## Setup Checklist

For new customers, we recommend reviewing the Setup Checklist to get the most out of your StayOnHire service. These will cover adding:

* Business Details
* User Permissions
* Features (billing)
* Integrations
* Fleet & Attachments
* New jobs
* Installing the mobile app


# Business Details

## Settings&#x20;

From any page in your StayOnHire app, click the bottom left image to reveal a menu with a settings 'cog':

<figure><img src="https://50563950-files.gitbook.io/~/files/v0/b/gitbook-x-prod.appspot.com/o/spaces%2F-Lzplo2osBdXGzFtPu2f%2Fuploads%2Fo7Moty1Q718CT0dPc12C%2FScreenshot%202024-05-09%20at%202.56.43%E2%80%AFPM.png?alt=media&amp;token=a3da5c03-cf39-4917-bc47-8600ef63171e" alt=""><figcaption></figcaption></figure>

Clicking this cog icon will navigate to [Settings > Business ](https://app.stayonhire.com/org/business)

<figure><img src="https://50563950-files.gitbook.io/~/files/v0/b/gitbook-x-prod.appspot.com/o/spaces%2F-Lzplo2osBdXGzFtPu2f%2Fuploads%2F4Gh7t5go1Uq12sn6xirR%2FScreenshot%202024-05-09%20at%202.59.47%E2%80%AFPM.png?alt=media&amp;token=c7de65c2-79fb-4076-ad5d-0d41de27d149" alt=""><figcaption></figcaption></figure>

Add your business information here.&#x20;

These fields are important as they will pre-fill document templates generated by StayOnHire and prevent you from having to enter data later on manually.


# Users & Permissions

## Add New Users

1. Navigate to [Settings > Users](https://app.stayonhire.com/org/users)
2. Click **'Add user'** (lcated top right-hand corner of your page)
3. Add the user's details, then click **'Invite'**

{% hint style="info" %}
*Note:* Only users with the 'Owner' role can adjust the user permissions. To get this role changed in your organisation, contact your StayOnHire representative.
{% endhint %}

<figure><img src="https://50563950-files.gitbook.io/~/files/v0/b/gitbook-x-prod.appspot.com/o/spaces%2F-Lzplo2osBdXGzFtPu2f%2Fuploads%2FM7NlFS0OaHRHL3X9G9k9%2FScreenshot%202024-05-08%20at%203.59.47%E2%80%AFPM.png?alt=media&amp;token=f801e96f-f79e-4988-b0fd-9013ad069aad" alt=""><figcaption><p>'Users' will be a page option on the left-hand menu </p></figcaption></figure>

<figure><img src="https://50563950-files.gitbook.io/~/files/v0/b/gitbook-x-prod.appspot.com/o/spaces%2F-Lzplo2osBdXGzFtPu2f%2Fuploads%2FZOoFcxnjS4J9fX5wBKo9%2FScreenshot%202024-05-08%20at%204.04.17%E2%80%AFPM.png?alt=media&amp;token=34aeb2a2-e4f5-4f28-93cd-670c5245bbd0" alt=""><figcaption><p>The invite user popup will appear with a few basic fields to complete</p></figcaption></figure>

## Permissions

Navigate to [Settings > Users](https://app.stayonhire.com/org/users).

Double-click the 'Billing Permissions' cell of the individual you wish to give access to:

<figure><img src="https://50563950-files.gitbook.io/~/files/v0/b/gitbook-x-prod.appspot.com/o/spaces%2F-Lzplo2osBdXGzFtPu2f%2Fuploads%2FM7NlFS0OaHRHL3X9G9k9%2FScreenshot%202024-05-08%20at%203.59.47%E2%80%AFPM.png?alt=media&amp;token=f801e96f-f79e-4988-b0fd-9013ad069aad" alt=""><figcaption></figcaption></figure>

A bottom sheet will appear with permission-related functionality you can change.&#x20;

Click the desired toggles to the 'on' position and click 'Save' as pictured below:

<figure><img src="https://50563950-files.gitbook.io/~/files/v0/b/gitbook-x-prod.appspot.com/o/spaces%2F-Lzplo2osBdXGzFtPu2f%2Fuploads%2FcBDX2cthmoX4jIe8RkPv%2FScreenshot%202024-05-08%20at%204.00.48%E2%80%AFPM.png?alt=media&amp;token=32376157-e538-423f-be21-0fa5db5a185c" alt=""><figcaption></figcaption></figure>

{% hint style="success" %}
Once permissions have been changed on an existing user, they will need to refresh their page to begin seeing new features.&#x20;
{% endhint %}

<figure><img src="https://50563950-files.gitbook.io/~/files/v0/b/gitbook-x-prod.appspot.com/o/spaces%2F-Lzplo2osBdXGzFtPu2f%2Fuploads%2FITWht9zc5NpbnfGHSPGY%2FScreenshot%202024-05-08%20at%204.26.27%E2%80%AFPM.png?alt=media&amp;token=2dd3ad03-e21c-46bc-9e4f-143ac2214fe3" alt=""><figcaption></figcaption></figure>

To perform a hard refresh, refer to the following keyboard shortcuts:

<figure><img src="https://50563950-files.gitbook.io/~/files/v0/b/gitbook-x-prod.appspot.com/o/spaces%2F-Lzplo2osBdXGzFtPu2f%2Fuploads%2F0b78Y9MCsZ7hZTyOwvNr%2Fhard-refresh-browser-firefox.jpg?alt=media&amp;token=125a83a7-3f21-4b3a-8e5c-95f19eb6d948" alt=""><figcaption></figcaption></figure>

### View&#x20;

Users will see the billing page in their account main menu and view billing information and notes for jobs and invoices.

{% hint style="info" %}
Users cannot edit or save any billing-related changes without their edit functionality activated.&#x20;
{% endhint %}

### Edit

Users will be able to edit and save changes made on invoices in StayOnHire.


# Features

## Activating Features

Features are not activated by default to prevent cluttered user interfaces.

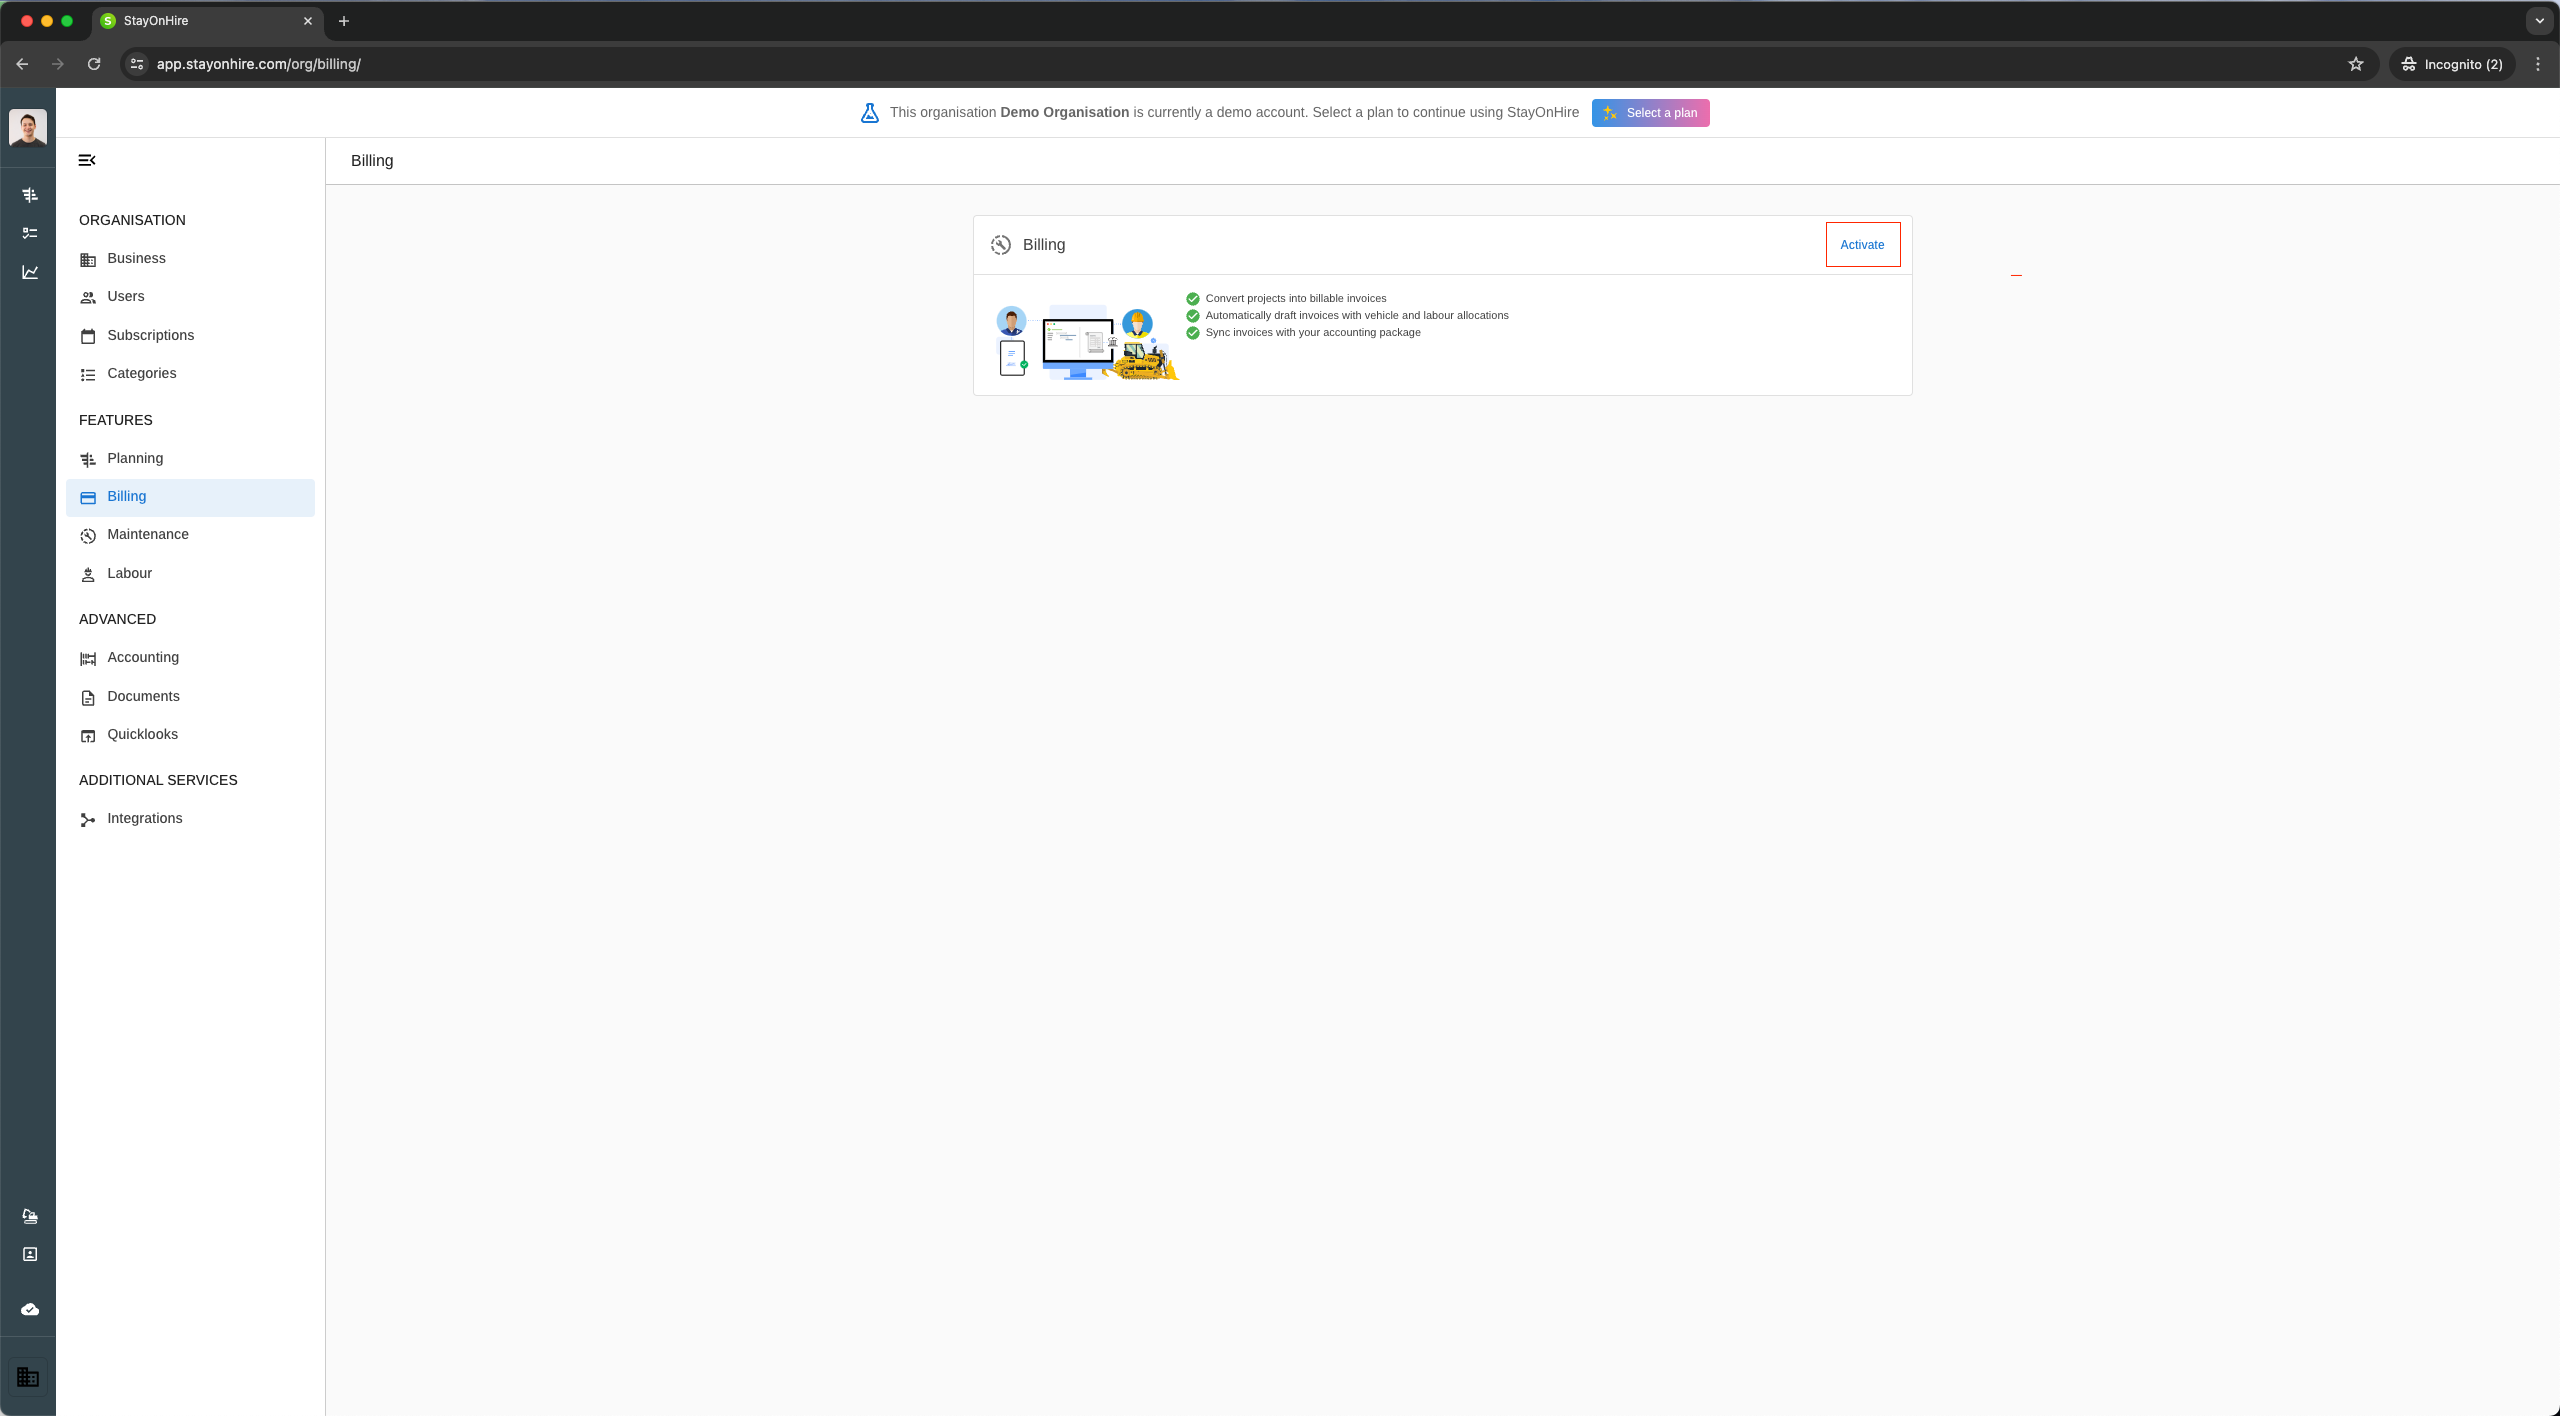
To activate a feature, navigate to settings, find the feature, and click activate:

<figure><img src="https://50563950-files.gitbook.io/~/files/v0/b/gitbook-x-prod.appspot.com/o/spaces%2F-Lzplo2osBdXGzFtPu2f%2Fuploads%2FKV6euqhxpOpNaXSDyh8J%2FScreenshot%202024-05-08%20at%207.22.05%E2%80%AFAM.png?alt=media&amp;token=0124a808-22dd-4ca2-a01c-0e64a432041f" alt=""><figcaption><p>An inactive billing settings page</p></figcaption></figure>

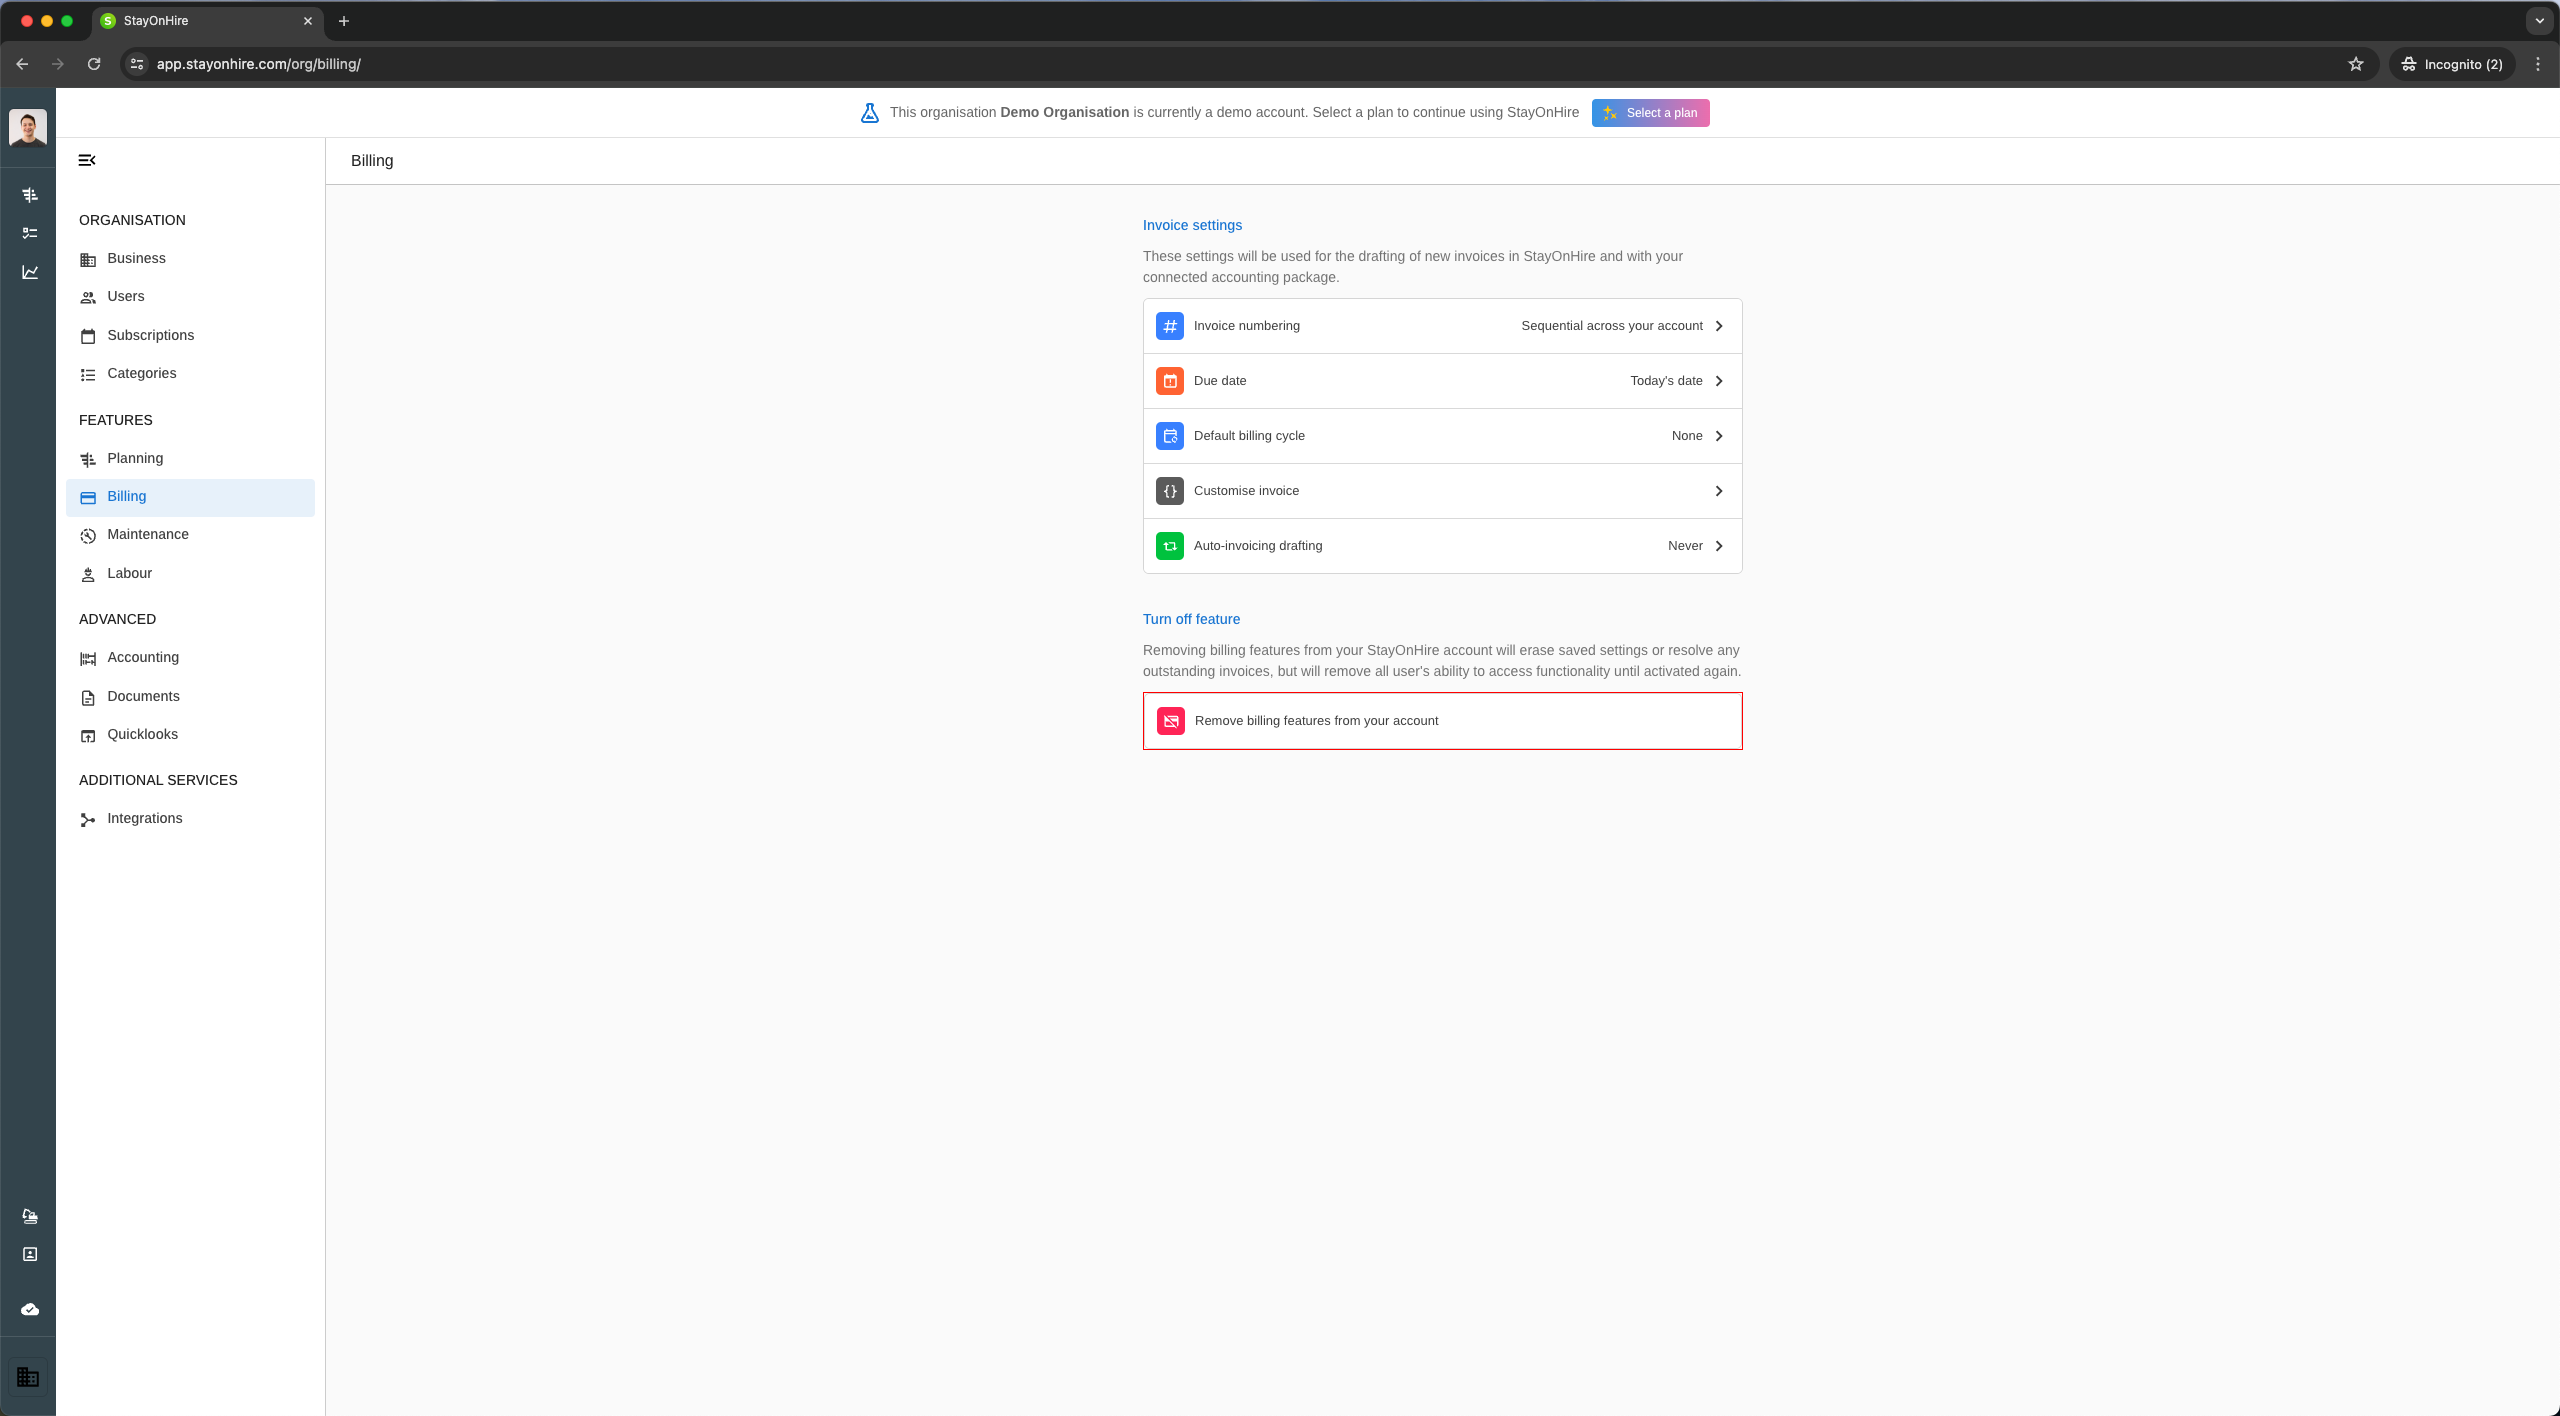
## Removing Features

Click “Permanently delete connection”

This will remove your account connection with [Xero](https://www.stayonhire.com/xero).

<figure><img src="https://50563950-files.gitbook.io/~/files/v0/b/gitbook-x-prod.appspot.com/o/spaces%2F-Lzplo2osBdXGzFtPu2f%2Fuploads%2FIcrdUhPQil50FZJgqtvj%2FScreenshot%202024-05-08%20at%207.37.06%E2%80%AFAM.png?alt=media&amp;token=5fa5c6b6-0d26-48ff-afd3-640c9ca73452" alt=""><figcaption></figcaption></figure>

## Re-connecting Features

A StayOnHire account can have its feature re-connected back again at a later date.

The reconnection will keep any historical data from the future in the past.


# Integrations

StayOnHire has a range of integrations that can be connected to your account.

## Integrations&#x20;

Go to [Settings > Integrations](https://app.stayonhire.com/org/integrations)

Select the menu option in the bottom left titled "Integrations":

<figure><img src="https://50563950-files.gitbook.io/~/files/v0/b/gitbook-x-prod.appspot.com/o/spaces%2F-Lzplo2osBdXGzFtPu2f%2Fuploads%2Fgnyrg8s9I0oBXHj5cSm6%2FScreenshot%202024-05-09%20at%203.05.19%E2%80%AFPM.png?alt=media&amp;token=b952bba5-5c90-429b-b8dc-e07757045080" alt=""><figcaption></figcaption></figure>

### Connecting Apps

The individual setup process for each integration may vary.

For details on each specific integration such as the [Xero integration](/integrations/xero) pictured please see the relevant guide.

<figure><img src="https://lh7-us.googleusercontent.com/68uq4mFa2AlQuxuzl6KuE-8Yn_LRm61An5WYXVEWROyiJVrz2Zh1ro87JBCONvdRnJXV7j4ifwD4C1adryi-oUOb3kaC-kDoiLZ302PZ6UGVD3CaxeuZuqRItNqf2KL6UqdXXMmDQMWuFU1vBp4VOnU" alt=""><figcaption></figcaption></figure>


# Apps

This step-by-step guide will help anybody in your team quickly install StayOnHire apps on their tablet, mobile, or desktop devices.

## Select an app

StayOnHire has different applications for each business scenario. All apps are available on desktop, tablet, and mobile-friendly versions.

Click each app name for a step-by-step guide:

<table><thead><tr><th width="202">App Name</th><th width="232">Target Users</th><th width="375">Use Case</th></tr></thead><tbody><tr><td><a href="/getting-started/apps/field-actions">Field Actions</a></td><td>Field &#x26; workshop workers</td><td>Entering field data such as:<br>- On/off hiring<br>- Updating asset details/photos</td></tr><tr><td><a href="/getting-started/apps/office">Office</a></td><td>Owners, admin, fleet managers and billing teams</td><td>Managing business-critical planning, scheduling and billing</td></tr><tr><td>My StayOnHire</td><td>Individuals outside a business</td><td>Signing &#x26; accessing digital documents sent by a business</td></tr></tbody></table>

### Progressive Web Apps (PWAs)

StayOnHire enhances your experience by combining desktop functionality with mobile accessibility—a hallmark of Progressive Web Apps (PWA).&#x20;

Unlike typical native apps from App Stores, StayOnHire's apps offer a seamless user experience across all device types, brands, and operating systems.

### What is a Progressive Web App (PWA)?

A Progressive Web App (PWA) is a type of application software delivered through the web, built using common web technologies including HTML, CSS, and JavaScript. It is intended to work on any platform that uses a standards-compliant browser, including both desktop and mobile devices.

#### **Key Features of PWAs:**

* **Responsiveness and Browser Compatibility:** PWAs are designed to work on any device with a screen and a web browser. They automatically adjust to fit the size of the device, whether it's a desktop, a mobile phone, or a tablet.
* **Offline Capability:** One of the most significant advantages of a PWA is its ability to work offline or on low-quality networks. This is achieved through the use of service workers that cache the application's assets.
* **App-like Interface:** PWAs mimic the navigation and interactions of native applications, making them easy to use and navigate.
* **No Install Required from App Stores:** Unlike traditional apps, PWAs don’t require users to download them from app stores. They can be added directly to a device's home screen and send push notifications just like native apps.
* **Safety and Security:** PWAs are served through HTTPS to prevent snooping and ensure that the content hasn’t been tampered with.

**Benefits of Using PWAs:**

* **Fast Installation:** Users can add PWAs to their home screen without the lengthy download times of traditional apps.
* **Reduced Data Usage:** Since much of the information is stored locally on the device, PWAs use less data compared to traditional web pages.
* **Automatic Updates:** Users receive the most updated version of the app without needing to manually update it through an app store.

PWAs provide a user-friendly, efficient, and effective way to deliver digital experiences, combining the best of web and native apps. They are an excellent choice for businesses looking to improve their mobile presence without the development and maintenance costs associated with native apps.


# Field Actions

How to install the StayOnHire field app. This app is for field & workshop workers entering field data such as on/off hire times and updating asset details/photos.

## What type of device are you using?

* [Apple ](#apple-devices)
* [Android](#android-devices)
* [Microsoft Edge on PC](#microsoft-edge)
* [Google Chrome on PC](#google-chrome)

## Mobile App

### Apple Devices

#### 1. Open Safari

Open your Safari browser and head to [m.stayonhire.com](https://m.stayonhire.com/ready-status)

<figure><img src="https://50563950-files.gitbook.io/~/files/v0/b/gitbook-x-prod.appspot.com/o/spaces%2F-Lzplo2osBdXGzFtPu2f%2Fuploads%2FXyHGCJHZEslPdm1B0omQ%2F649a7cb12922c16b17e70657_OpenSafari.png?alt=media&amp;token=bb26e7ac-9586-4118-bc7b-4469c47f5e31" alt="" width="375"><figcaption></figcaption></figure>

{% hint style="info" %}
Apple prefers PWAs be added to the home screen via Safari over other browsers like Chrome.
{% endhint %}

#### 2. Login

Enter your credentials

<div data-full-width="false"><figure><img src="https://50563950-files.gitbook.io/~/files/v0/b/gitbook-x-prod.appspot.com/o/spaces%2F-Lzplo2osBdXGzFtPu2f%2Fuploads%2FeRUOZOt3U5Jb8flg8AB0%2FIMG_CF835BD66C71-1.jpeg?alt=media&amp;token=42071009-2ba4-4fa1-8343-4cd11ce4515c" alt="" width="375"><figcaption></figcaption></figure></div>

#### 3. Add to Home Screen

Click the Export button to reveal a menu option titled "Add to Home Screen"

### Android Devices

#### 1. Open Google Chrome & Login

Open a Google Chrome browser and head to [m.stayonhire.com](https://m.stayonhire.com/ready-status)&#x20;

After logging in, you will be prompted a pop-up asking if you want to add an app to the home screen:

<figure><img src="https://50563950-files.gitbook.io/~/files/v0/b/gitbook-x-prod.appspot.com/o/spaces%2F-Lzplo2osBdXGzFtPu2f%2Fuploads%2FSHLHcYqNEbhDaIagw8H2%2F649a7feae1123bc0ac6ebaa4_Android.png?alt=media&amp;token=19bbccb3-4154-49d6-9297-05a52bf77614" alt="" width="375"><figcaption></figcaption></figure>

#### 2. Add to Home Screen

If you don't see an install prompt straight away, open the menu and look for an option to "Install app" or "Add to Home Screen"

<figure><img src="https://50563950-files.gitbook.io/~/files/v0/b/gitbook-x-prod.appspot.com/o/spaces%2F-Lzplo2osBdXGzFtPu2f%2Fuploads%2Futr3d0QlkkAoOS5Jbi62%2F649a805d5c796e29861c477c_Install%20app.png?alt=media&amp;token=5067d3d4-c595-47bc-970c-8d7e7483df32" alt="" width="563"><figcaption></figcaption></figure>

## Desktop App

### Microsoft Edge

#### 1. Open Microsoft Edge

Open your Edge browser, head to [m.stayonhire.com](https://m.stayonhire.com/ready-status), and log in.

Click the 'Add app' icon from your URL header:

<figure><img src="https://50563950-files.gitbook.io/~/files/v0/b/gitbook-x-prod.appspot.com/o/spaces%2F-Lzplo2osBdXGzFtPu2f%2Fuploads%2FofHukPfzmDfy8AMBEKbK%2FScreenshot%202024-05-09%20at%203.53.35%E2%80%AFPM.png?alt=media&amp;token=9cc1efc5-87af-43f0-a7c4-bc13b9d5f19a" alt=""><figcaption></figcaption></figure>

#### 2. The Field Actions App

Your [StayOnHire](https://www.stayonhire.com) Field Actions App will now be available on your device:

<figure><img src="https://50563950-files.gitbook.io/~/files/v0/b/gitbook-x-prod.appspot.com/o/spaces%2F-Lzplo2osBdXGzFtPu2f%2Fuploads%2FIm5qulb3DHXKgyk9J2D9%2FScreenshot%202024-05-09%20at%203.56.29%E2%80%AFPM.png?alt=media&amp;token=d074b99a-fd0c-48d2-8438-c6ce30617d90" alt=""><figcaption></figcaption></figure>

### Google Chrome

#### 1. Open Google Chrome

Open your Chrome browser, head to [m.stayonhire.com](https://m.stayonhire.com/ready-status), and log in.

Click the 'Install app' icon from your URL header:

<figure><img src="https://50563950-files.gitbook.io/~/files/v0/b/gitbook-x-prod.appspot.com/o/spaces%2F-Lzplo2osBdXGzFtPu2f%2Fuploads%2Fsoya0BkhlyvDODYG6qGG%2FScreenshot%202024-05-09%20at%203.51.57%E2%80%AFPM.png?alt=media&amp;token=98404b84-4ef7-4563-9043-c809085c844e" alt=""><figcaption></figcaption></figure>

#### 2. The Field Actions App

Your [StayOnHire](https://www.stayonhire.com) Field Actions App will now be available on your device:

<figure><img src="https://50563950-files.gitbook.io/~/files/v0/b/gitbook-x-prod.appspot.com/o/spaces%2F-Lzplo2osBdXGzFtPu2f%2Fuploads%2F1iklUb5ioyGKeLgj95F6%2FScreenshot%202024-05-09%20at%204.05.17%E2%80%AFPM.png?alt=media&amp;token=9a8292ed-c448-4afc-aef0-da19e6b4f6a4" alt=""><figcaption></figcaption></figure>


# Office

How to install the StayOnHire Office app on devices. This app is used predominantly by admins and people in a team who have many controls over creating new data.

## What type of device are you using?

* [Apple ](#apple-devices)
* [Android](#android-devices)
* [Microsoft Edge on PC](#microsoft-edge)
* [Google Chrome on PC](#google-chrome)

## Mobile App

### Apple Devices

#### 1. Open Safari

Open your Safari browser and head to [app.stayonhire.com](https://app.stayonhire.com/)

{% hint style="info" %}
Apple prefers PWAs be added to the home screen via Safari over other browsers like Chrome.
{% endhint %}

#### 2. Login

Enter your credentials

<div data-full-width="false"><figure><img src="https://50563950-files.gitbook.io/~/files/v0/b/gitbook-x-prod.appspot.com/o/spaces%2F-Lzplo2osBdXGzFtPu2f%2Fuploads%2FeRUOZOt3U5Jb8flg8AB0%2FIMG_CF835BD66C71-1.jpeg?alt=media&amp;token=42071009-2ba4-4fa1-8343-4cd11ce4515c" alt="" width="375"><figcaption></figcaption></figure></div>

#### 3. Add to Home Screen

Click the Export button to reveal a menu option titled "Add to Home Screen"

### Android Devices

#### 1. Open Google Chrome & Login

Open a Google Chrome browser and head to [app.stayonhire.com](https://app.stayonhire.com/)

After logging in, you will be prompted a pop-up asking if you want to add an app to the home screen:

#### 2. Add to Home Screen

If you don't see an install prompt straight away, open the menu and look for an option to "Install app" or "Add to Home Screen"

## Desktop App

### Microsoft Edge

#### 1. Open Microsoft Edge

Open your Edge browser, head to [app.stayonhire.com](https://app.stayonhire.com/), and log in.

Click the 'Add app' icon from your URL header:

<figure><img src="https://50563950-files.gitbook.io/~/files/v0/b/gitbook-x-prod.appspot.com/o/spaces%2F-Lzplo2osBdXGzFtPu2f%2Fuploads%2FofHukPfzmDfy8AMBEKbK%2FScreenshot%202024-05-09%20at%203.53.35%E2%80%AFPM.png?alt=media&amp;token=9cc1efc5-87af-43f0-a7c4-bc13b9d5f19a" alt=""><figcaption></figcaption></figure>

#### 2. The Field Actions App

Your [StayOnHire](https://www.stayonhire.com) Field Actions App will now be available on your device:

<figure><img src="https://50563950-files.gitbook.io/~/files/v0/b/gitbook-x-prod.appspot.com/o/spaces%2F-Lzplo2osBdXGzFtPu2f%2Fuploads%2FIm5qulb3DHXKgyk9J2D9%2FScreenshot%202024-05-09%20at%203.56.29%E2%80%AFPM.png?alt=media&amp;token=d074b99a-fd0c-48d2-8438-c6ce30617d90" alt=""><figcaption></figcaption></figure>

### Google Chrome

#### 1. Open Google Chrome

Open your Chrome browser, head to [app.stayonhire.com](https://app.stayonhire.com/), and log in.

Click the 'Install app' icon from your URL header:

<figure><img src="https://50563950-files.gitbook.io/~/files/v0/b/gitbook-x-prod.appspot.com/o/spaces%2F-Lzplo2osBdXGzFtPu2f%2Fuploads%2Fsoya0BkhlyvDODYG6qGG%2FScreenshot%202024-05-09%20at%203.51.57%E2%80%AFPM.png?alt=media&amp;token=98404b84-4ef7-4563-9043-c809085c844e" alt=""><figcaption></figcaption></figure>

#### 2. The Field Actions App

Your [StayOnHire](https://www.stayonhire.com) Field Actions App will now be available on your device:

<figure><img src="https://50563950-files.gitbook.io/~/files/v0/b/gitbook-x-prod.appspot.com/o/spaces%2F-Lzplo2osBdXGzFtPu2f%2Fuploads%2F1iklUb5ioyGKeLgj95F6%2FScreenshot%202024-05-09%20at%204.05.17%E2%80%AFPM.png?alt=media&amp;token=9a8292ed-c448-4afc-aef0-da19e6b4f6a4" alt=""><figcaption></figcaption></figure>


# Software Updates

Updates are deployed real-time across all devices and can be received by refreshing your device, browser or app.

## Perform a Hard Refresh

* Windows Desktop (Chrome/Firefox): Press **`Ctrl + F5`** or **`Shift + F5`**.
* Mac Desktop (Safari): **Press `Cmd + Option + R`**.
* Android Mobile Devices (Chrome PWA): **Close your app and re-open it.**
* iOS Mobile Devices (Safari PWA): **Close your app and re-open it.**

### Why it works?

Whenever we roll out an update, it's deployed live on our servers. This means that as soon as our developers push a new feature or bug fix, it's immediately available on our platform. There’s no waiting for app store approvals or manual downloads required by the user.

A quick refresh is enough to see changes in real time.

## What type of device are you using?

* [Apple ](#apple-devices)
* [Android](#android-devices)

## Mobile

### Apple Devices

#### 1. Close the StayOnHire app

Slowly, gesture 'swipe up' from the bottom of your device screen to enter your 'open apps' screen:

<figure><img src="https://50563950-files.gitbook.io/~/files/v0/b/gitbook-x-prod.appspot.com/o/spaces%2F-Lzplo2osBdXGzFtPu2f%2Fuploads%2FWzY83Z9OdM8OCz6hX3Sb%2FIMG_9192.PNG?alt=media&amp;token=0d64bfa0-8558-469c-a1b3-2464b39907db" alt="" width="375"><figcaption></figcaption></figure>

To close an app, swipe the application completely upwards until it disappears from view:

<figure><img src="https://50563950-files.gitbook.io/~/files/v0/b/gitbook-x-prod.appspot.com/o/spaces%2F-Lzplo2osBdXGzFtPu2f%2Fuploads%2F074NMvbn4EzTorSesTea%2FIMG_9191.PNG?alt=media&amp;token=817f2b21-28a1-494e-9d6d-5ee10aa7a6d6" alt="" width="375"><figcaption></figcaption></figure>

For more information, refer to Apple's guide: [Close an app on your iPhone or iPod touch](https://support.apple.com/en-au/109359)

#### 2. Open the StayOnHire app

Updates will now be visible in your application once re-opened.

### Android Devices (Chrome)

* **Automatic Updates:**
  * Chrome also uses Service Workers to manage updates. When a new version is detected, it will be downloaded in the background.
* **Manual Refresh:**
  * Users can refresh the PWA by closing and reopening it, or by performing a hard refresh within Chrome (go to the StayOnHire site and swipe down from the top of the screen to refresh).


# Glossary

## A

* **ABN** – Australian Business Number, a unique identifier for businesses in Australia.
* **Asset** – A piece of equipment, machinery, or property that is owned or leased.
* **Asset Allocation** – Distribution of assets (equipment or resources) across different tasks or locations.
* **Asset Event** – An occurrence or situation involving an asset that might require action (e.g., breakdown, maintenance).
* **Asset ID** – A unique identifier for a specific asset.
* [**Asset Management**](https://www.stayonhire.com/au/features/labour-fleet-management) – The process of tracking, maintaining, and managing assets throughout their lifecycle.
* **Asset Request** – A request made for the allocation or use of an asset.
* **Asset Tracking** – Monitoring and recording the location, status, and usage of assets.

## B

* **Barcode** – A visual representation of data in a machine-readable format.
* **Barcode Label** – A label containing a barcode that is placed on an item for tracking purposes.
* **Barcode Scanner** – A device used to read barcodes and input the associated data into a system.
* **Barcode Symbology** – The set of rules that defines the structure of a barcode.
* **Barcode Tracking Software** – Software used to track assets or inventory via barcode scanning.
* **Batch Scanning** – The process of scanning multiple barcodes or items at once.
* **Billable Item** – A service or product that is chargeable to a customer.
* **Billable Usage** – The time or resources used that can be billed to the customer.
* [**Billing**](https://www.stayonhire.com/au/features/billing-invoicing) – The process of creating and sending invoices to clients for services or products.
* **Billing Cycle** – The period over which a customer is billed (e.g., monthly, quarterly).
* **Booking Confirmation** – A document confirming the details of a reservation or booking.

## C

* **Cancellation Policy** – The terms under which a booking or rental can be cancelled and any applicable fees.
* **Client** – A customer or organization that hires or purchases goods or services.
* **Contact** – A person or organization that is relevant to a particular business transaction or relationship.
* **Contact ID** – A unique identifier for a contact in a system.
* **Contact Person** – The individual representing an organization or client for communication purposes.
* **Contract** – A formal agreement outlining the terms and conditions between parties.
* **Consumable** – Items used during operations that are expected to be consumed or depleted.

## D

* **Damage Waiver** – A fee charged to reduce or eliminate liability for damage to rented equipment.
* **Delivery Charge** – The cost associated with delivering equipment or goods to a location.
* **Demobe** – The process of deactivating or removing equipment from a project site after use.
* **Demobe Freight Brief** – A document detailing the transportation and logistics of equipment during demobilization.
* **Document** – A file or record that contains relevant information about a business transaction or process.
* **Document Generation** – The process of creating documents automatically based on predefined templates and data.
* **Document Template** – A preset document layout that can be filled with relevant data for various processes.
* **Digital Signing** – The process of electronically signing a document to confirm its authenticity and agreement.
* **Double Handling** – The process of moving goods or equipment more than once during transportation or during loading and unloading, which can increase costs and time.
* [**Dry Hire**](https://www.stayonhire.com/au/industries/hire-rental-cloud/dry-hire-software) – The hiring of equipment without an operator, where the lessee provides their own operator for the equipment.

## E

* **E-Signature** – A digital signature used to sign contracts and documents electronically.
* **Equipment Agreement** – A contract specifying the terms and conditions for renting or using equipment.
* **Equipment Allocation** – The distribution of equipment to specific tasks or locations.
* **Equipment Booking System** – A system used to reserve equipment for hire or use.
* **Equipment Bundle** – A set of equipment grouped together for convenience or as part of a special offer.
* [**Equipment Calendar**](https://www.stayonhire.com/au/features/labour-fleet-management) – A scheduling tool that tracks the availability and usage of equipment.
* **Equipment Checkout** – The process of checking out equipment from a facility or service provider.
* **Equipment Checkout System** – A system that facilitates the checkout process for equipment.
* **Equipment Depreciation** – The reduction in value of equipment over time due to wear and tear or obsolescence.
* **Equipment Downtime** – The period during which equipment is not operational due to maintenance, breakdown, or other issues.
* **Equipment Loan** – A temporary loan of equipment for a specified period.
* **Equipment Loss** – The loss of equipment due to theft, damage, or other circumstances.
* **Equipment Maintenance** – Activities designed to keep equipment in working condition, such as inspections and repairs.
* [**Equipment Management**](https://www.stayonhire.com/au/features/labour-fleet-management) – The overall process of managing, maintaining, and utilizing equipment in an organization.
* **Equipment Pricing** – The cost of renting or purchasing equipment, including fees for maintenance and other services.
* [**Equipment Rental Software**](https://www.stayonhire.com/) – A system used to manage and track the rental of equipment.
* **Equipment ROI** – Return on investment for equipment, assessing the profitability relative to the cost.
* [**Equipment Scheduling**](https://www.stayonhire.com/au/features/labour-fleet-management) – The process of planning and organizing the use of equipment for various tasks.
* **Equipment Shortage** – A situation where the demand for equipment exceeds the available supply.
* **Equipment Tracking** – The process of monitoring the location and usage of equipment throughout its lifecycle.

## F

* [**Field App**](https://www.stayonhire.com/au/solutions/in-the-field) – A mobile application used by field workers to access, update, or report information in real time.
* [**Field Action**](https://www.stayonhire.com/au/solutions/in-the-field) – An activity or task carried out in the field, typically relating to maintenance, repairs, or service requests.
* **Field Operations** – The activities conducted at the job site, including managing resources and equipment.
* **Freight** – The transportation of goods or equipment, typically by truck, ship, or rail.
* **Freight Schedule** – A timetable that organizes and tracks the delivery of freight or goods.
* **Freight Brief** – A document detailing the specifications and logistics for moving freight or equipment.

## G

* **Group Booking** – The process of booking multiple items or services under a single reservation.

## I

* **Inventory Audit** – The process of checking and verifying the stock levels of items or assets.
* **Inventory Barcode System** – A system that uses barcodes to manage and track inventory.
* **Inventory Count** – The physical counting of items or assets in stock to verify quantities.
* **Inventory List** – A list that contains details of the items in stock, including quantity, type, and location.
* **Inventory Management** – The process of overseeing and controlling inventory levels and movement.
* **Inventory Tracking** – Monitoring the movement and status of inventory items from acquisition to use.
* [**Invoice**](https://www.stayonhire.com/au/features/billing-invoicing) – A document sent to a customer requesting payment for goods or services provided.
* **Invoice Numbering** – The system used to assign unique numbers to invoices for identification and tracking purposes.
* **Integration** – The process of combining different software or systems to work together seamlessly and share data.

## J

* [**Job**](https://www.stayonhire.com/au/features/labour-fleet-management) – A specific task or project that requires resources, equipment, and labour to complete.
* **Job Contact** – The person responsible for communication and coordination regarding a specific job.
* **Job ID** – A unique identifier assigned to a particular job or task.
* **Job Summary** – A brief description or overview of a job or project.

## K

* **KPIs** – Key Performance Indicators, metrics used to evaluate the success or progress of an activity.

## L

* [**Labour**](https://www.stayonhire.com/au/industries/construction-software/wet-hire-software) – The workforce or employees engaged in tasks that require physical or mental effort, often within a business or operational context.
* **Labour Allocation** – The assignment of workers to specific tasks or jobs.
* **Labour Request** – A request for the assignment or hiring of labour for a specific task.
* **Late Fee** – A charge applied when a payment or action is delayed beyond the due date.
* **Long-Term Rental** – Renting equipment or services for an extended period, typically over a year.

## M

* **Make** – The manufacturer or brand of a piece of equipment or vehicle.
* **Model** – The specific version or variant of an item, often defined by features or specifications.
* **Mobilisation** – The process of preparing and transporting equipment to a job site for use.
* **Mobe** – Short for mobilization, it refers to the act of deploying equipment or resources to a job site.
* **Mobe Freight Brief** – A document outlining the logistics for transporting equipment to a job site.

## O

* **Odometer** – A device used to measure the distance travelled by a vehicle or equipment.
* **On Hire** – The status of equipment or assets that are currently rented or in use.
* **Off Hire** – The status of equipment or assets that are no longer rented or in use.
* **Operating Hours** – The hours during which equipment or machinery is operational.
* **Operational Status** – The current state or condition of equipment, indicating whether it is active or inactive.
* **Online Booking System** – A digital platform used to make reservations or bookings for equipment or services.
* [**Office App**](https://www.stayonhire.com/au/solutions/in-the-office) – A software application designed to facilitate office-related tasks, often including tools for communication, scheduling, and document management.

## P

* **Packing Slip** – A document accompanying goods during shipping, detailing the items being delivered.
* **Pre-Hire Condition** – The state or condition of equipment before it is rented out or used.
* **Post-Hire Condition** – The state or condition of equipment after it has been returned or used.
* **Pricing Structure** – The system or method used to determine the price of services or products.
* **Purchase Order Number** – A unique identifier for a purchase order, used for tracking and reference.

## Q

* [**Quote**](https://www.stayonhire.com/au/features/billing-invoicing) – A formal offer outlining the price and terms for goods or services.
* **QR Code** – A type of barcode that stores data and can be scanned with a mobile device.

## R

* **Ready Status** – The indication that equipment is available and ready for use.
* **Rental Inventory** – The stock of items available for rent.
* **Rental Period** – The duration for which equipment or services are rented.
* **Rental Return** – The process of returning rented equipment or goods after use.
* **Rental Software** – Software used to manage and track rental transactions and inventory.
* **Reservation System** – A system used to make, confirm, and track reservations for equipment or services.
* **Revenue** – The total income generated by a business through sales, services, or rentals.

## S

* **Self-Service Booking** – A booking system where customers can make reservations or requests independently.
* **SKU (Stock Keeping Unit)** – A unique identifier used to track inventory items.
* **Short-Term Rental** – Renting equipment or services for a brief period, typically under a year.
* **Stock** – The items or products available for sale, rent, or use in a business.
* **Stock Identifier** – A code or label used to distinguish different stock items.
* **Subrenting** – The practice of renting equipment from one provider and then renting it out to another customer.
* [**Service Record**](https://www.stayonhire.com/au/features/maintenance) – A record of maintenance, repairs, and service performed on an asset or equipment.
* **Stand Down** – A period when operations are paused, often for maintenance or safety reasons.
* **Security Deposit** – A deposit paid by the renter or lessee as a security against potential damages or non-compliance with contract terms.

## T

* [**Task**](https://www.stayonhire.com/au/features/to-do-task-management) – A specific action or assignment to be completed as part of a job or project.
* [**Task Management**](https://www.stayonhire.com/au/features/to-do-task-management) – The process of organizing, assigning, and tracking tasks to ensure timely completion.
* **Tax Rate** – The percentage rate applied to calculate the tax due on goods or services.
* **Timeline** – A schedule that outlines the start and finish dates for tasks, jobs, or projects.

## U

* **Utilisation Rate** – The percentage of time that equipment is in use compared to its available time.
* **User** – An individual with access to a system or platform, typically for managing or interacting with data.

## W

* **Waiver** – A legal document where a party relinquishes a right or claim.
* **Warehouse** – A storage facility used to store inventory, goods, or equipment.
* **Wear and Tear** – The normal deterioration of equipment or assets from usage over time.
* [**Wet Hire**](https://www.stayonhire.com/au/industries/construction-software/wet-hire-software) – The hiring of equipment along with an operator for a specified period.


# Bulk Importing Assets

This page covers how you can quickly setup your fleet in StayOnHire bulk importing assets via spreadsheet Copy-Paste

***

### Step 1: Open your source Spreadsheet (Excel/CSV/XLSX)

Open your spreadseet asset list (i.e. in Excel). Select and copy (`Ctrl + C` or `Cmd + C`) the specific text column that holds the values you want to copy

* Tip: Always start with your unique identifiers column (e.g. Asset ID, or Unit Code) to smoothly establish the system base rows

<figure><img src="https://50563950-files.gitbook.io/~/files/v0/b/gitbook-x-prod.appspot.com/o/spaces%2F-Lzplo2osBdXGzFtPu2f%2Fuploads%2FJLRGCxMtvmWCq2AM9iDR%2FScreenshot%202026-06-03%20at%202.51.12%E2%80%AFpm.png?alt=media&amp;token=455ccb87-3cdf-48f2-975d-ea6b635769c9" alt=""><figcaption><p>Copy the column from your spreadsheet</p></figcaption></figure>

#### Step 2: Go to the StayOnHire Fleet Page

Log into your Fleet page at [`app.stayonhire.com/assets`](https://app.stayonhire.com/assets/active). In the primary dark left-hand navigation sidebar panel, move down to the Company grouping list section and click onto the Fleet page.&#x20;

Look directly at the utility actions running along the top header bar of your active fleet data table:

1. Turn on interactive layout updates by clicking the inline slide indicator text marked 'Edit' mode.
2. Once active, go over to the right side of the filter controls and click the blue action button named `+ Add Asset`. This instantly focuses your selection onto a freshly generated empty data row.

<figure><img src="https://50563950-files.gitbook.io/~/files/v0/b/gitbook-x-prod.appspot.com/o/spaces%2F-Lzplo2osBdXGzFtPu2f%2Fuploads%2Fh81VIa3hkXD2KqTg9ezV%2FScreenshot%202026-06-03%20at%202.53.43%E2%80%AFpm.png?alt=media&amp;token=638614cf-ae89-4d8e-b64b-4deda4a9cbbc" alt=""><figcaption><p>Click the 'Edit', then '+ Add Asset' buttons</p></figcaption></figure>

#### Step 3: Paste your copied column of data

Click directly inside the focused primary input cell text box for your new line (specifically the Asset ID entry block). Execute a direct system clipboard paste action (`Ctrl + V` or `Cmd + V`).

<figure><img src="https://50563950-files.gitbook.io/~/files/v0/b/gitbook-x-prod.appspot.com/o/spaces%2F-Lzplo2osBdXGzFtPu2f%2Fuploads%2FnPxxKNpYugeVKF2ZZgmM%2FScreenshot%202026-06-03%20at%202.57.38%E2%80%AFpm.png?alt=media&amp;token=0b660e87-3509-4a3c-a9d4-9f66a4f8e5d0" alt=""><figcaption><p>Paste your data into a column of StayOnHire</p></figcaption></figure>

StayOnHire will automatically intercept the multi-line array on your clipboard and instantly project every line item down sequentially, generating multiple rows across your asset tracking catalogue simultaneously in real time.

> 💡 Pro-Tip: Sequential Column Mapping: > Once your empty rows are successfully built out using the Asset IDs, you can go back to your Excel spreadsheet, copy subsequent data columns (such as *Short Description*, *Type*, or *Make/Model*), and paste them right into the matching column block in StayOnHire to quickly enrich your workspace profiles.

<figure><img src="https://50563950-files.gitbook.io/~/files/v0/b/gitbook-x-prod.appspot.com/o/spaces%2F-Lzplo2osBdXGzFtPu2f%2Fuploads%2F9Ekko160WK11o6ENvpkA%2FScreenshot%202026-06-03%20at%203.00.29%E2%80%AFpm.png?alt=media&amp;token=460f3585-a107-4605-8991-3b91d9d283cb" alt=""><figcaption><p>We reccomend pasting one column at a time to accurately map all values you want to import</p></figcaption></figure>


# Jobs

Building and managing jobs is the heart of your StayOnHire experience and in this section, we'll go through how to work for you and your team.


# Getting Started

How to get started using planning for the first time in StayOnHire. This page is for users who are looking for step-by-step instructions on how to use the planning system.

***

## Introduction

The Planning page will be visible to all accounts and is the primary place to view jobs and asset or labor allocations. This page will be visible in the main menu when clicking the option 'Planning':

<figure><img src="https://50563950-files.gitbook.io/~/files/v0/b/gitbook-x-prod.appspot.com/o/spaces%2F-Lzplo2osBdXGzFtPu2f%2Fuploads%2Fv3h7KVyEMeeJMv2yLT9N%2FScreenshot%202024-07-01%20at%208.47.53%E2%80%AFAM.png?alt=media&amp;token=bdf4b3e7-a1d9-4d37-9abc-ba877c985ab0" alt=""><figcaption><p>The planning page can be accessed at anytime to all accounts</p></figcaption></figure>


# Configure & Setup

This page covers how you can customise the settings of your planning system.

***

## Job Numbering

Job numbering in StayOnHire is customizable to suit how your business prefers to generate new job numbers automatically.

By default, your account will be set to generate job numbers sequentially:

JOB-01, JOB-02, JOB-03, etc.

This can, however, be customised to suit your business with increased number padding or prefixes, or even unique to each contact, such as:

0001, 0002, 0003, etc. *(increased number padding)*

JOB-0001, JOB-0002, JOB-0003, etc. *(adding a job number prefix)*

ABC-0001, XYZ-0001, ABC-0002, etc. *(unique & sequential to each customer)*

Navigate to [Settings > Features > Planning](https://app.stayonhire.com/org/planning)

<figure><img src="https://50563950-files.gitbook.io/~/files/v0/b/gitbook-x-prod.appspot.com/o/spaces%2F-Lzplo2osBdXGzFtPu2f%2Fuploads%2FEYLmoSz3VWfVq2IagHvG%2FScreenshot%202024-07-01%20at%208.54.50%E2%80%AFAM.png?alt=media&amp;token=5c312850-97b8-4203-b6eb-aca74217233f" alt=""><figcaption></figcaption></figure>

<figure><img src="https://50563950-files.gitbook.io/~/files/v0/b/gitbook-x-prod.appspot.com/o/spaces%2F-Lzplo2osBdXGzFtPu2f%2Fuploads%2FcGKDQFlVT8sjTc3Dyzq1%2FScreenshot%202024-05-08%20at%207.37.06%E2%80%AFAM%202.png?alt=media&amp;token=775097f1-05ac-4de7-8130-1954b41fab40" alt=""><figcaption></figcaption></figure>

By default, new StayOnHire accounts will begin their invoice numbering schedule with:

* Invoice Number Prefix: "None"
* &#x20;Next Invoice Number: "01"
* Invoice Number Padding: "2"

<figure><img src="https://50563950-files.gitbook.io/~/files/v0/b/gitbook-x-prod.appspot.com/o/spaces%2F-Lzplo2osBdXGzFtPu2f%2Fuploads%2FzLqEPVamI2FLGxyxFerE%2FScreenshot%202024-05-08%20at%2011.43.09%E2%80%AFAM.png?alt=media&amp;token=1eeb5c25-62fe-4092-a6fc-e009de240690" alt=""><figcaption></figcaption></figure>

{% hint style="info" %}
Some businesses customer their invoice numbering to differentiate between invoices generated in StayOnHire compared to those created in an integrated accounting system. \
\
For example, invoices in StayOnHire can be configured to increment as *"SOH-001, SOH-002, SOH-003"* etc. while letting your accounting integration increment as *"INV-001, INV0-002, INV-003"* etc.
{% endhint %}

## Ready Status

Navigate to [Settings > Billing > Due Date](https://app.stayonhire.com/org/billing/invoice-due-date)

<figure><img src="https://50563950-files.gitbook.io/~/files/v0/b/gitbook-x-prod.appspot.com/o/spaces%2F-Lzplo2osBdXGzFtPu2f%2Fuploads%2FvWl001uGx4TIyXTUYnVH%2FScreenshot%202024-05-08%20at%207.37.06%E2%80%AFAM%202%202.png?alt=media&amp;token=9d9bb40a-f384-46e4-9e29-88493da9243e" alt=""><figcaption></figcaption></figure>

By default, new StayOnHire accounts will have their default invoice date set to pre-fill as:

* Due Date: "Today's Date"

<figure><img src="https://50563950-files.gitbook.io/~/files/v0/b/gitbook-x-prod.appspot.com/o/spaces%2F-Lzplo2osBdXGzFtPu2f%2Fuploads%2F4ZttX4xxEzjnybwfsp1W%2FScreenshot%202024-05-08%20at%2012.01.00%E2%80%AFPM.png?alt=media&amp;token=445692e6-b4a0-4e4c-ace4-a6fd8570d145" alt=""><figcaption></figcaption></figure>

By changing this to one of the listed options available, any newly drafted invoice in StayOnHire will insert a due date better suited to your business needs.&#x20;

## Default Billing Cycle

Navigate to [Settings > Billing > Default Billing Cycle](https://app.stayonhire.com/org/billing/default-billing-cycle)

<figure><img src="https://50563950-files.gitbook.io/~/files/v0/b/gitbook-x-prod.appspot.com/o/spaces%2F-Lzplo2osBdXGzFtPu2f%2Fuploads%2FvaCnZuWUpDqwH8ZZ3nKp%2FScreenshot%202024-05-08%20at%207.37.06%E2%80%AFAM%202%203.png?alt=media&amp;token=64692983-0cdf-4b3a-8551-7a9feb3fc526" alt=""><figcaption></figcaption></figure>

By default, new StayOnHire accounts will have their default billing cycle set to:

* Default Billing Cycle: "Today's Date"

<figure><img src="https://50563950-files.gitbook.io/~/files/v0/b/gitbook-x-prod.appspot.com/o/spaces%2F-Lzplo2osBdXGzFtPu2f%2Fuploads%2F4ZttX4xxEzjnybwfsp1W%2FScreenshot%202024-05-08%20at%2012.01.00%E2%80%AFPM.png?alt=media&amp;token=445692e6-b4a0-4e4c-ace4-a6fd8570d145" alt=""><figcaption></figcaption></figure>

By changing this to one of the listed options available, any newly drafted invoice in StayOnHire will insert a due date better suited to your business needs.&#x20;

***

## Invoice Customisation

Navigate to [Settings > Billing > Customise Invoice](https://app.stayonhire.com/org/billing/customise-invoice)

<figure><img src="https://50563950-files.gitbook.io/~/files/v0/b/gitbook-x-prod.appspot.com/o/spaces%2F-Lzplo2osBdXGzFtPu2f%2Fuploads%2FHIMc3APykYmI3S8yRw3o%2FScreenshot%202024-05-08%20at%207.37.06%E2%80%AFAM%202%204.png?alt=media&amp;token=f85ea38e-3e44-40a3-8b63-1fd339ef4cb8" alt=""><figcaption></figcaption></figure>

### Invoice References

By default, new StayOnHire accounts will have their default invoice reference field set to pre-fill as:

* Reference: None

Adding a StayOnHire [{{ReferenceTag}}](/documents/templates/reference-tags) into this field will pre-fill a newly drafted invoice with a reference to StayOnHire data.&#x20;

This can then allow unique job data to be sent to third-party accounting integrations.

{% hint style="info" %}
Common examples used include **`{{JobPONumber}}`** or **`{{JobSiteAddress}}`**.
{% endhint %}

<figure><img src="https://50563950-files.gitbook.io/~/files/v0/b/gitbook-x-prod.appspot.com/o/spaces%2F-Lzplo2osBdXGzFtPu2f%2Fuploads%2F0y99MvHESe2NJ94X0jpN%2FScreenshot%202024-05-08%20at%202.47.42%E2%80%AFPM%202.png?alt=media&amp;token=4e79f6e0-5200-4f05-ac50-26185e6c5438" alt=""><figcaption></figcaption></figure>

### Custom Reference Tags

There is currently only one customisable reference tag: **`{{InvoiceNotes}}`**

<figure><img src="https://50563950-files.gitbook.io/~/files/v0/b/gitbook-x-prod.appspot.com/o/spaces%2F-Lzplo2osBdXGzFtPu2f%2Fuploads%2FyDc35zfz3xJRO5GAKFFh%2FScreenshot%202024-05-08%20at%202.47.42%E2%80%AFPM.png?alt=media&amp;token=5156f39e-a2fb-4d76-b5e0-6ee6620ee6d5" alt=""><figcaption></figcaption></figure>

These tags can be inserted around billing documents and by default, this will be set to the bottom of default StayOnHire invoices:

> {{InvoiceNotes}}: Please make payment to the following recipient with "{{InvNumber}}" as the payment description/reference, thank you.
>
> {{OrgName}} \
> BSB: {{OrgBankBSB}} \
> Account #: {{OrgBankAccountNumber}}

Adding StayOnHire [Reference Tags](/documents/templates/reference-tags) into this field will pre-fill newly drafted invoices with a reference to StayOnHire data.&#x20;

## Auto-invoice Drafting

Navigate to [Settings > Billing > Auto-invoice drafting](https://app.stayonhire.com/org/billing/invoice-auto-drafting)

<figure><img src="https://50563950-files.gitbook.io/~/files/v0/b/gitbook-x-prod.appspot.com/o/spaces%2F-Lzplo2osBdXGzFtPu2f%2Fuploads%2Fz48WkBKRmmrvULH3x8zJ%2FScreenshot%202024-05-08%20at%207.37.06%E2%80%AFAM%202%205.png?alt=media&amp;token=22a4f911-c41f-443e-b3fa-ed7d1269a656" alt=""><figcaption></figcaption></figure>

### Auto-invoice drafting

By default, new StayOnHire accounts will have their default auto-invoice drafting settings set as:

* Create drafts: "Never"

By changing this setting, you are enabling turning on the automatic generation of new draft invoices based on your calendar and schedule.&#x20;

{% hint style="info" %}
Draft invoices do not sync to third party accounting integrations. Unwanted draft invoices can be deleted with ease.
{% endhint %}

<figure><img src="https://50563950-files.gitbook.io/~/files/v0/b/gitbook-x-prod.appspot.com/o/spaces%2F-Lzplo2osBdXGzFtPu2f%2Fuploads%2FPmrEhVOaY6pSYMjDDPdf%2FScreenshot%202024-05-08%20at%203.07.37%E2%80%AFPM.png?alt=media&amp;token=3c1bba74-8072-4f00-b948-bf3a16b31d1b" alt=""><figcaption></figcaption></figure>

### Invoice duration of hire pre-fill

By default, new StayOnHire accounts will have their default auto-invoice drafting settings set as:

* Row pre-fill: "Confirmed on hire times"

<figure><img src="https://50563950-files.gitbook.io/~/files/v0/b/gitbook-x-prod.appspot.com/o/spaces%2F-Lzplo2osBdXGzFtPu2f%2Fuploads%2Fl3gfnoQ8HQPxrXA69oz9%2FScreenshot%202024-05-08%20at%203.07.48%E2%80%AFPM.png?alt=media&amp;token=3809ac0b-620e-4ce2-a32d-2c0e949123e6" alt=""><figcaption></figcaption></figure>

By changing this to one of the listed options available, any newly drafted invoice in StayOnHire will insert a due date better suited to your business needs.&#x20;


# Users & Permissions

How to give users in your team access to planning features in StayOnHire.

## Users

### Edit Existing Users

{% hint style="warning" %}
Only users with the role of 'Owner' can adjust the user permissions. To get this role changed in your organisation, contact your StayOnHire representative.
{% endhint %}

Navigate to [Settings > Users](https://app.stayonhire.com/org/users).

Double-click the 'Billing Permissions' cell of the individual you wish to give access to:

<figure><img src="https://50563950-files.gitbook.io/~/files/v0/b/gitbook-x-prod.appspot.com/o/spaces%2F-Lzplo2osBdXGzFtPu2f%2Fuploads%2FM7NlFS0OaHRHL3X9G9k9%2FScreenshot%202024-05-08%20at%203.59.47%E2%80%AFPM.png?alt=media&amp;token=f801e96f-f79e-4988-b0fd-9013ad069aad" alt=""><figcaption></figcaption></figure>

A bottom sheet will appear with permission-related functionality you can change.&#x20;

Click the desired toggles to the 'on' position and click 'Save' as pictured below:

<figure><img src="https://50563950-files.gitbook.io/~/files/v0/b/gitbook-x-prod.appspot.com/o/spaces%2F-Lzplo2osBdXGzFtPu2f%2Fuploads%2FcBDX2cthmoX4jIe8RkPv%2FScreenshot%202024-05-08%20at%204.00.48%E2%80%AFPM.png?alt=media&amp;token=32376157-e538-423f-be21-0fa5db5a185c" alt=""><figcaption></figcaption></figure>

{% hint style="success" %}
Once permissions have been changed on an existing user, they will need to refresh their page to begin seeing new features.&#x20;
{% endhint %}

<figure><img src="https://50563950-files.gitbook.io/~/files/v0/b/gitbook-x-prod.appspot.com/o/spaces%2F-Lzplo2osBdXGzFtPu2f%2Fuploads%2FITWht9zc5NpbnfGHSPGY%2FScreenshot%202024-05-08%20at%204.26.27%E2%80%AFPM.png?alt=media&amp;token=2dd3ad03-e21c-46bc-9e4f-143ac2214fe3" alt=""><figcaption></figcaption></figure>

To perform a hard refresh, refer to the following keyboard shortcuts:

<figure><img src="https://50563950-files.gitbook.io/~/files/v0/b/gitbook-x-prod.appspot.com/o/spaces%2F-Lzplo2osBdXGzFtPu2f%2Fuploads%2F0b78Y9MCsZ7hZTyOwvNr%2Fhard-refresh-browser-firefox.jpg?alt=media&amp;token=125a83a7-3f21-4b3a-8e5c-95f19eb6d948" alt=""><figcaption></figcaption></figure>

### Add New Users

To create new users in your organisation refer to the StayOnHire [Invite User](/getting-started/company-setup/users-and-permissions#invite-users) guide.

## Permissions

### View&#x20;

Users will see the billing page in their account main menu and view billing information and notes in jobs and invoices.&#x20;

{% hint style="info" %}
Users will not be able to edit or save any billing-related changes without having the edit functionality also activated.&#x20;
{% endhint %}

### Edit

Users will be able to edit and save changes made on invoices in StayOnHire.


# Create a Job

This page covers the standard flow of creating a new job in StayOnHire.

## Add new job

1. In the top right-hand side of you account, click the blue 'Create +' button. Click this and then the option that says 'Job':

<figure><img src="https://50563950-files.gitbook.io/~/files/v0/b/gitbook-x-prod.appspot.com/o/spaces%2F-Lzplo2osBdXGzFtPu2f%2Fuploads%2FhnO5mRoW498lEy2kiG90%2FScreenshot%202024-07-28%20at%202.07.50%E2%80%AFPM%20(3).png?alt=media&amp;token=1d4bd844-37fc-48ec-b491-69f39791ae36" alt=""><figcaption></figcaption></figure>

2. Complete each field in the popup that appears:

<figure><img src="https://50563950-files.gitbook.io/~/files/v0/b/gitbook-x-prod.appspot.com/o/spaces%2F-Lzplo2osBdXGzFtPu2f%2Fuploads%2FB7GCwisQH8UmRbZXVMEd%2FScreenshot%202024-07-28%20at%202.08.17%E2%80%AFPM%20(3).png?alt=media&amp;token=097a3a8a-7eca-4059-bcb4-93e57234cffe" alt=""><figcaption></figcaption></figure>

3. Once created, your job will now appear on the right-hand side

<figure><img src="https://50563950-files.gitbook.io/~/files/v0/b/gitbook-x-prod.appspot.com/o/spaces%2F-Lzplo2osBdXGzFtPu2f%2Fuploads%2FaeJ4XH5basjWMgpwZoyW%2FScreenshot%202024-07-28%20at%202.09.11%E2%80%AFPM%20(3).png?alt=media&amp;token=bca3fd21-4767-40d6-9898-c11d9829fef4" alt=""><figcaption></figcaption></figure>

## Allocating Assets

Assets can be allocated to a job in two simple methods:

* Direct allocation (to the job)
* 'Assets required' table (a list of desired assets)

### Direct to Job

&#x20;**If you know** what asset you want to allocate to a job, assets can be allocated directly to a job:

1. 'Click and drag' the asset onto the relevant job:

<figure><img src="https://50563950-files.gitbook.io/~/files/v0/b/gitbook-x-prod.appspot.com/o/spaces%2F-Lzplo2osBdXGzFtPu2f%2Fuploads%2Frh4SL8wD4OSgRaLOcqPs%2FScreenshot%202024-07-28%20at%202.09.48%E2%80%AFPM%20(3).png?alt=media&amp;token=51616efc-5242-4beb-ba33-4050d1234d3c" alt=""><figcaption><p>Find the asset you'd like to allocate and drag it onto your job</p></figcaption></figure>

2. The asset will then appear allocated to a job, both in the 'Assets Required' table and in the asset allocation tab.

<figure><img src="https://50563950-files.gitbook.io/~/files/v0/b/gitbook-x-prod.appspot.com/o/spaces%2F-Lzplo2osBdXGzFtPu2f%2Fuploads%2FvtciUUARdQeq9seIHFyn%2FScreenshot%202024-07-28%20at%202.10.25%E2%80%AFPM%20(3).png?alt=media&amp;token=d6354145-9c9d-48f9-844d-f45943956490" alt=""><figcaption><p>How an allocation appears on your calendar, and in the 'Assets Required' table</p></figcaption></figure>

### 'Assets Required' Table ("Positions")

If you **don't yet know** what asset you want to allocate to a job, such as when a job is still being tendered or quoted, a list of assets can be built directly to a job through the 'Assets Required' table by adding an 'Asset Position'.

{% hint style="info" %}
**What are 'Asset Position' on a job?**

An asset position can be thought of as the obligation you have to provide something to your customer, like a contract. For example:<br>

An Asset "Position" = 1.8t Excavator for $200 per day

An Asset "Allocation" = EX01 added to this position<br>

Why this works:

Take a break down scenario where an asset is swapped out:

* If EX01, breaks down and is swapped out for another asset, EX02
* This would be an example of the 'Allocation' (EX01) **changing**
* The 'Position' (a 1.8t Excavator for $200 per day) **would not change**
* The customer is paying for the 1.8t position , not the individual asset on the job (EX01 vs EX02)
  {% endhint %}

1. Click the action button and select 'Add asset/position':

<figure><img src="https://50563950-files.gitbook.io/~/files/v0/b/gitbook-x-prod.appspot.com/o/spaces%2F-Lzplo2osBdXGzFtPu2f%2Fuploads%2FR8jgptSrNSFWltZ1bPXM%2FScreenshot%202024-07-28%20at%202.42.36%E2%80%AFPM%20(3).png?alt=media&amp;token=7d792e39-7236-41b8-87a0-6fdf5521f767" alt=""><figcaption><p>Adding an asset/position from the 'Assets Required' table</p></figcaption></figure>

2. Complete the popup prompting one (or multiple) of this position:

<figure><img src="https://50563950-files.gitbook.io/~/files/v0/b/gitbook-x-prod.appspot.com/o/spaces%2F-Lzplo2osBdXGzFtPu2f%2Fuploads%2FyhJsNNpybnWv8lNc2vph%2FScreenshot%202024-07-28%20at%202.52.36%E2%80%AFPM%20(3).png?alt=media&amp;token=9ca20bd7-6430-4cc5-92a3-ed59217a182d" alt=""><figcaption><p>Add one or more assets positions required on this job</p></figcaption></figure>

Once added, asset positions will appear in your calendar 'Awaiting Allocation':

<figure><img src="https://50563950-files.gitbook.io/~/files/v0/b/gitbook-x-prod.appspot.com/o/spaces%2F-Lzplo2osBdXGzFtPu2f%2Fuploads%2F5uc5T2um9MiLZ5wotBZz%2FScreenshot%202024-07-28%20at%203.10.18%E2%80%AFPM%20(3).png?alt=media&amp;token=68a3adba-404a-4f60-b305-8d6e4e215b56" alt=""><figcaption><p>How an asset position appears in your calendar</p></figcaption></figure>

## Adding a Rate

Rates can be added to assets on a job using the 'Assets Required' table:

<figure><img src="https://50563950-files.gitbook.io/~/files/v0/b/gitbook-x-prod.appspot.com/o/spaces%2F-Lzplo2osBdXGzFtPu2f%2Fuploads%2F70AHkyIXbxLGLbzPqFd7%2FScreenshot%202024-07-28%20at%202.11.08%E2%80%AFPM%20(3).png?alt=media&amp;token=11af9764-83c6-4633-8dc4-333371973b03" alt=""><figcaption><p>Clicking add a rate will give you the ability to insert rate information that suits your business</p></figcaption></figure>

Adding a rate to assets on your job will allow draft invoices to generate automatically:

<figure><img src="https://50563950-files.gitbook.io/~/files/v0/b/gitbook-x-prod.appspot.com/o/spaces%2F-Lzplo2osBdXGzFtPu2f%2Fuploads%2FSD3jz5OFRqcIcuaIHHhh%2FScreenshot%202024-07-28%20at%202.14.50%E2%80%AFPM%20(3).png?alt=media&amp;token=9c18c34a-57e9-4fc3-b98f-3c1aa8570d8e" alt=""><figcaption><p>Rates allow invoices to draft based on usage and billable periods ('Monday weekly' is the billable cycle on the this job)</p></figcaption></figure>

## On Hiring Assets

Accurate time confirmations are critical to ensuring your invoices are generated accurately.

To on confirm the on hire of an asset in your calendar:

1. Select the asset allocation and click 'On hire':

<figure><img src="https://50563950-files.gitbook.io/~/files/v0/b/gitbook-x-prod.appspot.com/o/spaces%2F-Lzplo2osBdXGzFtPu2f%2Fuploads%2FSGPJPp2nBaplO1fhZMHT%2FScreenshot%202024-07-28%20at%202.11.50%E2%80%AFPM%20(3).png?alt=media&amp;token=b28098bc-f9dd-4fd8-9e20-6224562ab645" alt=""><figcaption><p>Allocations on a calendar will display options allowing you to on hire</p></figcaption></figure>

2. Confirm when the asset should be on hired from. You will receive (3) common options:

* **Right now** - Use the current date/time
* **As planned** - 'Back date' or 'forward date' the on hire to when it was originally planned
* **Custom** - Set a custom date/time&#x20;

<figure><img src="https://50563950-files.gitbook.io/~/files/v0/b/gitbook-x-prod.appspot.com/o/spaces%2F-Lzplo2osBdXGzFtPu2f%2Fuploads%2Fiz6YWPdpO0Ud0kGCOJqC%2FScreenshot%202024-07-28%20at%202.12.01%E2%80%AFPM%20(3).png?alt=media&amp;token=0c5c9dd0-70b1-45fa-83c3-7a688440e398" alt=""><figcaption></figcaption></figure>

3. Once on hired, you will see the allocation become a more 'solid' filled colour in your calendar, and appear with the status "ON HIRE":

<figure><img src="https://50563950-files.gitbook.io/~/files/v0/b/gitbook-x-prod.appspot.com/o/spaces%2F-Lzplo2osBdXGzFtPu2f%2Fuploads%2FPbhfv6NIeGXOkbWPS2pZ%2FScreenshot%202024-07-28%20at%202.14.43%E2%80%AFPM%20(3).png?alt=media&amp;token=3a71bbad-7446-4ee5-9ee4-a4dbb390b0e3" alt=""><figcaption><p>On hired assets on your calendar appear more 'solid' in colour and have their status changed</p></figcaption></figure>


# Deleting ("Archiving") a Job

This page cover the fundamentals of removing jobs from your StayOnHire account. This can often be thought of as 'deleting', 'removing' or 'archiving' a job from visible views in your account.

***

* Jobs in StayOnHire cannot be 'deleted' in the traditional sense
* Jobs are instead 'archived' into a separate folder

This is intentional, as it allows StayOnHire to:

1. Increase performance and load speed of calendar pages (by not having to load old jobs)
2. Retain key company data for future analytics (such as job success rate); and&#x20;
3. Never accidentally lose job data via accidental deletion

## Archive a job

1. From the top right-hand side of your account, click the menu option, followed by the option 'Archive job':

<figure><img src="https://50563950-files.gitbook.io/~/files/v0/b/gitbook-x-prod.appspot.com/o/spaces%2F-Lzplo2osBdXGzFtPu2f%2Fuploads%2FHysgOgPJjjH60y8hoois%2FScreenshot%202024-07-28%20at%203.39.57%E2%80%AFPM%20(3).png?alt=media&amp;token=4e8156dc-73d9-4e97-85a1-bb3283fe7858" alt=""><figcaption><p>Archiving can be done from the header of any of your jobs</p></figcaption></figure>

2. If the job currently has active allocations, a popup may appear to prompt you to first remove these allocations. \
   \
   In the picture below, we can see the "BU81" asset is allocated and currently on hire to the job. to resolve this, we must off hire the asset, or delete the BU81 allocation before being able to archive the job.

<figure><img src="https://50563950-files.gitbook.io/~/files/v0/b/gitbook-x-prod.appspot.com/o/spaces%2F-Lzplo2osBdXGzFtPu2f%2Fuploads%2FtfcHpSneslotAnFbhXYR%2FScreenshot%202024-07-28%20at%203.41.48%E2%80%AFPM%20(3).png?alt=media&amp;token=abb09a2f-ea70-47b4-b220-3cf214960f75" alt=""><figcaption><p>Attempting to archive a job with active allocations will require additional action from you to prevent conflicts in your calendar</p></figcaption></figure>

## Delete an Asset Position/Allocation

To delete an asset allocation or position on a job:

1. Select the position/allocation from the calendar or allocations tab on a job

<figure><img src="https://50563950-files.gitbook.io/~/files/v0/b/gitbook-x-prod.appspot.com/o/spaces%2F-Lzplo2osBdXGzFtPu2f%2Fuploads%2FQcbxPlAxEhrhmeJmNvfB%2FScreenshot%202024-07-28%20at%203.42.04%E2%80%AFPM%20(3).png?alt=media&amp;token=bd8b7998-802a-4aa2-b1cd-48c6cf7277c4" alt=""><figcaption></figcaption></figure>

2. Click the "Delete position/allocation" option and confirm by clicking the red 'Delete' button

<figure><img src="https://50563950-files.gitbook.io/~/files/v0/b/gitbook-x-prod.appspot.com/o/spaces%2F-Lzplo2osBdXGzFtPu2f%2Fuploads%2F1XxHWaRLPbw7t2Tf2TSl%2FScreenshot%202024-07-28%20at%203.52.06%E2%80%AFPM%20(3).png?alt=media&amp;token=cac7c7c4-8a29-4977-81fc-5237c79c0e2a" alt=""><figcaption><p>A confirmation pop up will appear</p></figcaption></figure>


# Invoicing

StayOnHire will reduce manual data entry and improve the accuracy of your team's invoicing directly from your scheduling system.

{% hint style="info" %}
Invoicing requires billing features to be active in your StayOnHire account and that your account has the appropriate permissions to view, create, edit and delete billing data. Refer to [Activate Billing](https://docs.stayonhire.com/billing/pages/6GFzcrlovmNSl6WNeEBX#id-1.-activate) and [User Permissions](https://docs.stayonhire.com/billing/pages/6GFzcrlovmNSl6WNeEBX#id-3.-user-permissions) for more information.
{% endhint %}

## Overview

With a calendar to schedule your assets to jobs, generating invoices from this calendar system should be equally simple. This is the beauty of StayOnHire.&#x20;

By including job dates, rates on each asset and confirming the onn/off hire hours, we have everything you need in one place to invoice your customers effectively from the start.

## How it Works

Once jobs have been built in StayOnHire, they can then be invoiced based on a 'billable cycle' from your account settings. This means one job can be invoice directly now as a single invoice or divided into weekly/monthly invoices that recur on setting your choose.

An example job, when viewed from the Planning page:

<figure><img src="https://50563950-files.gitbook.io/~/files/v0/b/gitbook-x-prod.appspot.com/o/spaces%2F-Lzplo2osBdXGzFtPu2f%2Fuploads%2FOXMMazhxWjXlvCKL39Ai%2FScreenshot%202024-07-27%20at%2012.14.37%E2%80%AFPM%20(3).png?alt=media&amp;token=2efbbf00-b483-4254-97ab-facff6b43177" alt=""><figcaption><p>A job viewed from the Planning page of StayOnHire</p></figcaption></figure>

The same job split into "Monday Weekly" invoices from the Billing page:

<figure><img src="https://50563950-files.gitbook.io/~/files/v0/b/gitbook-x-prod.appspot.com/o/spaces%2F-Lzplo2osBdXGzFtPu2f%2Fuploads%2FsC5Fdr7YkbL99iaaDTzK%2FScreenshot%202024-07-27%20at%2012.28.57%E2%80%AFPM%20(3).png?alt=media&amp;token=e2994e2b-8c2c-406a-b07d-380de4e90ae5" alt=""><figcaption><p>Drafting invoices from the Billing page pre-fill based on assets on hire</p></figcaption></figure>

## Accounting integrations

Invoicing functionality is available to all StayOnHire customers **with** **or without** an accounting integration.&#x20;

Integrations to a third-party accounting software system, such as [Xero](/integrations/xero), are commonly used and are recommended, as this helps bring the key parts of your business operations together seamlessly.

Common implementations of accounting integration is to draft invoices in StayOnHire from your schuelding calendar, before syncing these invoices to your accounting system.


# Getting Started

How to get started using billing for the first time in StayOnHire. This page is for users that have an understanding of invoicing  processes.

***

## Activate Billing Features

First, let's begin by activating Billing features in our StayOnHire account on the [Settings > Billing](https://app.stayonhire.com/org/billing/) page.&#x20;

Click the 'Activate' button:

<figure><img src="https://50563950-files.gitbook.io/~/files/v0/b/gitbook-x-prod.appspot.com/o/spaces%2F-Lzplo2osBdXGzFtPu2f%2Fuploads%2FKV6euqhxpOpNaXSDyh8J%2FScreenshot%202024-05-08%20at%207.22.05%E2%80%AFAM.png?alt=media&amp;token=0124a808-22dd-4ca2-a01c-0e64a432041f" alt=""><figcaption><p>An inactive billing settings page</p></figcaption></figure>

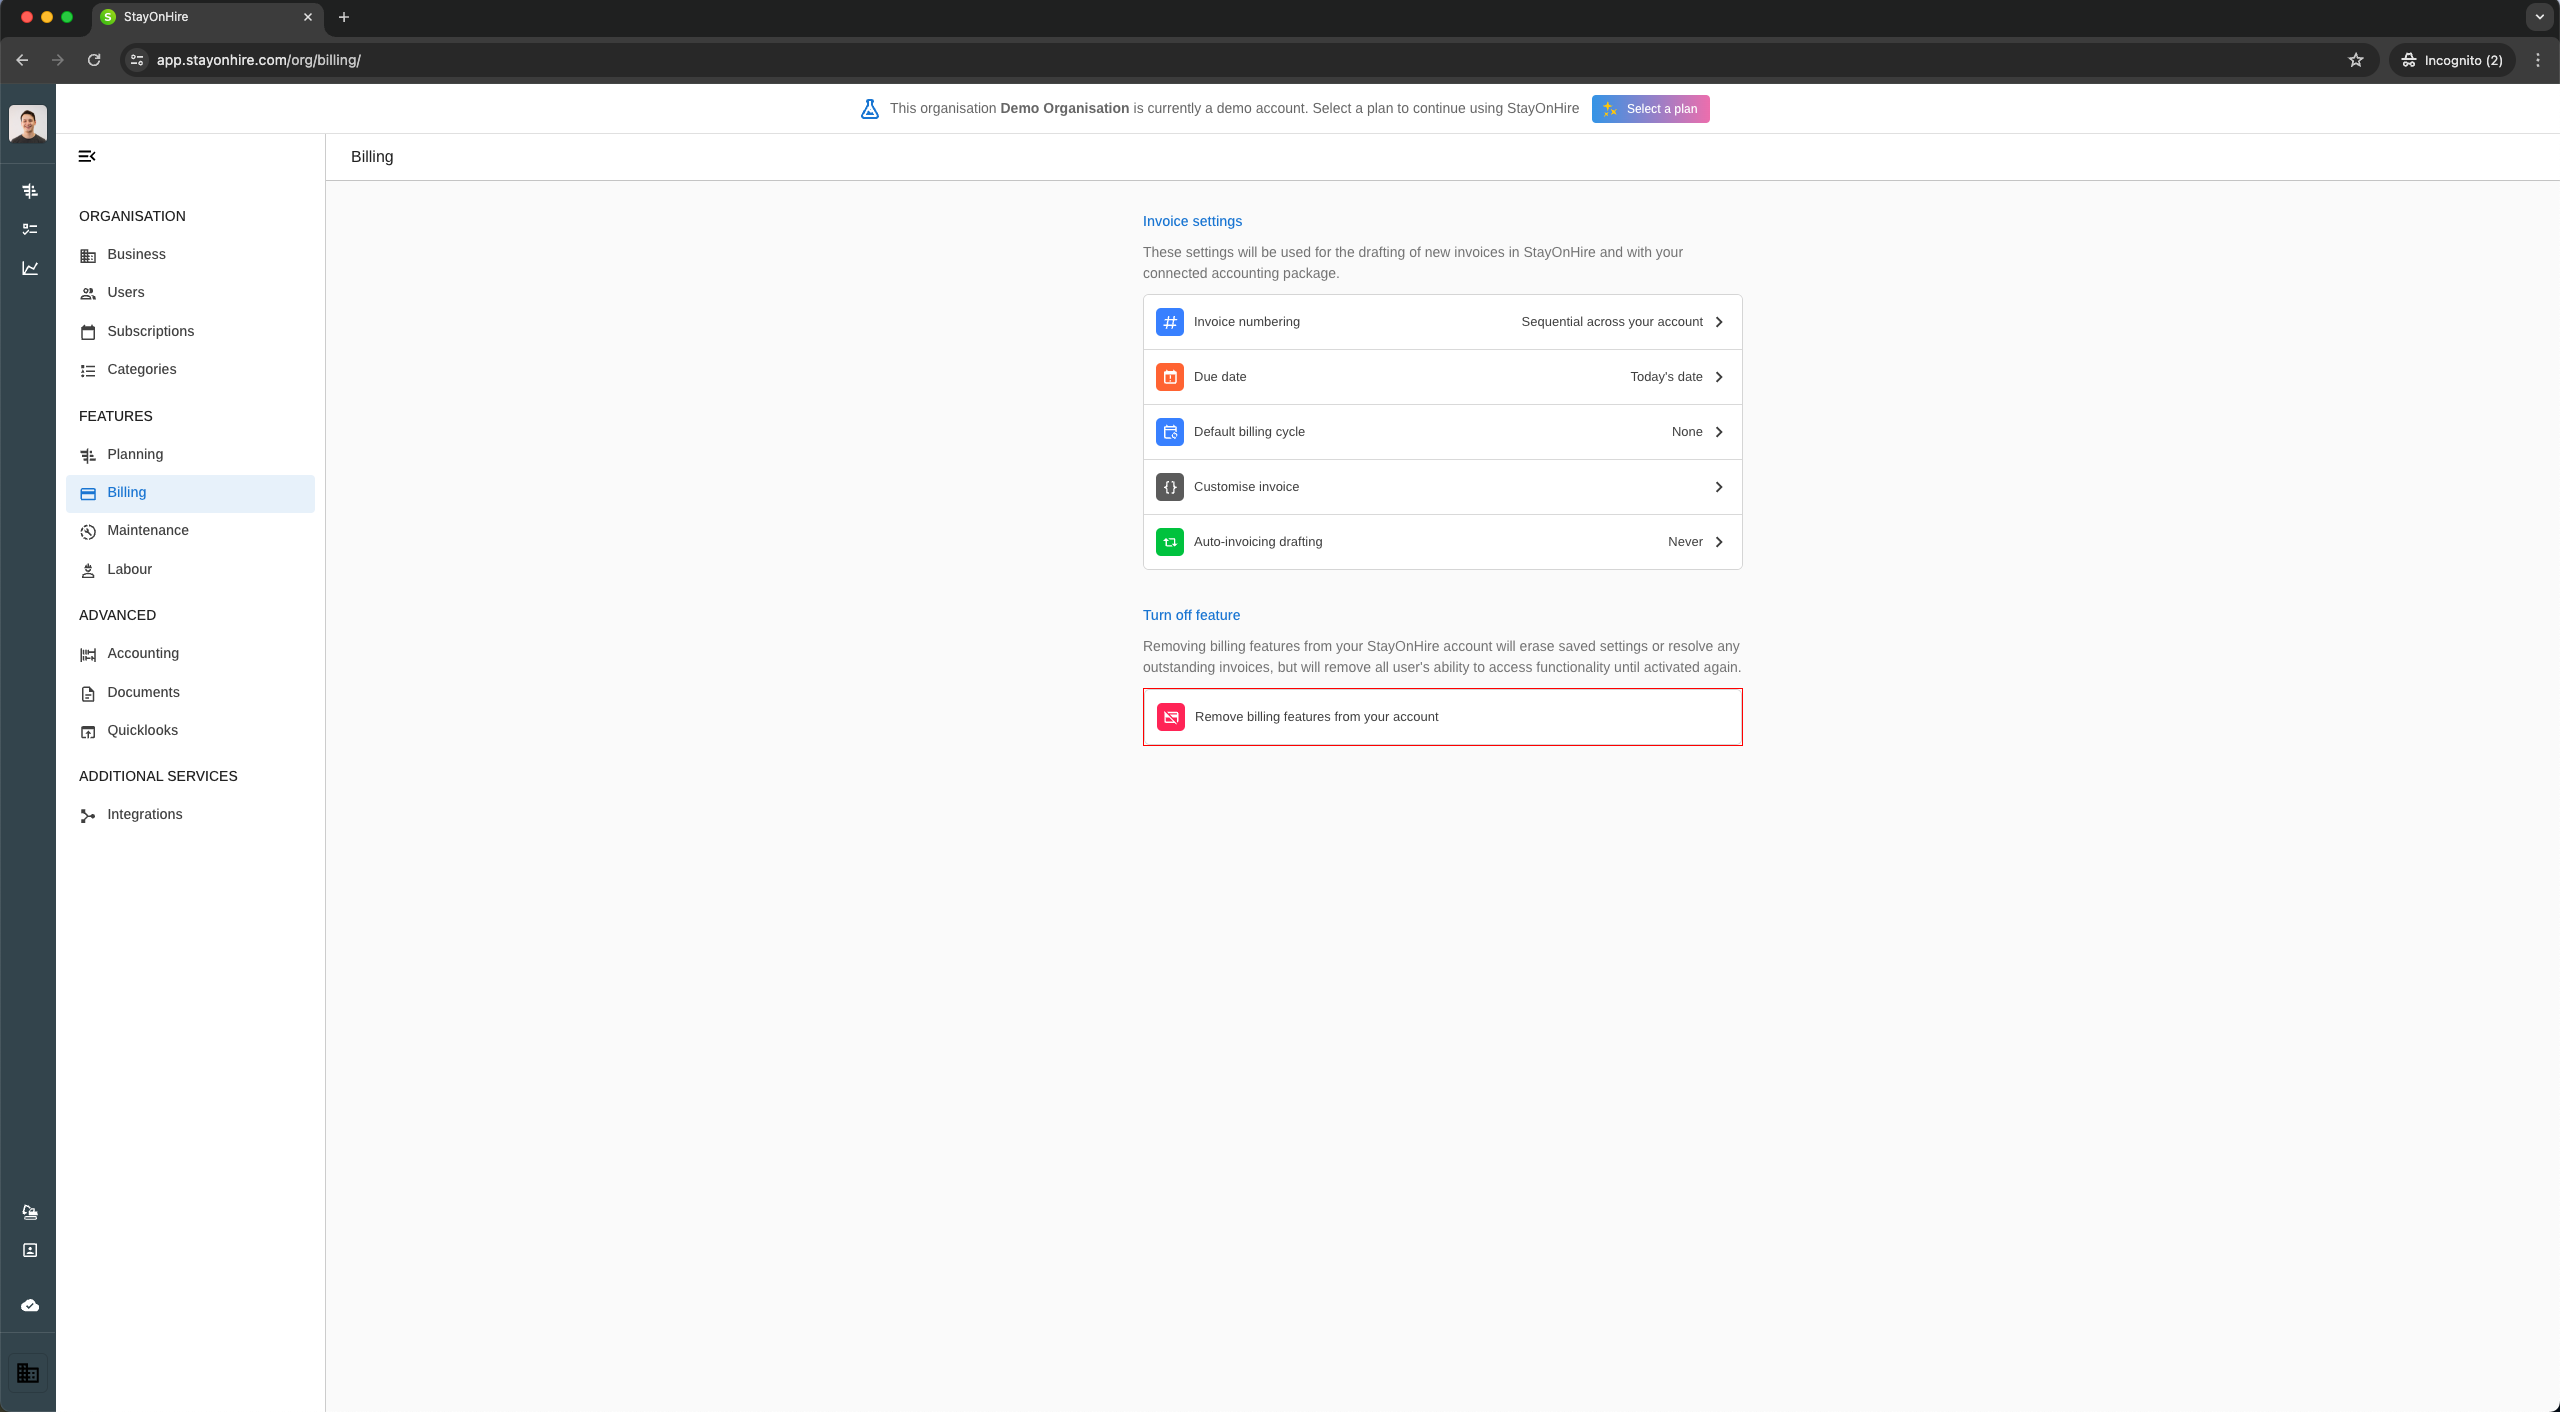
Your page will now begin showing billing-related settings. We'll cover how each of these settings work in the following guide: [Configure & Setup Billing](/billing/invoicing/getting-started/configure-and-setup)&#x20;

<figure><img src="https://50563950-files.gitbook.io/~/files/v0/b/gitbook-x-prod.appspot.com/o/spaces%2F-Lzplo2osBdXGzFtPu2f%2Fuploads%2FQZk7fCNkUViyIWYi98vV%2FScreenshot%202024-05-08%20at%207.37.06%E2%80%AFAM.png?alt=media&amp;token=d77f0fd6-ef1b-4801-8b53-7c3d716475c0" alt=""><figcaption><p>An activated billing settings page</p></figcaption></figure>

## Billing Visibility

Once activated, you will see a feature titled "Billing" will become visible in your main menu on the left hand side. This page can be viewed in a 'Calendar' or 'Table' view, depending on your preferences.

<figure><img src="https://50563950-files.gitbook.io/~/files/v0/b/gitbook-x-prod.appspot.com/o/spaces%2F-Lzplo2osBdXGzFtPu2f%2Fuploads%2FqNMq0HMDtL9CpTk24dGd%2FScreenshot%202024-07-27%20at%201.46.31%E2%80%AFPM%20(3).png?alt=media&amp;token=706842d6-b538-4965-911c-42f0aa5ad00a" alt=""><figcaption><p>Accessing the billing page from your main menu on the left</p></figcaption></figure>

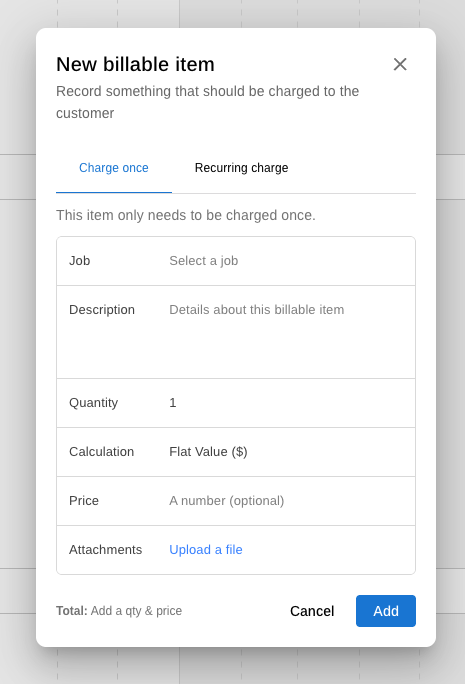
Jobs will also begin displaying a new Billing tab, that will list all billable items and invoices linked to a job:

<figure><img src="https://50563950-files.gitbook.io/~/files/v0/b/gitbook-x-prod.appspot.com/o/spaces%2F-Lzplo2osBdXGzFtPu2f%2Fuploads%2FNguqqydjOf0hz0k0pLvA%2FScreenshot%202024-07-27%20at%201.42.45%E2%80%AFPM%20(3).png?alt=media&amp;token=3b278473-438d-4965-8e11-40f7d04113a1" alt=""><figcaption><p>The billing tab of a job from the Planning page</p></figcaption></figure>


# Configure & Setup

A detailed look into how each invoicing part works in StayOnHire.

{% hint style="info" %}
Invoicing requires billing features be active in your StayOnHire account and that your account has the appropriate permissions to view, create, edit and delete billing data. Refer to [Activate Billing](https://docs.stayonhire.com/billing/invoicing/getting-started/pages/6GFzcrlovmNSl6WNeEBX#id-1.-activate) and [User Permissions](https://docs.stayonhire.com/billing/invoicing/getting-started/pages/6GFzcrlovmNSl6WNeEBX#id-3.-user-permissions) for more information.
{% endhint %}

## Configure & Setup

### Invoice Numbering&#x20;

Navigate to [Settings > Billing > Invoice Numbering](https://app.stayonhire.com/org/billing/invoice-numbering)

<figure><img src="https://50563950-files.gitbook.io/~/files/v0/b/gitbook-x-prod.appspot.com/o/spaces%2F-Lzplo2osBdXGzFtPu2f%2Fuploads%2FcGKDQFlVT8sjTc3Dyzq1%2FScreenshot%202024-05-08%20at%207.37.06%E2%80%AFAM%202.png?alt=media&amp;token=775097f1-05ac-4de7-8130-1954b41fab40" alt=""><figcaption></figcaption></figure>

By default, new StayOnHire accounts will begin their invoice numbering schedule with:

* Invoice Number Prefix: "None"
* &#x20;Next Invoice Number: "01"
* Invoice Number Padding: "2"

<figure><img src="https://50563950-files.gitbook.io/~/files/v0/b/gitbook-x-prod.appspot.com/o/spaces%2F-Lzplo2osBdXGzFtPu2f%2Fuploads%2FzLqEPVamI2FLGxyxFerE%2FScreenshot%202024-05-08%20at%2011.43.09%E2%80%AFAM.png?alt=media&amp;token=1eeb5c25-62fe-4092-a6fc-e009de240690" alt=""><figcaption></figcaption></figure>

{% hint style="info" %}
Some businesses customer their invoice numbering to differentiate between invoices generated in StayOnHire compared to those created in an integrated accounting system. \
\
For example, invoices in StayOnHire can be configured to increment as *"SOH-001, SOH-002, SOH-003"* etc. while letting your accounting integration increment as *"INV-001, INV0-002, INV-003"* etc.
{% endhint %}

### Due Date

Navigate to [Settings > Billing > Due Date](https://app.stayonhire.com/org/billing/invoice-due-date)

<figure><img src="https://50563950-files.gitbook.io/~/files/v0/b/gitbook-x-prod.appspot.com/o/spaces%2F-Lzplo2osBdXGzFtPu2f%2Fuploads%2FvWl001uGx4TIyXTUYnVH%2FScreenshot%202024-05-08%20at%207.37.06%E2%80%AFAM%202%202.png?alt=media&amp;token=9d9bb40a-f384-46e4-9e29-88493da9243e" alt=""><figcaption></figcaption></figure>

By default, new StayOnHire accounts will have their default invoice date set to pre-fill as:

* Due Date: "Today's Date"

<figure><img src="https://50563950-files.gitbook.io/~/files/v0/b/gitbook-x-prod.appspot.com/o/spaces%2F-Lzplo2osBdXGzFtPu2f%2Fuploads%2F4ZttX4xxEzjnybwfsp1W%2FScreenshot%202024-05-08%20at%2012.01.00%E2%80%AFPM.png?alt=media&amp;token=445692e6-b4a0-4e4c-ace4-a6fd8570d145" alt=""><figcaption></figcaption></figure>

By changing this to one of the listed options available, any newly drafted invoice in StayOnHire will insert a due date better suited to your business needs.&#x20;

### Billing Cycles

'Billing cycles' determine how many invoices will be drafted between the start and end of a job, in order to invoice your customers accurately in sync with your calendar and on/off hire times.

A company may have multiple billing cycles and apply them differently on each job, for example:

*Customer 1 is invoiced on the '1st of the month', for the calendar month*&#x20;

*Customer 2 is invoiced on 'Monday weekly'*

These cycles can be saved to an individual contact or set each time you create a new job.

#### Create a new billing cycle

1. Navigate to [Settings > Billing > Default Billing Cycle](https://app.stayonhire.com/org/billing/default-billing-cycle) and click the 'Manage' option

<figure><img src="https://50563950-files.gitbook.io/~/files/v0/b/gitbook-x-prod.appspot.com/o/spaces%2F-Lzplo2osBdXGzFtPu2f%2Fuploads%2FciAEPb57mlv4UfcwqX7R%2FScreenshot%202024-07-01%20at%203.17.32%E2%80%AFPM.png?alt=media&amp;token=ab131fad-5f66-4e09-8fa0-04b40b0d6dfe" alt=""><figcaption><p>The manage billing cycles settings button</p></figcaption></figure>

2. Click the add "+" button located In the top right-hand side of the page

<figure><img src="https://50563950-files.gitbook.io/~/files/v0/b/gitbook-x-prod.appspot.com/o/spaces%2F-Lzplo2osBdXGzFtPu2f%2Fuploads%2FFMisUlOoNVZNt7JCWGUa%2FScreenshot%202024-07-01%20at%203.21.35%E2%80%AFPM.png?alt=media&amp;token=aef48827-d7f7-4f86-b34b-025ce1ec02d2" alt=""><figcaption><p>A popup modal will appear asking for a few variables</p></figcaption></figure>

3. Answer each of the following fields to create a new cycle

* "Frequency" displays the most common types of recurring configurations&#x20;
* "Invoice From" allows you to change when and how you want this cycle to begin invoicing\
  (commonly 'after the first asset is on hired' or ' on the contract start date')
* "Invoice Until" allows you to change when and how you want this cycle to stop invoicing \
  (commonly 'after the last asset is off hired' or ' on the contract end date')
* "Cycle Name" will appear as an option when you toggle on the desire to "Save this billing cycle for future use". This is intended to be a short nickname that everyone in your company can recognise, such as '1st of the month'

<figure><img src="https://50563950-files.gitbook.io/~/files/v0/b/gitbook-x-prod.appspot.com/o/spaces%2F-Lzplo2osBdXGzFtPu2f%2Fuploads%2F44WnsBKOl7Mf95xHdB8k%2FScreenshot%202024-07-01%20at%203.22.30%E2%80%AFPM.png?alt=media&amp;token=b49e8c23-62ca-4686-a794-7d0d9d5e93f3" alt=""><figcaption></figcaption></figure>

#### Set a default billing cycle

Navigate to [Settings > Billing > Default Billing Cycle](https://app.stayonhire.com/org/billing/default-billing-cycle)

<figure><img src="https://50563950-files.gitbook.io/~/files/v0/b/gitbook-x-prod.appspot.com/o/spaces%2F-Lzplo2osBdXGzFtPu2f%2Fuploads%2FvaCnZuWUpDqwH8ZZ3nKp%2FScreenshot%202024-05-08%20at%207.37.06%E2%80%AFAM%202%203.png?alt=media&amp;token=64692983-0cdf-4b3a-8551-7a9feb3fc526" alt=""><figcaption></figcaption></figure>

By default, new StayOnHire accounts will have their default billing cycle set to:

* Default Billing Cycle: "Today's Date"

<figure><img src="https://50563950-files.gitbook.io/~/files/v0/b/gitbook-x-prod.appspot.com/o/spaces%2F-Lzplo2osBdXGzFtPu2f%2Fuploads%2F4ZttX4xxEzjnybwfsp1W%2FScreenshot%202024-05-08%20at%2012.01.00%E2%80%AFPM.png?alt=media&amp;token=445692e6-b4a0-4e4c-ace4-a6fd8570d145" alt=""><figcaption></figcaption></figure>

By changing this to one of the listed options available, any newly drafted invoice in StayOnHire will insert a due date better suited to your business needs.&#x20;

### Invoice Customisation

Navigate to [Settings > Billing > Customise Invoice](https://app.stayonhire.com/org/billing/customise-invoice)

<figure><img src="https://50563950-files.gitbook.io/~/files/v0/b/gitbook-x-prod.appspot.com/o/spaces%2F-Lzplo2osBdXGzFtPu2f%2Fuploads%2FHIMc3APykYmI3S8yRw3o%2FScreenshot%202024-05-08%20at%207.37.06%E2%80%AFAM%202%204.png?alt=media&amp;token=f85ea38e-3e44-40a3-8b63-1fd339ef4cb8" alt=""><figcaption></figcaption></figure>

#### Invoice Reference

By default, new StayOnHire accounts will have their default invoice reference field set to pre-fill as:

* Reference: None

Adding a StayOnHire [{{ReferenceTag}}](/documents/templates/reference-tags) into this field will pre-fill newly drafted invoice with a reference to StayOnHire data.&#x20;

This can then allow unique job data to be sent to third party accounting integrations.

{% hint style="info" %}
Common examples used include **`{{JobPONumber}}`** or **`{{JobSiteAddress}}`**.
{% endhint %}

<figure><img src="https://50563950-files.gitbook.io/~/files/v0/b/gitbook-x-prod.appspot.com/o/spaces%2F-Lzplo2osBdXGzFtPu2f%2Fuploads%2F0y99MvHESe2NJ94X0jpN%2FScreenshot%202024-05-08%20at%202.47.42%E2%80%AFPM%202.png?alt=media&amp;token=4e79f6e0-5200-4f05-ac50-26185e6c5438" alt=""><figcaption></figcaption></figure>

#### Custom Reference Tags

There is currently only one customisable reference tag: **`{{InvoiceNotes}}`**

<figure><img src="https://50563950-files.gitbook.io/~/files/v0/b/gitbook-x-prod.appspot.com/o/spaces%2F-Lzplo2osBdXGzFtPu2f%2Fuploads%2FyDc35zfz3xJRO5GAKFFh%2FScreenshot%202024-05-08%20at%202.47.42%E2%80%AFPM.png?alt=media&amp;token=5156f39e-a2fb-4d76-b5e0-6ee6620ee6d5" alt=""><figcaption></figcaption></figure>

This tags can be inserted around billing documents and by default, this will be set to the bottom of default StayOnHire invoices:

> {{InvoiceNotes}}: Please make payment to the following recipient with "{{InvNumber}}" as the payment description/reference, thank you.
>
> {{OrgName}} \
> BSB: {{OrgBankBSB}} \
> Account #: {{OrgBankAccountNumber}}

Adding StayOnHire [Reference Tags](/documents/templates/reference-tags) into this field will pre-fill newly drafted invoice with a reference to StayOnHire data.&#x20;

### Auto-invoice Drafting

Navigate to [Settings > Billing > Auto-invoice drafting](https://app.stayonhire.com/org/billing/invoice-auto-drafting)

<figure><img src="https://50563950-files.gitbook.io/~/files/v0/b/gitbook-x-prod.appspot.com/o/spaces%2F-Lzplo2osBdXGzFtPu2f%2Fuploads%2Fz48WkBKRmmrvULH3x8zJ%2FScreenshot%202024-05-08%20at%207.37.06%E2%80%AFAM%202%205.png?alt=media&amp;token=22a4f911-c41f-443e-b3fa-ed7d1269a656" alt=""><figcaption></figcaption></figure>

#### Auto-invoice drafting

By default, new StayOnHire accounts will have their default auto-invoice drafting settings set as:

* Create drafts: "Never"

By changing this setting, you are enabling turning on the automatic generation of new draft invoices based on your calendar and schedule.&#x20;

{% hint style="info" %}
Draft invoices do not sync to third party accounting integrations. Unwanted draft invoices can be deleted with ease.
{% endhint %}

<figure><img src="https://50563950-files.gitbook.io/~/files/v0/b/gitbook-x-prod.appspot.com/o/spaces%2F-Lzplo2osBdXGzFtPu2f%2Fuploads%2FPmrEhVOaY6pSYMjDDPdf%2FScreenshot%202024-05-08%20at%203.07.37%E2%80%AFPM.png?alt=media&amp;token=3c1bba74-8072-4f00-b948-bf3a16b31d1b" alt=""><figcaption></figcaption></figure>

#### Invoice duration of hire pre-fill

By default, new StayOnHire accounts will have their default auto-invoice drafting settings set as:

* Row pre-fill: "Confirmed on hire times"

<figure><img src="https://50563950-files.gitbook.io/~/files/v0/b/gitbook-x-prod.appspot.com/o/spaces%2F-Lzplo2osBdXGzFtPu2f%2Fuploads%2Fl3gfnoQ8HQPxrXA69oz9%2FScreenshot%202024-05-08%20at%203.07.48%E2%80%AFPM.png?alt=media&amp;token=3809ac0b-620e-4ce2-a32d-2c0e949123e6" alt=""><figcaption></figcaption></figure>

By changing this to one of the listed options available, any newly drafted invoice in StayOnHire will insert a due date better suited to your business needs.


# Users & Permissions

How to give users in your team access to billing features around StayOnHire.

## Users

### Existing Users

{% hint style="warning" %}
Only users with the role of 'Owner' can adjust the user permissions. To get this role changed in your organisation, contact your StayOnHire representative.
{% endhint %}

Navigate to [Settings > Users](https://app.stayonhire.com/org/users).

Double-click the 'Billing Permissions' cell of the individual you wish to give access to:

<figure><img src="https://50563950-files.gitbook.io/~/files/v0/b/gitbook-x-prod.appspot.com/o/spaces%2F-Lzplo2osBdXGzFtPu2f%2Fuploads%2FM7NlFS0OaHRHL3X9G9k9%2FScreenshot%202024-05-08%20at%203.59.47%E2%80%AFPM.png?alt=media&amp;token=f801e96f-f79e-4988-b0fd-9013ad069aad" alt=""><figcaption></figcaption></figure>

A bottom sheet will appear with permission-related functionality you can change.&#x20;

Click the desired toggles to the 'on' position and click 'Save' as pictured below:

<figure><img src="https://50563950-files.gitbook.io/~/files/v0/b/gitbook-x-prod.appspot.com/o/spaces%2F-Lzplo2osBdXGzFtPu2f%2Fuploads%2FcBDX2cthmoX4jIe8RkPv%2FScreenshot%202024-05-08%20at%204.00.48%E2%80%AFPM.png?alt=media&amp;token=32376157-e538-423f-be21-0fa5db5a185c" alt=""><figcaption></figcaption></figure>

{% hint style="success" %}
Once permissions have been changed on an existing user, they will need to refresh their page to begin seeing new features.&#x20;
{% endhint %}

<figure><img src="https://50563950-files.gitbook.io/~/files/v0/b/gitbook-x-prod.appspot.com/o/spaces%2F-Lzplo2osBdXGzFtPu2f%2Fuploads%2FITWht9zc5NpbnfGHSPGY%2FScreenshot%202024-05-08%20at%204.26.27%E2%80%AFPM.png?alt=media&amp;token=2dd3ad03-e21c-46bc-9e4f-143ac2214fe3" alt=""><figcaption></figcaption></figure>

To perform a hard refresh, refer to the following keyboard shortcuts:

<figure><img src="https://50563950-files.gitbook.io/~/files/v0/b/gitbook-x-prod.appspot.com/o/spaces%2F-Lzplo2osBdXGzFtPu2f%2Fuploads%2F0b78Y9MCsZ7hZTyOwvNr%2Fhard-refresh-browser-firefox.jpg?alt=media&amp;token=125a83a7-3f21-4b3a-8e5c-95f19eb6d948" alt=""><figcaption></figcaption></figure>

### New Users

To create new users in your organisation refer to the StayOnHire [Invite User](/getting-started/company-setup/users-and-permissions#invite-users) guide.

## Permissions

### View&#x20;

Users will be able to see the billing page in their account main menu, view billing information and notes in a job and invoices.&#x20;

{% hint style="info" %}
Users will not be able to edit or save any billing-related changes without having edit functionality also activated.&#x20;
{% endhint %}

### Edit

Users will be able to edit and save changes made on invoices in StayOnHire.


# Create an Invoice

This page is a guide and overview on generating invoices in StayOnHire. Additional functionality is available for businesses with accounting integrations.

***

## Overview

There are two types of invoices that can be created in StayOnHire:

* [**Linked invoices**](#linked-invoices) (recommended) - An invoice **linked** to a job or hire
* [**Standard invoices**](#stand-alone-invoices) - An invoice **not linked** to a job or hire

Both invoice types can be created from the blue 'Create' button:

<figure><img src="https://50563950-files.gitbook.io/~/files/v0/b/gitbook-x-prod.appspot.com/o/spaces%2F-Lzplo2osBdXGzFtPu2f%2Fuploads%2FadxwOryDtyvcSv93BjoE%2FScreenshot%202024-07-28%20at%2010.24.44%E2%80%AFAM%20(3).png?alt=media&amp;token=176e0830-374e-4cec-890c-4b259d5e50c9" alt=""><figcaption><p>Create a 'new invoice' from the blue primary action button</p></figcaption></figure>

## Linked Invoices (recommended)

A linked invoices has additional functionality as is can prompt/remind your billing team to insert expenses or charges to the customer from a job/hire. This includes structured billable items like:

* On/Off Hire Allocations
* Transport (Mobe/Demobe charges)
* Stand Downs
* Damages Logs
* Refuelling Events
* Cleaning Fees
* Other Billable Items

Linked invoices can be created by two methods:

* From an open job, on the Billing tab
* From the primary blue 'Create' button

### From The Job (recommended)

We recommend generating draft invoices from the job drawer, in the billing tab or even from the Billing page calendar view, when looking at a job:

<figure><img src="https://50563950-files.gitbook.io/~/files/v0/b/gitbook-x-prod.appspot.com/o/spaces%2F-Lzplo2osBdXGzFtPu2f%2Fuploads%2F1tP04yvHeZ6RHstUT2nZ%2FScreenshot%202024-07-28%20at%2010.46.07%E2%80%AFAM%20(3).png?alt=media&amp;token=f3e3daca-fdfd-4c8c-977d-496ccfe3abb8" alt=""><figcaption><p>Draft an invoice from the job drawer (when on the Planning page)</p></figcaption></figure>

<figure><img src="https://50563950-files.gitbook.io/~/files/v0/b/gitbook-x-prod.appspot.com/o/spaces%2F-Lzplo2osBdXGzFtPu2f%2Fuploads%2Fh22hFLJ7EtjMaClskWZ7%2FScreenshot%202024-07-28%20at%2010.49.52%E2%80%AFAM%20(3).png?alt=media&amp;token=9688b868-ee05-428d-b4d3-7c40ad42e2a3" alt=""><figcaption><p>Draft an invoice from your calendar (when on the Billing page)</p></figcaption></figure>

By generating an invoice from the context of a job, we can begin to see other billable items that may be due to charge this customer:

<figure><img src="https://50563950-files.gitbook.io/~/files/v0/b/gitbook-x-prod.appspot.com/o/spaces%2F-Lzplo2osBdXGzFtPu2f%2Fuploads%2FQAmddXNQJI2YdH2uWVKq%2FScreenshot%202024-07-28%20at%2011.51.17%E2%80%AFAM%20(3).png?alt=media&amp;token=08c7cdc1-6dc0-4bc8-a610-5cad56bbd2b5" alt=""><figcaption><p>Linked invoices will display prompts to also charge for other billable items</p></figcaption></figure>

### From the blue 'Create' button

Alternatively, this can be done from your blue 'Create' button in the top right-hand side of your page.

1. Click 'Invoice'
2. Select the 'Linked' tab
3. Select the job you wish to link this new invoice to and click 'Create'

<div><figure><img src="https://50563950-files.gitbook.io/~/files/v0/b/gitbook-x-prod.appspot.com/o/spaces%2F-Lzplo2osBdXGzFtPu2f%2Fuploads%2FvUQkB7OnMlZh3pF8m3MJ%2FA.png?alt=media&amp;token=e9be2fff-791a-40c3-81fe-967aab3942df" alt=""><figcaption><p>New invoice from the blue 'Create' button</p></figcaption></figure> <figure><img src="https://50563950-files.gitbook.io/~/files/v0/b/gitbook-x-prod.appspot.com/o/spaces%2F-Lzplo2osBdXGzFtPu2f%2Fuploads%2FD4cMOUrZ2KzwpAeXO65r%2FC.png?alt=media&amp;token=760fbe80-07ae-47d4-87d1-d8751346dc16" alt=""><figcaption><p>Click the linked tab, then select a job</p></figcaption></figure></div>

## Standard Invoices

A standard invoice is no different than one created in your accounting system.&#x20;

We recommend using [Linked Invoices](#linked-invoices) for all jobs managed in StayOnHire.

<figure><img src="https://50563950-files.gitbook.io/~/files/v0/b/gitbook-x-prod.appspot.com/o/spaces%2F-Lzplo2osBdXGzFtPu2f%2Fuploads%2FEJv6LeVjxbCkwqdopm5R%2FScreenshot%202024-07-28%20at%2010.27.08%E2%80%AFAM.png?alt=media&amp;token=5934b58b-574c-464c-b5a7-9e65bd9f78cb" alt=""><figcaption><p>Standard invoices are not linked to a job in StayOnHire</p></figcaption></figure>

By selecting a client or customer contact, an empty draft invoice will be generated and opened on the right-hand side of your screen (or fullscreen if on a mobile device):

<figure><img src="https://50563950-files.gitbook.io/~/files/v0/b/gitbook-x-prod.appspot.com/o/spaces%2F-Lzplo2osBdXGzFtPu2f%2Fuploads%2FhqN3FFdq3U8eedMoHT5S%2FScreenshot%202024-07-28%20at%2010.31.10%E2%80%AFAM%20(3).png?alt=media&amp;token=0e7c3df7-61a3-4c04-885f-49cb9569b3c3" alt=""><figcaption></figcaption></figure>

## Accounting Sync

{% hint style="success" %}
Invoices **will not sync** to an accounting package until they are marked as 'Approved' in StayOnHire.
{% endhint %}

In the example account pictured below, a Xero integration is connected.

When connected, a 'Sync Status' field will appear and display additional information on the progress of a sync.

<figure><img src="https://50563950-files.gitbook.io/~/files/v0/b/gitbook-x-prod.appspot.com/o/spaces%2F-Lzplo2osBdXGzFtPu2f%2Fuploads%2Fr4YN8vJxFTz4XKx8j8cQ%2FScreenshot%202024-07-28%20at%2012.08.32%E2%80%AFPM%20(3).png?alt=media&amp;token=47612fb6-7ac0-4fae-ac8e-db8445b5dec8" alt=""><figcaption><p>A 'Sync Status' field will appear if an accounting integration is connected</p></figcaption></figure>

Once and invoice is 'Approved' in StayOnHire, the invoice sync to your accounting integration will be completed:

<figure><img src="https://50563950-files.gitbook.io/~/files/v0/b/gitbook-x-prod.appspot.com/o/spaces%2F-Lzplo2osBdXGzFtPu2f%2Fuploads%2FM1pLHAovpiV17LJJjJMK%2FScreenshot%202024-07-28%20at%2012.12.53%E2%80%AFPM%20(3).png?alt=media&amp;token=fab74294-7d7d-42d3-921d-a0778703f9c1" alt=""><figcaption><p>An approved invoice with its Sync Status changing once approved</p></figcaption></figure>

For more information on how our Xero integration works, visit the [Xero](/integrations/xero) guide.


# Remove Feature

A short guide on how to remove billing features within StayOnHire. The section is for those looking to remove any reference to billing features around their StayOnHire organisation.

{% hint style="info" %}
*Important:* To hide billing and payment information around the StayOnHire office and mobile from particular users, such as field or yard workers, refer to [User Permissions](https://docs.stayonhire.com/billing/invoicing/pages/6GFzcrlovmNSl6WNeEBX#id-3.-user-permissions).&#x20;
{% endhint %}

## 1. Go to Settings

Navigate to [Settings > Billing](https://app.stayonhire.com/org/billing/)

<figure><img src="https://50563950-files.gitbook.io/~/files/v0/b/gitbook-x-prod.appspot.com/o/spaces%2F-Lzplo2osBdXGzFtPu2f%2Fuploads%2Fcd6guHRqwNjs0ofr4zdy%2FScreenshot%202024-05-08%20at%207.37.06%E2%80%AFAM.png?alt=media&amp;token=c3bd889e-a132-4e58-91df-d504441fa3ce" alt=""><figcaption></figcaption></figure>

## 2. Delete Connection

Click “Permanently delete connection”

This will remove your account connection with Xero.

<figure><img src="https://50563950-files.gitbook.io/~/files/v0/b/gitbook-x-prod.appspot.com/o/spaces%2F-Lzplo2osBdXGzFtPu2f%2Fuploads%2FIcrdUhPQil50FZJgqtvj%2FScreenshot%202024-05-08%20at%207.37.06%E2%80%AFAM.png?alt=media&amp;token=5fa5c6b6-0d26-48ff-afd3-640c9ca73452" alt=""><figcaption></figcaption></figure>

## 3. Deleting Leftover Data

This disconnection process will not remove imported data (such as accounts, tax rates, contacts etc.), but rather remove any live connection to your Xero account.

To delete all reference data remaining, navigate to each relevant page (i.e. Tax Rates in the settings page), select all and delete all.

## 4. Re-connection

A StayOnHire account can be re-connected back to the same Xero organisation at a later date.

The reconnection will keep any historically mapped data and not duplicate or overwrite it.

{% hint style="info" %}
If connecting a new Xero organisation to your StayOnHire account, we recommend deleting leftover Tax Rates and Accounts before proceeding to prevent any unnecessary duplicate data.\
\
*Example:* Failure to do this may result in two '200 Sales' accounts. One from your previous Xero organisation and one from your newly connected integration.
{% endhint %}


# Rates Table

StayOnhire enables users to build base rates or charges given to customers on assets allocated to jobs.

{% hint style="info" %}
Rates require billing features to be active in your StayOnHire account and that your account has the appropriate permissions to view, create, edit and delete billing data. Refer to [Activate Billing](https://docs.stayonhire.com/billing/pages/6GFzcrlovmNSl6WNeEBX#id-1.-activate) and [User Permissions](https://docs.stayonhire.com/billing/pages/6GFzcrlovmNSl6WNeEBX#id-3.-user-permissions) for more information.
{% endhint %}

## Overview

Once categories are setup in your account, you will have the ability to configure a Base Rates Table. This table is used by your internal billing teams to achieve two primary functions:

1. Give your sales team a quick reference to what you charge per category; and
2. Pre-fill the default rates into your new jobs

## How it Works

Setup Categories in your account's settings, then add a base rate for each asset category.


# Pre-Fill Rates

We understand that not all higher businesses will want to automatically pre-fill rates into new jobs. This page will outline how to set up pre-filling rates into your new jobs.

Pre-filling rates will require that your account has categories. Set up correctly and base rates. This can be set up using your Categories and [Rates Table](/billing/rates-table) page.

## 1. Go to your [Settings > Billing](https://app.stayonhire.com/org/billing) page

## 2. Scroll down to 'Asset Rates'

## 3. Toggle 'Pre-fill jobs' ON to 'Auto insert rates (if known)'

<figure><img src="https://50563950-files.gitbook.io/~/files/v0/b/gitbook-x-prod.appspot.com/o/spaces%2F-Lzplo2osBdXGzFtPu2f%2Fuploads%2FLOO0X4CusIdeWZfzxQRL%2FScreenshot%202025-11-27%20at%201.00.55%E2%80%AFpm.png?alt=media&amp;token=9744cf3c-2ee5-4f88-ac33-4796742b4178" alt=""><figcaption></figcaption></figure>

<p align="center">This may be set OFF to 'Don't auto insert rates' or can be switched ON to 'Auto insert rates (if known)' as pictured</p>


# Billable Items

Billable items are things that should be charged on a job to the customer. These come in many shapes and sizes but often follow the same format and rules.

{% hint style="info" %}
Billable Items require billing features to be active in your StayOnHire account and that your account has the appropriate permissions to view, create, edit and delete billing data. Refer to [Activate Billing](https://docs.stayonhire.com/billing/pages/6GFzcrlovmNSl6WNeEBX#id-1.-activate) and [User Permissions](https://docs.stayonhire.com/billing/pages/6GFzcrlovmNSl6WNeEBX#id-3.-user-permissions) for more information.
{% endhint %}

## Overview

Typical billable items in StayOnHire include:

1. Transport events (charge)
2. Stand downs (credit)
3. Damages (charge)
4. Re-fuelling (charge)
5. Cleaning (charge)
6. Other (charge)

The last listed option, "other" billable items also have additional functionality to:

* Charge once
* Recur the charge
* Be calculated as a flat value (i.e. 1 x $150.00); or
* Be calculated as a percentage of the invoice total

These types of billable items allow for both the most common types of billable items to be captured, but also the ability to enter more bespoke values, suach as environtmental levies or receurring percentage based charges.

## How it Works

Typical billable items allow users in the field to collect key information and enable our billing teams to action them at the invoicing level.

All billable items can be created from the 'Create' or ' Field actions' main menu buttons in the StayOnHire app.


# 'Other' Billable Items

Other billable items are often used for custom charges you business may need to charge on a daily basis, outside of the traditional types provided by StayOnHire.

## How to Create

### 1. Create new

'Other' billable items can be created from the following pages around the app:

a) The 'Create' main menu dropdown option
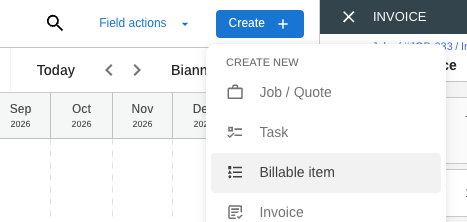
<figure><img src="https://50563950-files.gitbook.io/~/files/v0/b/gitbook-x-prod.appspot.com/o/spaces%2F-Lzplo2osBdXGzFtPu2f%2Fuploads%2F6PmJSoZeG9diXwp3U153%2FScreenshot%202026-01-27%20at%207.45.50%E2%80%AFam.png?alt=media&amp;token=92a33140-310e-4028-86b2-22853b7a1efc" alt=""><figcaption><p>Main Menu > 'Billable item'</p></figcaption></figure>

As this was create from the main menu, we give you the baility to link this to a job in StayOnHire:

<figure><img src="https://50563950-files.gitbook.io/~/files/v0/b/gitbook-x-prod.appspot.com/o/spaces%2F-Lzplo2osBdXGzFtPu2f%2Fuploads%2FME1kYGiYjlabd6HptnMF%2FScreenshot%202026-01-27%20at%207.54.45%E2%80%AFam.png?alt=media&amp;token=ba947862-3303-4ac1-8214-732b22e67f49" alt=""><figcaption><p>A 'New billable item' popup, with no job link pre-filled</p></figcaption></figure>

b) The blue 'Add other' button inside a Job's 'Billable Items' page

<figure><img src="https://50563950-files.gitbook.io/~/files/v0/b/gitbook-x-prod.appspot.com/o/spaces%2F-Lzplo2osBdXGzFtPu2f%2Fuploads%2FtNs3MtVb2PG7C0Z8BmJO%2FScreenshot%202026-01-27%20at%207.48.47%E2%80%AFam.png?alt=media&amp;token=831162e1-72ca-4452-bb0d-228d3039459c" alt=""><figcaption><p>Open the job > Billable Items > 'Add other"</p></figcaption></figure>

Where you create billable items from with a job, we will pre-ill the job value into the billable item:

<figure><img src="https://50563950-files.gitbook.io/~/files/v0/b/gitbook-x-prod.appspot.com/o/spaces%2F-Lzplo2osBdXGzFtPu2f%2Fuploads%2F1CNJNsKcQFkylM918pBW%2FScreenshot%202026-01-27%20at%207.52.55%E2%80%AFam.png?alt=media&amp;token=200a1196-1152-4ce5-98e2-77247ce88655" alt=""><figcaption><p>A 'New billable item' created within a job, will pre-filled the job value</p></figcaption></figure>

### 2. Enter a description

This value is what the customer will see as a line in their invoice.&#x20;

### 3. Select a Calculation

#### Flat Rate ($) vs Percentage on invoice total (%)

Now you will to select whether you want to charge a flat value or a percentage:

<figure><img src="https://50563950-files.gitbook.io/~/files/v0/b/gitbook-x-prod.appspot.com/o/spaces%2F-Lzplo2osBdXGzFtPu2f%2Fuploads%2FYgQLJd6T7Lsnt0ZpP0yx%2FScreenshot%202026-01-27%20at%208.02.54%E2%80%AFam.png?alt=media&amp;token=d80b6c1e-78c3-4d5e-8db0-3095b5ce3fbe" alt=""><figcaption><p>A billable item can be calculated in several ways</p></figcaption></figure>

**Flat Value ($)**

Flat value will allow you to charge, as simply a value.

i.e. 1 x $100.00 = $100.00 total&#x20;

<figure><img src="https://50563950-files.gitbook.io/~/files/v0/b/gitbook-x-prod.appspot.com/o/spaces%2F-Lzplo2osBdXGzFtPu2f%2Fuploads%2FxceKmMhVaNCgJOdPMw4m%2FScreenshot%202026-01-27%20at%208.07.13%E2%80%AFam.png?alt=media&amp;token=4deb7b7d-e5d0-47de-9b56-5b28de06dcce" alt=""><figcaption></figcaption></figure>

**Percentage on each invoice total (%)**

A percentage value will chnage based on the invoice's subtotal value.

i.e. 1 x 2% = $100.00 total&#x20;

<figure><img src="https://50563950-files.gitbook.io/~/files/v0/b/gitbook-x-prod.appspot.com/o/spaces%2F-Lzplo2osBdXGzFtPu2f%2Fuploads%2F4qUbS9vjlMmNCfuDECIS%2FScreenshot%202026-01-27%20at%208.09.23%E2%80%AFam.png?alt=media&amp;token=a13117b9-d8c8-4dcc-a97e-ad942303df26" alt=""><figcaption></figcaption></figure>

<p align="center"></p>

Important notes:

* Percentage charges **do not compound**\
  i.e. Creating two 10% charges on a job invoice worth $100.00 ex taxes, will create two rows of $10.00 each, subtotalling $120.00.&#x20;
* All percentage-based billable items can only have a Quantity locked to "1"\
  This helps create consistency in expected invoice funcitonality and avoid unecessary confusion.

## Using Recurring Billable Items

In the below example&#x20;


# Templates

## Overview

StayOnHire allows you to use default and customisable templates throughout your operations to help you standardise your branding and automate tedious manual data entry over and over again.

## Standardised Templates

Out of the box, all new StayOnHire accounts come with the following default templates:

* [Job Summary](/documents/templates/job-summary)
* [Hire Agreement](/documents/templates/hire-agreement)
* Invoice
* Freight Brief (Mobilisation / Start of Job)
* Freight Brief (De-mobilisation / End of Job)

<figure><img src="https://50563950-files.gitbook.io/~/files/v0/b/gitbook-x-prod.appspot.com/o/spaces%2F-Lzplo2osBdXGzFtPu2f%2Fuploads%2FBzUWiskXQw1djZayvEyn%2FScreenshot%202024-05-09%20at%202.48.35%E2%80%AFPM.png?alt=media&amp;token=70f87569-37eb-4e12-aa6e-2f079bfcd7ae" alt=""><figcaption></figcaption></figure>


# Job Summary

The below example is the default provided by StayOnHire.

#### Example:

A document uploaded to StayOnHire endpoints (within reference tags):

<figure><img src="https://50563950-files.gitbook.io/~/files/v0/b/gitbook-x-prod.appspot.com/o/spaces%2F-Lzplo2osBdXGzFtPu2f%2Fuploads%2FDaBMM7WUqHX9S48juXIo%2FScreen_Shot_2022-01-13_at_11.19_1.png?alt=media&amp;token=d8286919-0ef2-460b-898d-4d506e127636" alt=""><figcaption></figcaption></figure>

A document exported from StayOnHire endpoints (using reference tags):

<figure><img src="https://50563950-files.gitbook.io/~/files/v0/b/gitbook-x-prod.appspot.com/o/spaces%2F-Lzplo2osBdXGzFtPu2f%2Fuploads%2Fz2x8dhBFPtxRcvcr32kz%2FScreen_Shot_2022-01-13_at_11.14_1.png?alt=media&amp;token=3a0c426c-e8c9-44f2-b336-058fa9493b5f" alt=""><figcaption></figcaption></figure>

### Download for Microsoft Word

Once your template is set up in StayOnHire, simply download it and make the adjustments required. This can then be saved or exported as a PDF from Microsoft Word.

<figure><img src="https://50563950-files.gitbook.io/~/files/v0/b/gitbook-x-prod.appspot.com/o/spaces%2F-Lzplo2osBdXGzFtPu2f%2Fuploads%2FKBX2wwbWiKrPtA8FwL0a%2FFrame_17.png?alt=media&amp;token=85d4e070-b7ae-4947-a248-67ce27720a49" alt=""><figcaption></figcaption></figure>


# Hire Agreement

The below example is the default provided by StayOnHire.

#### Example:

A document uploaded to StayOnHire endpoints (within reference tags):

<figure><img src="https://50563950-files.gitbook.io/~/files/v0/b/gitbook-x-prod.appspot.com/o/spaces%2F-Lzplo2osBdXGzFtPu2f%2Fuploads%2FjW3FffdlLTEFgbnNB1Z7%2FFrame_15_(3).png?alt=media&amp;token=a427af30-a91a-41bd-a7eb-249f0b578b6e" alt=""><figcaption></figcaption></figure>

A document exported from StayOnHire endpoints (using reference tags):

<figure><img src="https://50563950-files.gitbook.io/~/files/v0/b/gitbook-x-prod.appspot.com/o/spaces%2F-Lzplo2osBdXGzFtPu2f%2Fuploads%2F3g1C4KJnQn0dBv8YVBJl%2FFrame_16_(2).png?alt=media&amp;token=ca9e6e8d-a1c7-4e63-914c-de5830ef2df8" alt=""><figcaption></figcaption></figure>

### Download for Microsoft Word

Once your template is set up in StayOnHire, simply download it and make the adjustments required. This can then be saved or exported as a PDF from Microsoft Word.

<figure><img src="https://50563950-files.gitbook.io/~/files/v0/b/gitbook-x-prod.appspot.com/o/spaces%2F-Lzplo2osBdXGzFtPu2f%2Fuploads%2FebFK4r02y5Y96eyxcarc%2FFrame_17.png?alt=media&amp;token=9029d049-9b3b-44e3-8da5-2316f32fecf6" alt=""><figcaption></figcaption></figure>


# Reference Tags

## Job Tags

The following tags can be used anywhere you need documents produced.

<table><thead><tr><th width="249">Tag</th><th width="248">Description</th><th width="250.31640625">Example</th></tr></thead><tbody><tr><td>{{#JobAllocations}}<br>...<br>{{/}}</td><td>Special tag to start and end a list of job allocations. <br><br>After the tag is used you can access nested tags of the allocation data, then use <code>{{/}}</code> to exit the list context and return to primary tags. <br><br>Without these tags at the start and end the document can not know where to start and end the list.<br><br><a href="#job-allocation-tags">View nested tags</a></td><td>Tags needed at start/end but do not appear in the document export:<br><br><img src="https://50563950-files.gitbook.io/~/files/v0/b/gitbook-x-prod.appspot.com/o/spaces%2F-Lzplo2osBdXGzFtPu2f%2Fuploads%2FUSxJUl8v9te61WpOv0UJ%2FScreenshot%202026-02-18%20at%2012.22.07%E2%80%AFpm.png?alt=media&amp;token=7345fcc4-135d-4ad7-a9f1-25269fd3d563" alt=""></td></tr><tr><td>{{JobAssetIDs}}</td><td>Formatted list of asset IDs that are linked to job, seperated by commas.<br><br>Commonly used inn the reference field of smaller jobs.</td><td>EX01, BU01, BU02, BU03</td></tr><tr><td>{{JobBillingContactAddress}}</td><td>Formatted address of job's client/billing contact</td><td>123 Hamilton Street, Joondalup, WA 6000</td></tr><tr><td>{{JobBillingContactABN}}</td><td>The ABN of job's client/billing contact</td><td>97 123 456 789</td></tr><tr><td>{{JobBillingContactACN}}</td><td>The ACN of job's client/billing contact</td><td>123 456 789</td></tr><tr><td>{{JobBillingContactDetails}}</td><td>Summary of job's client/billing contact details combined into Name, Mobile, Landline and Email information.</td><td>Ben Billing<br>M: 0412 345 678<br>L: 08 1234 5678<br>E: ben@company.com</td></tr><tr><td>{{JobBillingContactEmail}}</td><td>The email of job's client/billing contact</td><td>ben@company.com</td></tr><tr><td>{{JobBillingContactName}}</td><td>The client company name or primary identifier as defined in the Contacts page of your app.</td><td>ABC Company Name</td></tr><tr><td>{{JobBillingContactMobile}}</td><td>Formatted mobile of job's client/billing contact</td><td>0412 345 678</td></tr><tr><td>{{JobBillingContactLandline}}</td><td>Formatted landline of job's client/billing contact</td><td>08 9123 4567</td></tr><tr><td>{{JobBillingContactFax}}</td><td>Formatted fax of job's client/billing contact</td><td>08 9123 4567</td></tr><tr><td>{{JobBillingContactPersonFullName}}</td><td>The full name of job's client/billing contact</td><td>Ben Billing</td></tr><tr><td>{{JobContactName}}</td><td>The primary contact name assigned to a company, business or person who is a client to your business.</td><td>ABC Company Name</td></tr><tr><td>{{JobContactFullName}}</td><td>The full name of the job's job contact (from job contacts section)</td><td>James Job</td></tr><tr><td>{{JobContactDetails}}</td><td>Summary of job's job contact details (from job contacts section)</td><td>James Job<br>M: 0412 345 678<br>L: 08 1234 5678<br>E: james@company.com</td></tr><tr><td>{{JobContactMobile}}</td><td>Formatted mobile of job's job contact (from job contacts section)</td><td>0412 345 678</td></tr><tr><td>{{JobContactLandline}}</td><td>Formatted landline of job's job contact (from job contact section)</td><td>08 1234 5678</td></tr><tr><td>{{JobContactEmail}}</td><td>The email of job's job contact (from job contacts section)</td><td>james@company.com</td></tr><tr><td>{{JobSiteContactFullName}}</td><td>The full name of job's site contact (from job contacts section).<br><br>i.e. The person on site who may receive deliveries.</td><td>Sam Site</td></tr><tr><td>{{JobSiteContactDetails}}</td><td>Summary of job's site contact details combined into Name, Mobile, Landline and Email information.<br><br>i.e. The person on site who may receive deliveries.</td><td>Sam Site<br>M: 0412 345 678<br>L: 08 1234 5678<br>E: sam@company.com</td></tr><tr><td>{{JobSiteContactMobile}}</td><td>The mobile phone number of a job's site contact (from job contacts section).<br><br>i.e. The person on site who may receive deliveries.</td><td>0412 345 678</td></tr><tr><td>{{JobSiteContactLandline}}</td><td>The landline number of a job's site contact (from job contacts section).<br><br>i.e. The person on site who may receive deliveries.</td><td>08 1234 5678</td></tr><tr><td>{{JobSiteContactEmail}}</td><td>The email of a job's site contact (from job contacts section).<br><br>i.e. The person on site who may receive deliveries.</td><td>sam@company.com</td></tr><tr><td>{{JobDescription}}</td><td>Long-form text describing the scope of work.</td><td>Supply and delivery of 20t Excavators for site prep.</td></tr><tr><td>{{JobEstEndDateTime}}</td><td>Estimated completion date and time (ISO/Local).<br><br>This can also be "Ongoing" if the job has no forecast end.</td><td>15/12/2023 05:00 PM<br><br>or<br><br>"Ongoing"</td></tr><tr><td>{{JobEstStartDateTime}}</td><td>Estimated commencement date and time (ISO/Local).</td><td>12/10/2023 08:00 AM</td></tr><tr><td>{{JobFuelCharges}}</td><td><strong>This field is longer in use and has been supersceded by newer functionality.</strong><br><br>This value is still active for legacy customers still using the feature.</td><td>"Any text entered by your business"</td></tr><tr><td>{{JobCleaningFees}}</td><td><strong>This field is longer in use and has been supersceded by newer functionality.</strong><br><br>This value is still active for legacy customers still using the feature.</td><td>"Any text entered by your business"</td></tr><tr><td>{{JobLiabilityCover}}</td><td><strong>This field is longer in use and has been supersceded by newer functionality.</strong><br><br>This value is still active for legacy customers still using the feature.</td><td>"Any text entered by your business"</td></tr><tr><td>{{JobListContacts}}</td><td>Displays Billing, Site and Job, contact names in that order, seperated by commas.<br><br>Used when addressing a document to all on a job. <br><br>i.e. "ATTN: Ben Billing, Sam Site, James Job"</td><td>Ben Billing, Sam Site, James Job</td></tr><tr><td>{{JobListStaffResponsible}}</td><td>Displays team member names assigned reposisible to the job, seperated by commas.<br><br>Used to detail who can be contacted if needed. <br><br>i.e. "Sales Rep: Sarah Sales"</td><td>Sarah Sales</td></tr><tr><td>{{JobName}}</td><td>The descriptive title given to the job.</td><td>Northshore Extension Project</td></tr><tr><td>{{JobNotes}}</td><td>A descriptive field used by companies how they see fit.</td><td>"Any text entered by your business"</td></tr><tr><td>{{JobNumber}}</td><td>The unique alphanumeric identifier for the job.</td><td>JOB-10254</td></tr><tr><td>{{JobPONumber}}</td><td>The client's Purchase Order number.</td><td>PO-882190</td></tr><tr><td>{{JobRentalRate}}</td><td>The text box field in Job Details that can be used to write whatever your company likes.<br><br>Thic can be kep private from company documents or also used to pre-fill into documents.</td><td>"Any text entered by your business"</td></tr><tr><td>{{JobRateNotes}}</td><td>The text box field in Job Details that can be used to write whatever your company likes.<br><br>Thic can be kep private from company documents or also used to pre-fill into documents.</td><td>"Any text entered by your business"</td></tr><tr><td>{{JobSiteAddress}}</td><td>The full formatted physical address of the job site.</td><td>123 Industrial Way, Perth WA 6000</td></tr><tr><td>{{JobSpecialConditions}}</td><td><strong>This field is longer in use and has been supersceded by newer functionality.</strong><br><br>This value is still active for legacy customers still using the feature.</td><td>"Any text entered by your business"</td></tr><tr><td>{{JobTransportContactName}}</td><td>The client contact name performing the delivery or collection.</td><td>Transport Company Name</td></tr><tr><td>{{JobTransportCostExTax}}</td><td><strong>This field is longer in use and has been supersceded by newer functionality.</strong><br><br>This value is still active for legacy customers still using the feature.<br><br>Replaced by {{MobeCost}} and {{DemobeCost}}.</td><td>$1,500</td></tr><tr><td>{{JobTransportDate}}</td><td><strong>This field is longer in use and has been supersceded by newer functionality.</strong><br><br>This value is still active for legacy customers still using the feature.<br><br>Replaced by {{MobePickupDateTime}} and {{DemobePickupDateTime}}.</td><td>1 Jan 2030</td></tr><tr><td>{{JobTransportFromAddress}}</td><td><strong>This field is longer in use and has been supersceded by newer refernce tags.</strong><br><br>This value is still active for legacy customers still using the feature.</td><td>Not applicable / Do not use</td></tr><tr><td>{{JobTransportNotes}}</td><td><strong>This field is longer in use and has been supersceded by newer refernce tags.</strong><br><br>This value is still active for legacy customers still using the feature.</td><td>Not applicable / Do not use</td></tr><tr><td>{{JobTransportToAddress}}</td><td><strong>This field is longer in use and has been supersceded by newer refernce tags.</strong><br><br>This value is still active for legacy customers still using the feature.</td><td>Not applicable / Do not use</td></tr><tr><td>{{MobeNotes}}</td><td>The text box field in Transport events that can be used to write whatever your company likes.<br><br>Thic can be kep private from company documents or also used to pre-fill into documents.</td><td>"Any text entered by your business"</td></tr><tr><td>{{MobeFreightType}}</td><td>The method chosen within the app to build the transport event.</td><td>"One delivery"<br>"Customer self-pickup"<br>"Not required"</td></tr><tr><td>{{MobeMethod}}</td><td>The method chosen within the app to build the transport event.</td><td>"One delivery"<br>"Customer self-pickup"<br>"Not required"</td></tr><tr><td>{{MobeTransportProviderName}}</td><td>The primary client name of the service provider completing this work.<br><br>This can be an external contact or your internal business name if proviing the service 'in-house'.</td><td>"External Transport Company Pty Ltd"<br><br>or<br><br>"Our Company Name Pty Ltd"</td></tr><tr><td>{{MobeDeliveryContactPerson}}</td><td>Relating specifically to the first mobilisation transport event on a job, this is the site contact person, with their phone number and email.<br><br>This will often pre-fill with the Site Contact from the job, though can also be overridden by users when creating a delivery event.</td><td>Steve Site, 0441 234 567, steve@company.com</td></tr><tr><td>{{MobePickupAddressNickname}}</td><td>A landmark or nickname given to an address. <br><br>This tag is specifically used for customer's who self-pickup. <br><br>i.e. "Fiona Stanley Hospital"</td><td>"Any text entered by your business" <br><br>or<br><br>"Landmark Nickname" prefilled by Google Maps</td></tr><tr><td>{{MobePickupAddress}}</td><td>Origin address for the delivery.<br><br>Used specfically for events relating to start of job where the dirver is travlling to a locaiton to collect.</td><td>45 Yard Lane, Welshpool WA 6106</td></tr><tr><td>{{MobeDeliveryAddressNickname}}</td><td>A landmark or nickname given to an address. <br><br>This tag is specifcally used in relation to mobilisaiton delivery events.<br><br>i.e. "Fiona Stanley Hospital"</td><td>"Any text entered by your business" <br><br>or<br><br>"Landmark Nickname" prefilled by Google Maps</td></tr><tr><td>{{MobeDeliveryAddress}}</td><td>Origin address for the delivery.<br><br>Used specfically for events relating to start of job deliveries to a customer location.</td><td>45 Yard Lane, Welshpool WA 6106</td></tr><tr><td>{{MobePickupPrefix}}</td><td>The transport target or goal defined when scheduling a delivery at the start of a job. Used specifically for customer's who self-pickup.<br><br>This field pairs well with {{MobePickupDateTime}}.<br><br>i.e. "Deliver before 1 Jan 2030, 12:00 am.</td><td>"Deliver before..."<br>"Deliver after..."<br>"Collect before..."<br>"Collect after..."</td></tr><tr><td>{{MobeDeliveryPrefix}}</td><td>The transport target or goal defined when scheduling a delivery at the start of a job.<br><br>This field pairs well with {{MobePickupDateTime}}.<br><br>i.e. "Deliver before 1 Jan 2030, 12:00 am"</td><td>"Deliver before..."<br>"Deliver after..."<br>"Collect before..."<br>"Collect after..."</td></tr><tr><td>{{MobePickupDateTime}}</td><td>The <strong>date and time</strong> of the mobilisation's schedule in one tag.<br><br>Used specifically with deliveries where the customer is self-picking up at the start of the mobilisation.</td><td>31 Dec 2026, 04:00 pm</td></tr><tr><td>{{MobeDeliveryDateTime}}</td><td>The <strong>date and time</strong> of the mobilisation's schedule in one tag.<br><br>Used specifically with deliveries where the driver is collecting from someone at the start of the mobilisation.</td><td>31 Dec 2026, 04:00 pm</td></tr><tr><td>{{MobeCost}}</td><td>The value charged for mobilisation, excluding taxes.</td><td>$550.00</td></tr><tr><td>{{MobeTime}}</td><td>The <strong>time only</strong> of the mobilisation's schedule</td><td>06:00 pm</td></tr><tr><td>{{MobeDate}}</td><td>The <strong>date only</strong> of the mobilisation's schedule</td><td>1 Oct 2026</td></tr><tr><td>{{MobeCompletion}}</td><td><strong>This field is longer in use and has been supersceded by newer functionality.</strong><br><br>This value is still active for legacy customers still using the feature.</td><td>Not applicable / Do not use</td></tr><tr><td>{{DemobeNotes}}</td><td>The text box field in Transport events that can be used to write whatever your company likes.<br><br>Thic can be kep private from company documents or also used to pre-fill into documents.</td><td>"Any text entered by your business"</td></tr><tr><td>{{DemobeFreightType}}</td><td>The method chosen within the app to build the transport event.</td><td>"One collection"<br>"Customer self-return"<br>"Not required"</td></tr><tr><td>{{DemobeMethod}}</td><td>The method chosen within the app to build the transport event.</td><td>"One collection"<br>"Customer self-return"<br>"Not required"</td></tr><tr><td>{{DemobeTransportProviderName}}</td><td>The primary client name of the service provider completing this work.<br><br>This can be an external contact or your internal business name if proviing the service 'in-house'.</td><td>"External Transport Company Pty Ltd"<br><br>or<br><br>"Our Company Name Pty Ltd"</td></tr><tr><td>{{DemobeCollectionContactPerson}}</td><td></td><td></td></tr><tr><td>{{DemobePickupAddressNickname}}</td><td>A landmark or nickname given to an address.<br><br>i.e. "Fiona Stanley Hospital"</td><td>"Any text entered by your business" <br><br>or<br><br>"Landmark Nickname" prefilled by Google Maps</td></tr><tr><td>{{DemobePickupAddress}}</td><td>The starting address of a delivery, specific to a demobe transport event.<br><br>This would typically pre-fill with the job's site address, as this would typically be where the asset is being picked up from. </td><td>123 Industrial Way, Perth WA 6000</td></tr><tr><td>{{DemobeDeliveryAddressNickname}}</td><td>A landmark or nickname given to an address.<br><br>i.e. "Fiona Stanley Hospital"</td><td>"Any text entered by your business" <br><br>or<br><br>"Landmark Nickname" prefilled by Google Maps</td></tr><tr><td>{{DemobeDeliveryAddress}}</td><td></td><td></td></tr><tr><td>{{DemobePickupPrefix}}</td><td>The transport target or goal defined when scheduling a customer self-pickup at the end of a job.<br><br>This field pairs well with {{DemobePickupDateTime}}.<br><br>i.e. "Deliver before 1 Jan 2030, 12:00 am"</td><td>"Deliver before..."<br>"Deliver after..."<br>"Collect before..."<br>"Collect after..."</td></tr><tr><td>{{DemobeDeliveryPrefix}}</td><td>The transport target or goal defined when scheduling a delivery at the end of a job.<br><br>This field pairs well with {{DemobePickupDateTime}}.<br><br>i.e. "Deliver before 1 Jan 2030, 12:00 am"</td><td>"Deliver before..."<br>"Deliver after..."<br>"Collect before..."<br>"Collect after..."</td></tr><tr><td>{{DemobePickupDateTime}}</td><td></td><td></td></tr><tr><td>{{DemobeDeliveryDateTime}}</td><td></td><td></td></tr><tr><td>{{DemobeCost}}</td><td>The flat charge amount recorded on the transport event, excluding taxes.</td><td>500.00</td></tr><tr><td>{{DemobeTime}}</td><td>The <strong>time only</strong> of the mobilisation's schedule</td><td>06:00 AM</td></tr><tr><td>{{DemobeDate}}</td><td>The <strong>date only</strong> of the mobilisation's schedule</td><td>1 Oct 2026</td></tr><tr><td>{{DemobeCompletion}}</td><td><strong>This field is longer in use and has been supersceded by newer functionality.</strong><br><br>This value is still active for legacy customers still using the feature.</td><td>Not applicable / Do not use</td></tr><tr><td>{{JobBillingContactAddressLine}}</td><td></td><td></td></tr><tr><td>{{JobBillingContactAddressSuburb}}</td><td></td><td></td></tr><tr><td>{{JobBillingContactAddressState}}</td><td></td><td></td></tr><tr><td>{{JobBillingContactAddressZip}}</td><td></td><td></td></tr><tr><td>{{JobBillingContactFirstName}}</td><td></td><td></td></tr><tr><td>{{JobBillingContactLastName}}</td><td></td><td></td></tr><tr><td>{{JobSiteAddressLine}}</td><td></td><td>191 St Georges Terrace</td></tr><tr><td>{{JobSiteAddressSuburb}}</td><td></td><td>Perth</td></tr><tr><td>{{JobSiteAddressState}}</td><td></td><td>WA</td></tr><tr><td>{{JobSiteAddressZip}}</td><td></td><td>6000</td></tr><tr><td>{{EstHireDuration}}</td><td>The approximate duraiton of time between start and end of hire, displayed shorthand in a readable value of years, months, days, minutes.</td><td>31d 0h 0m</td></tr><tr><td>{{CreatedByUserFullName}}</td><td>The first and last name of the user who drafted the document. <br><br>Commonly used when detailing the author and primary contact for a quote or invoice.</td><td>Steve Smith</td></tr><tr><td>{{CreatedByUserMobile}}</td><td>The internal mobile contact nubmer of the user who drafted the document. <br><br>Commonly used when detailing the author and primary contact for a quote or invoice.</td><td>0412 345 678</td></tr><tr><td>{{CreatedByUserEmail}}</td><td>The work email address of the user who drafted the document. <br><br>Commonly used when detailing the author and primary contact for a quote or invoice.</td><td>steve@company.com</td></tr><tr><td>{{JobBillingContactPhotoIDLicenceNumber}}</td><td>The unique ID of photo identification taken when capturing a customer's details.</td><td>1234567</td></tr><tr><td>{{JobBillingContactPhotoIDLicenceState}}</td><td>The state and country of the origination photo ID</td><td>WA Australia</td></tr><tr><td>{{JobBillingContactPhotoIDFront}}</td><td>A photo of the licence taken of the front.</td><td><p></p><div><figure><img src="https://50563950-files.gitbook.io/~/files/v0/b/gitbook-x-prod.appspot.com/o/spaces%2F-Lzplo2osBdXGzFtPu2f%2Fuploads%2F11iN8zY6vgKWx9NXCq5B%2FScreenshot%202026-08-05%20at%2011.13.47%E2%80%AFam.png?alt=media&amp;token=58c003d3-e8f7-4f8a-8439-43b7ae1c0fbb" alt=""><figcaption></figcaption></figure></div></td></tr><tr><td>{{JobBillingContactPhotoIDBack}}</td><td>A photo of the licence taken of the rear.</td><td><div><figure><img src="https://50563950-files.gitbook.io/~/files/v0/b/gitbook-x-prod.appspot.com/o/spaces%2F-Lzplo2osBdXGzFtPu2f%2Fuploads%2Fk8riAFZkwnj1Py3Aev6l%2FScreenshot%202026-08-05%20at%2011.13.51%E2%80%AFam.png?alt=media&amp;token=499e9ade-6832-4dba-97c8-b3e772bdd432" alt=""><figcaption></figcaption></figure></div><p></p></td></tr><tr><td></td><td></td><td></td></tr><tr><td></td><td></td><td></td></tr></tbody></table>

## Org Tags

| Tag                        | Description                                                   | Example                              |
| -------------------------- | ------------------------------------------------------------- | ------------------------------------ |
| {{OrgABN}}                 | ABN of your organisation                                      | 97 123 456 789                       |
| {{OrgBillingAddress}}      | Your company’s primary mailing/billing address.               | Suite 4, 10 Main St, Sydney NSW 2000 |
| {{OrgBillingContactEmail}} | Email of billing contact from organisation settings           |                                      |
| {{OrgBillingContactName}}  | Name of billing contact from organisation settings            | Adam West                            |
| {{OrgBillingContactPhone}} | Formatted phone of billing contact from organisation settings | 0412 345 678                         |
| {{OrgName}}                | Name of your organisation                                     | Example Hire Company                 |

## Table Lists

These tags pull data directly from the Job entity. They are used for primary document headers and site-specific details.

The following tags can only be used when listing multiple asset rows in one context. For example, producing a hire agreement table with multiple rows of several assets.

| Tag                        | Description                                                                                                                                                              | Example                                                         |
| -------------------------- | ------------------------------------------------------------------------------------------------------------------------------------------------------------------------ | --------------------------------------------------------------- |
| {{#JobAllocations}}        | <p><strong>REQUIRED:</strong><br>Begin any table listing multiple rows with this special tag to start the list. This can be inserted as a row for easy visualisation</p> | <p>Download template with tags<br>Download document list</p>    |
| {{/}}                      | <p><strong>REQUIRED:</strong><br>Finish any table with this special tag to finish the list</p>                                                                           | <p>Download template with tags<br>Download document list</p>    |
| {{$AssetID}}               | The asset's primary identification tag/acronym. This can often be physically marked on the asset                                                                         | <p>"EX01"<br>"ASSET-0001"<br>"0000001"</p>                      |
| {{$AssetShortDescription}} | A short description of this asset that helps your team quickly identify more information about an asset                                                                  | <p>"Mini Excavator with ROPS"<br>"Cat 301.5 Mini Excavator"</p> |
| {{$Rate}}                  | <p>The position's rate, displayed in a quickly readable format<br>i.<em>e. Amount per Unit of Time</em></p>                                                              | "$200 / day"                                                    |
| {{$HireStatus}}            | The current hire status of the asset allocation, displayed as simple text                                                                                                | <p>"Pending"<br>"In Progress"<br>"Hire finished"</p>            |
| {{$OnHireDate}}            | Pull the start date and time of hire. If not yet known, the job's estimated start date may be inserted here instead.                                                     | "1 Jan 2025 06:00 am"                                           |
| {{$OnHireSMUReading}}      | The service meter reading of this asset at the pre-hire inspection or start of the hire                                                                                  | "12345.00"                                                      |
| {{$AssetSerialNumber}}     | The recorded serial number associated with this asset                                                                                                                    | "123456789"                                                     |

## Job Allocation Table Rows

These tags must be placed inside the `{{#JobAllocations}} ... {{/}}` block. They iterate through each individual asset or service assigned to the job.

| Tag                                     | Description                                                                                                                                                                                                                                                                                                                                                                                                            | Example                                                                           |
| --------------------------------------- | ---------------------------------------------------------------------------------------------------------------------------------------------------------------------------------------------------------------------------------------------------------------------------------------------------------------------------------------------------------------------------------------------------------------------- | --------------------------------------------------------------------------------- |
| {{$AssetHomeBranch}}                    | <p><strong>This field is longer in use and has been supersceded by newer functionality.</strong><br><br>This value is still active for legacy customers still using the feature.</p>                                                                                                                                                                                                                                   | Not applicable / Do not use                                                       |
| {{$AssetID}}                            | The unique fleet or plant number of the asset.                                                                                                                                                                                                                                                                                                                                                                         | EX-04                                                                             |
| {{$AssetMake}}                          | The manufacturer of the asset. Commonly paired with {{$AssetModel}} inside a single "Make / Model" column of an allocation or freight checklist table.                                                                                                                                                                                                                                                                 | Komatsu                                                                           |
| {{$AssetModel}}                         | The manufacturer's model designation for the asset. Commonly paired with {{$AssetMake}} inside a single "Make / Model" column of an allocation or freight checklist table.                                                                                                                                                                                                                                             | PC200-8                                                                           |
| {{$AssetSerialNumber}}                  | The manufacturer's unique chassis/serial number.                                                                                                                                                                                                                                                                                                                                                                       | KMT12345ABC                                                                       |
| {{$AssetShortDescription}}              | A brief summary of the asset as identified by your team internally.                                                                                                                                                                                                                                                                                                                                                    | 20T Hydraulic Crawler Excavator                                                   |
| {{$AssetRoadRego}}                      | <p>The road registration (number plate) recorded against the asset. <br><br>Only populated for road-registered assets such as trucks and trailers, so design the row to read correctly when it renders empty for unregistered plant.</p>                                                                                                                                                                               | QWE123                                                                            |
| {{$AssetVIN}}                           | <p>The Vehicle Identification Number recorded against the asset. <br><br>Sits alongside {{$AssetSerialNumber}} and {{$AssetEngineNumber}} in the identification of an asset's specifications.</p>                                                                                                                                                                                                                      | 123456789123456                                                                   |
| {{$AssetCategory}}                      | <p>The 'Category Title' assigned to this asset. This will be configured by your business settings and is generally used to describe the Size or Type of a grouped asset category.<br><br>i.e. "5.5t excavators"<br>"Posi Track Skid Steer Loader"</p>                                                                                                                                                                  | 5.5t Excavator                                                                    |
| {{$AssetCategoryGroup}}                 | <p>Asset categories that are in common together under this definition.<br><br>i.e. 1.7t, 5.5t and 20t excavators could be placed under a group titled "Excavators"<br><br>If you have different types, under each group, this is how you could seperate them.<br><br>i.e. A group called "Tracked Excavators" and a seperate group called "Wheeled Excavators" could both contain 5.5t categories underneath them.</p> | <p>"Excavators"<br><br>or<br><br>"Tracked Excavators"<br>"Wheeled Excavators"</p> |
| {{$AssetCategoryCode}}                  | <p>The short code you company may use to refer to this group groups and type of asset.<br><br>This is usually paired with the Asset Category.</p>                                                                                                                                                                                                                                                                      | <p>"EX-5.5"<br><br>or<br><br>"TR-EX-5.5"<br>"WH-EX-5.5"</p>                       |
| {{$ChargeBasedOn}}                      | <p><strong>This field is longer in use and has been supersceded by newer functionality.</strong><br><br>This value is still active for legacy customers still using the feature.</p>                                                                                                                                                                                                                                   | Not applicable                                                                    |
| {{$HireStatus}}                         | The current state of the allocation (e.g. On Hire).                                                                                                                                                                                                                                                                                                                                                                    | On Hire                                                                           |
| {{$OffHireDate}}                        | The date the asset was officially returned from hire.                                                                                                                                                                                                                                                                                                                                                                  | 10/11/2023                                                                        |
| {{$OffHireSMUReading}}                  | The engine hours or odometer reading at end of a hire.                                                                                                                                                                                                                                                                                                                                                                 | 1490.2                                                                            |
| {{$OnHireDate}}                         | The date the asset was officially on hired out to the client.                                                                                                                                                                                                                                                                                                                                                          | 14/11/2023                                                                        |
| {{$OnHireSMUReading}}                   | The engine hours or odometer reading at start of a hire.                                                                                                                                                                                                                                                                                                                                                               | 1450.5                                                                            |
| {{$Rate}}                               | The specific hire rate for this individual allocation.                                                                                                                                                                                                                                                                                                                                                                 | $1,200.00 / Day                                                                   |
| {{$JobRentalRate}}                      | Any text written by your team in the 'Job Rate Notes' field inside a job. These can often be string text, are unformatted text and should be reserved for specific needs.                                                                                                                                                                                                                                              | <p>"Asset #123 @ $495.00+ per week.                                               |
| <br>Transport @ $345.00+ each way."</p> |                                                                                                                                                                                                                                                                                                                                                                                                                        |                                                                                   |
| {{$AssetPPSRNumber}}                    | A 12-digit reference number generated when you run or create a search on the [Personal Property Securities Register](https://www.google.com/url?sa=i\&source=web\&rct=j\&url=https://www.ppsr.gov.au/\&ved=2ahUKEwigzNKFzN2WAxVqgOEIHeJQJ5kQy_kOegoIAggACAEICBAB\&opi=89978449\&cd\&psig=AOvVaw0erox9DkxrkEBMx1voZ0_h\&ust=1788909152110000)                                                                           | 123456789123                                                                      |
| {{$AssetEngineNumber}}                  | The asset's engine number as recorded in the individual specification tab of the asset.                                                                                                                                                                                                                                                                                                                                | 12345678                                                                          |
| {{$AssetWidth}}                         | <p>The asset's number value as recorded in the individual specification tab of the asset. <br><br>These are not yet tied to any unit of mesure.</p>                                                                                                                                                                                                                                                                    | <p>Any number value set <br>"123"</p>                                             |
| {{$AssetHeight}}                        | <p>The asset's number value as recorded in the individual specification tab of the asset. <br><br>These are not yet tied to any unit of mesure.</p>                                                                                                                                                                                                                                                                    | <p>Any number value set <br>"123"</p>                                             |
| {{$AssetWeight}}                        | <p>The asset's number value as recorded in the individual specification tab of the asset. <br><br>These are not yet tied to any unit of mesure.</p>                                                                                                                                                                                                                                                                    | <p>Any number value set <br>"123"</p>                                             |
| {{$AssetLength}}                        | <p>The asset's number value as recorded in the individual specification tab of the asset. <br><br>These are not yet tied to any unit of mesure.</p>                                                                                                                                                                                                                                                                    | <p>Any number value set <br>"123"</p>                                             |
| {{$AssetCapacity}}                      | <p>The asset's number value as recorded in the individual specification tab of the asset. <br><br>These are not yet tied to any unit of mesure.</p>                                                                                                                                                                                                                                                                    | <p>Any number value set <br>"123"</p>                                             |
| {{$AssetRequiredDesc}}                  | <p>The description recorded on the Asset Request, i.e. what was asked for, rather than the asset that was ultimately allocated. <br><br>Use it on documents that must show the requested specification; use {{$AssetShortDescription}} for the asset actually assigned.</p>                                                                                                                                            |                                                                                   |
| {{$AssetRequiredCategory}}              | <p>The asset category recorded on the Asset Request, i.e. the category asked for rather than the category of the asset ultimately allocated. <br><br>Use {{$AssetCategory}} for the asset actually assigned.</p>                                                                                                                                                                                                       | Excavator                                                                         |
| {{$AssetRequiredCategoryGroup}}         | <p>The asset category group recorded on the Asset Request, i.e. the group asked for rather than the group of the asset ultimately allocated. <br><br>Use {{$AssetCategoryGroup}} for the asset actually assigned.</p>                                                                                                                                                                                                  | Tracked 10T Excavators                                                            |
| {{$AssetRequiredCategoryCode}}          | <p>The asset category code recorded on the Asset Request, i.e. the code asked for rather than the code of the asset ultimately allocated. <br><br>Use {{$AssetCategoryCode}} for the asset actually assigned.</p>                                                                                                                                                                                                      | EX-10T                                                                            |
| {{$AssetEstHireDuration}}               | <p>The estimated length of hire for this individual allocation, formatted as days, hours and minutes. <br><br>Use it inside an allocation table where each asset may run for a different period; use {{EstHireDuration}} for the job as a whole.</p>                                                                                                                                                                   |                                                                                   |
| {{$$}}                                  | <p>The index/row number of the item in the list.<br><br>i.e. The quote/invoice row number: 1, 2, 3, 4, etc.</p>                                                                                                                                                                                                                                                                                                        | 1                                                                                 |
| {{$AssetPlannedStart}}                  | <p>The estimated or planned start date/time an Asset Request was expected to start. <br><br>i.e. The date/time the asset was supposed to start/on hire</p>                                                                                                                                                                                                                                                             | 1 Jan 2027, 6:00 AM                                                               |
| {{$AssetPlannedEnd}}                    | <p>The estimated or planned end date/time an Asset Request was expected to end. <br><br>i.e. The date/time the asset was supposed to end/off hire</p>                                                                                                                                                                                                                                                                  | 31 Jan 2027, 6:00 PM                                                              |

These pull details about your company (the organization using StayOnHire).

## Quotes & Invoices

Used for generating tax invoices or payment summaries.

| Tag                                                                                                                                            | Description                                                                                                                                                                                                                                | Example                                                                                                                                                                                                                                                                                                            |
| ---------------------------------------------------------------------------------------------------------------------------------------------- | ------------------------------------------------------------------------------------------------------------------------------------------------------------------------------------------------------------------------------------------ | ------------------------------------------------------------------------------------------------------------------------------------------------------------------------------------------------------------------------------------------------------------------------------------------------------------------ |
| {{InvNumber}}                                                                                                                                  | The system-generated invoice number.                                                                                                                                                                                                       | INV-5501                                                                                                                                                                                                                                                                                                           |
| {{InvCurrencySym}}                                                                                                                             | Invoice currency symbol                                                                                                                                                                                                                    | $                                                                                                                                                                                                                                                                                                                  |
| {{InvIssueDate}}                                                                                                                               | The date the invoice was generated.                                                                                                                                                                                                        | 01/11/2023                                                                                                                                                                                                                                                                                                         |
| {{InvDueDate}}                                                                                                                                 | The payment deadline based on terms.                                                                                                                                                                                                       | 15/11/2023                                                                                                                                                                                                                                                                                                         |
| {{InvReference}}                                                                                                                               | Reference from invoice                                                                                                                                                                                                                     | "Any written words"                                                                                                                                                                                                                                                                                                |
| {{InvPeriod}}                                                                                                                                  | Formatted invoice period                                                                                                                                                                                                                   |                                                                                                                                                                                                                                                                                                                    |
| {{InvSubtotal}}                                                                                                                                | Formatted subtotal of invoice                                                                                                                                                                                                              |                                                                                                                                                                                                                                                                                                                    |
| {{InvTaxTotal}}                                                                                                                                | Total GST/Tax amount.                                                                                                                                                                                                                      | $200.00                                                                                                                                                                                                                                                                                                            |
| {{InvTotal}}                                                                                                                                   | Formatted total of invoice                                                                                                                                                                                                                 |                                                                                                                                                                                                                                                                                                                    |
| {{InvTotalPaid}}                                                                                                                               | Formatted total paid for invoice                                                                                                                                                                                                           |                                                                                                                                                                                                                                                                                                                    |
| {{InvAmountDue}}                                                                                                                               | Formatted amount due for invoice                                                                                                                                                                                                           |                                                                                                                                                                                                                                                                                                                    |
| {{InvFooterNote}}                                                                                                                              | (Currently unavailable)                                                                                                                                                                                                                    |                                                                                                                                                                                                                                                                                                                    |
| {{InvBillingContactName}}                                                                                                                      | Name of invoice billing contact                                                                                                                                                                                                            |                                                                                                                                                                                                                                                                                                                    |
| {{InvBillingContactAddress}}                                                                                                                   | Formatted full address of invoice billing contact                                                                                                                                                                                          |                                                                                                                                                                                                                                                                                                                    |
| {{InvBillingContactAddressLine1}}                                                                                                              | Address line 2 of invoice billing contact                                                                                                                                                                                                  |                                                                                                                                                                                                                                                                                                                    |
| {{InvBillingContactAddressLine2}}                                                                                                              | Address line 1 of invoice billing contact                                                                                                                                                                                                  |                                                                                                                                                                                                                                                                                                                    |
| {{InvBillingContactEmail}}                                                                                                                     | Email of invoice billing contact                                                                                                                                                                                                           |                                                                                                                                                                                                                                                                                                                    |
| {{InvBillingContactMobile}}                                                                                                                    | Formatted mobile of invoice billing contact                                                                                                                                                                                                |                                                                                                                                                                                                                                                                                                                    |
| {{InvBillingContactABN}}                                                                                                                       | ABN of invoice billing contact                                                                                                                                                                                                             |                                                                                                                                                                                                                                                                                                                    |
| {{InvoiceNotes}}                                                                                                                               | Notes from invoice                                                                                                                                                                                                                         |                                                                                                                                                                                                                                                                                                                    |
| <p>{{#InvoiceRows}}<br><br>{{$InvRowDescription}} {{$InvRowRate}} {{$InvRowQty}} {{$InvRowPrice}} {{$InvRowTax}} {{$InvRowTotal}}<br>{{/}}</p> | Special tag to open list of invoice row information. After the tag is used you can access nested tags of the invoice row data, then use `{{/}}` to exit the list context and return to primary tags. [View nested tags](#invoice-row-tags) | Refer to Quote and                                                                                                                                                                                                                                                                                                 |
| {{PaidStamp}}                                                                                                                                  | If an invoice is fully paid, this will display a large "PAID" text. This field is used to help ensure customer who recevie a paid tax invoice do not mistake it for another invoice.                                                       | "PAID"                                                                                                                                                                                                                                                                                                             |
| {{RecipSign}}                                                                                                                                  | Place a signature field for the recipient of this document to sign.                                                                                                                                                                        | <p><img src="https://50563950-files.gitbook.io/~/files/v0/b/gitbook-x-prod.appspot.com/o/spaces%2F-Lzplo2osBdXGzFtPu2f%2Fuploads%2FLc85P12k9fEYABUHTXH6%2FScreenshot%202026-08-05%20at%2011.20.45%E2%80%AFam.png?alt=media&amp;token=4f3bc8e7-2cbb-4f9e-9f50-accd118af5cf" alt="" data-size="original"></p><p></p> |
| {{RecipSignDateTime}}                                                                                                                          | This tag will insert the date and time a recipient's signature was placed on the document.                                                                                                                                                 | 21/06/2027, 15:02 AWST                                                                                                                                                                                                                                                                                             |
| {{RecipSignName}}                                                                                                                              | Insert the full name of the signing recipient of this document.                                                                                                                                                                            | Ryan Recipient                                                                                                                                                                                                                                                                                                     |
| {{SenderSign}}                                                                                                                                 | Place a signature field for the sender of this document to sign.                                                                                                                                                                           | <p><img src="https://50563950-files.gitbook.io/~/files/v0/b/gitbook-x-prod.appspot.com/o/spaces%2F-Lzplo2osBdXGzFtPu2f%2Fuploads%2FdFCMhTQ7un6Xv0hMFflk%2FScreenshot%202026-08-05%20at%2011.20.45%E2%80%AFam.png?alt=media&amp;token=0f4df406-873c-49a5-a8a6-4fda45c378ec" alt="" data-size="original"></p><p></p> |
| {{SenderSignDateTime}}                                                                                                                         | This tag will insert the date and time a sender's signature was placed on the document.                                                                                                                                                    | 21/06/2027, 15:02 AWST                                                                                                                                                                                                                                                                                             |
| {{SenderSignName}}                                                                                                                             | Insert the full name of the signing sender of this document.                                                                                                                                                                               | Steve Sender                                                                                                                                                                                                                                                                                                       |
| {{QuValidity}}                                                                                                                                 | <p>The duration of time this quote is valid for from creation.<br><br>Also referred to as 'Agreement Expiry' when terms are attached to a quote.</p>                                                                                       | <p>"12 months"<br>"23 months"<br>"Ongoing / No expiration"<br>"Custom date"</p>                                                                                                                                                                                                                                    |

## Quotes & Invoices Table Rows

Must be placed inside the `{{#InvoiceRows}} ... {{/}}` block to list line items.

| Tag                    | Description                                                                                                                                                                                                     | Example                                                                                                |
| ---------------------- | --------------------------------------------------------------------------------------------------------------------------------------------------------------------------------------------------------------- | ------------------------------------------------------------------------------------------------------ |
| {{$InvRowItem}}        | An item description text used by a integrated accounting system.                                                                                                                                                | Golf balls                                                                                             |
| {{$InvRowDescription}} | Narrative for the specific line item. These can be customised in [Settings > Billing > Customise Invoice > Invoice Row Descriptions](https://app.stayonhire.com/org/billing/customise-invoice)                  | <p>Hire for {{Asset}}<br>Rate: {{Rate}}<br>Billable usage: {{Usage}}<br>Dates: {{BilledDateRange}}</p> |
| {{$InvRowRate}}        | The specific hire rate for this row's rate.                                                                                                                                                                     | $1,000.00 / Day                                                                                        |
| {{$InvRowQty}}         | Quantity or duration (e.g., days/units).                                                                                                                                                                        | 1.00                                                                                                   |
| {{$InvRowPrice}}       | <p>The line amount before tax, i.e. this row's rate multiplied by its quantity. <br><br>Belongs in the "Price" column, between {{$InvRowQty}} and {{$InvRowTax}}.</p>                                           | 1000.00                                                                                                |
| {{$InvRowTax}}         | <p>The tax amount applied to this line. Belongs in the "Tax" column, between {{$InvRowPrice}} and {{$InvRowTotal}}. <br><br>Row tax amounts add up to {{InvTaxTotal}} in the summary block below the table.</p> | 100.0                                                                                                  |
| {{$InvRowTotal}}       | <p>The line total including tax. Belongs in the final column of the row. <br><br>Row totals add up to {{InvTotal}} in the summary block below the table.</p>                                                    | 1100.00                                                                                                |

## Util Tags

System-level tags for document timestamps.

| Tag             | Description                                                                                                                                                                                                       | Example     |
| --------------- | ----------------------------------------------------------------------------------------------------------------------------------------------------------------------------------------------------------------- | ----------- |
| {{TodaysDate}}  | The current date the document is generated.                                                                                                                                                                       | 30/12/2023  |
| {{DateCreated}} | The date the record was first created by the system.                                                                                                                                                              | 10/12/2023  |
| {{TimeCreated}} | The precise system time of document generation.                                                                                                                                                                   | 14:45:02    |
| {{DocumentID}}  | <p>The primary unique identifying tag associated with any document generated in your StayOnHire account. <br><br>This helps customers refer to "document 123" and you find the same document in your acocunt.</p> | DOC-000001  |
| {{SvcID}}       |                                                                                                                                                                                                                   | SER-000001  |
| {{InspID}}      |                                                                                                                                                                                                                   | INSP-000001 |
| {{TranspID}}    |                                                                                                                                                                                                                   | TR-000001   |


# Troubleshooting

The section is a trove of useful information to help you get the most out of your StayOnHire templates.

## FAQs

### Why does my template not work when I copy and paste the exact reference tag?

#### Solution 1 - Check Curly Brackets

Check that all of your endpoints contain clear two curly brackets before and after each endpoint is added.

i.e. {{JobNumber}}

#### Solution 2 - Remove Mergefield Code

Microsoft Word templates are managed with Field Code view. To see if your fields have been correctly inserted, switch to Field code view:

* If you’re using Windows, press Alt + F9 on your keyboard.
* If you’re using a Mac, go to Preferences and click on Authoring and Proofing Tools. Then select View and Field codes instead of values.

<figure><img src="https://50563950-files.gitbook.io/~/files/v0/b/gitbook-x-prod.appspot.com/o/spaces%2F-Lzplo2osBdXGzFtPu2f%2Fuploads%2FT4EfYc0W198RXN9H3Mn5%2FScreen_Shot_2022-02-21_at_12.07.24_pm.png?alt=media&amp;token=3124477f-f706-42e3-b50c-5d9a1ec47288" alt=""><figcaption></figcaption></figure>

You’ll now be able to see the field codes. This can be leftover logic from other templates and source documentation (like using Xero templates).

Remove any Mergefield code present, then Save and try uploading the template to StayOnHire again.


# Xero

Learn about a Xero accounting integration with your StayOnHire account. This section is ideal for people who manage financial elements of a business such as invoicing and payments.

## Overview

For the best experience, we recommend having your integration set as pictured below:

<figure><img src="https://50563950-files.gitbook.io/~/files/v0/b/gitbook-x-prod.appspot.com/o/spaces%2F-Lzplo2osBdXGzFtPu2f%2Fuploads%2FHAf6Lr8CTJ5TrSweEJBq%2FScreenshot%202024-05-07%20at%204.19.02%E2%80%AFPM.png?alt=media&amp;token=99126e40-2a47-429e-b5f8-5f8afc2190e2" alt=""><figcaption><p>This integration page will be visible in the settings of your StayOnHire application</p></figcaption></figure>

## How it works

* Build and execute jobs/hires in StayOnHire
* Auto-draft invoices with equipment & billable items in StayOnHire
* Review and approve draft invoices in StayOnHire
* Approved invoices sync to Xero

## Sync Behaviour

Once connected to your StayOnHire account, this integration helps bridge the gap between the calendar scheduling and billing sides of your business together. This is achieved by:

1. Syncing time-sensitive data instantly (i.e. invoices, payments)
2. Syncing non-time-sensitive data every hour (i.e. new tax rates, accounts)
3. Giving you the ability to manually trigger a sync of non-essential data to update

### Background Sync

StayOnHire will sync general data every 60 minutes automatically, and when performing key actions, such as approving approving an invoice or creating a new contact.

A typical integration will sync automatically under the following conditions:

<figure><img src="https://50563950-files.gitbook.io/~/files/v0/b/gitbook-x-prod.appspot.com/o/spaces%2F-Lzplo2osBdXGzFtPu2f%2Fuploads%2FFqNvbWZ6DFNKCZYhSrOd%2FScreenshot%202024-05-08%20at%203.21.47%E2%80%AFPM.png?alt=media&amp;token=02908d6e-8dac-495f-8409-1290a68f81f3" alt=""><figcaption></figcaption></figure>

{% hint style="info" %}
Xero is not responsible for triggering these background syncs, this is handled automatically by StayOnHire out of the box.
{% endhint %}

### Manual Sync Triggers

A typical integration displays manual sync details as follows:

<figure><img src="https://50563950-files.gitbook.io/~/files/v0/b/gitbook-x-prod.appspot.com/o/spaces%2F-Lzplo2osBdXGzFtPu2f%2Fuploads%2Fj6d3dNAULOzsBR0PUE77%2FScreenshot%202024-05-08%20at%203.21.53%E2%80%AFPM.png?alt=media&amp;token=373660ac-ea7a-48d4-a30c-71a000bc74d8" alt=""><figcaption></figcaption></figure>

If ever you need data to be manually triggered, these can be done from StayOnHire using sync buttons around the StayOnHire user interface.

<figure><img src="https://50563950-files.gitbook.io/~/files/v0/b/gitbook-x-prod.appspot.com/o/spaces%2F-Lzplo2osBdXGzFtPu2f%2Fuploads%2FV619wxyFwXeAFCmLOAYL%2FScreenshot%202024-05-08%20at%203.34.01%E2%80%AFPM.png?alt=media&amp;token=b82db7f5-1ec6-4f78-bbe6-3f44122c50c4" alt=""><figcaption><p>A sync button visible on the contacts page with Xero integration</p></figcaption></figure>


# Getting Started

A step-by-step guide on how to setup your Xero integration with StayOnHire. The section is ideal for those setting up their Xero integration for the first time.

## 1. Open your App <a href="#login" id="login"></a>

### Login <a href="#login" id="login"></a>

Go to [app.stayonhire.com](https://app.stayonhire.com/)

This will redirect you to a login portal[ auth.stayonhire.com/u/login](https://auth.stayonhire.com/u/login) if you are not currently logged in.

Enter your login credentials:

<figure><img src="https://50563950-files.gitbook.io/~/files/v0/b/gitbook-x-prod.appspot.com/o/spaces%2F-Lzplo2osBdXGzFtPu2f%2Fuploads%2FBCLbfqX8P68X1J8u2Gid%2FScreenshot%202024-05-03%20at%201.50.20%E2%80%AFPM.png?alt=media&amp;token=2b693914-dd91-4249-b5a1-979903dfeffe" alt=""><figcaption><p>StayOnHire login screen</p></figcaption></figure>

### Settings&#x20;

From the bottom left-hand side of your page, click your organisation logo/business image, then click the round settings ‘cog’ icon to navigate to [Settings > Business](https://app.stayonhire.com/org/business):

<figure><img src="https://50563950-files.gitbook.io/~/files/v0/b/gitbook-x-prod.appspot.com/o/spaces%2F-Lzplo2osBdXGzFtPu2f%2Fuploads%2FaXRWGjfwAYApqgU1KNJG%2FScreenshot%202024-05-03%20at%2012.54.38%E2%80%AFPM%20(2).png?alt=media&amp;token=fdedd344-f063-41c8-bf17-e77fbd118be7" alt=""><figcaption></figcaption></figure>

### Integrations&#x20;

Go to [Settings > Integrations](https://app.stayonhire.com/org/integrations)

Select the menu option in the bottom left titled "Integrations":

<figure><img src="https://50563950-files.gitbook.io/~/files/v0/b/gitbook-x-prod.appspot.com/o/spaces%2F-Lzplo2osBdXGzFtPu2f%2Fuploads%2FtvuiEsMw6TYeYowSB7GO%2FScreenshot%202024-05-03%20at%201.01.31%E2%80%AFPM.png?alt=media&amp;token=f83134fb-d8dd-46ee-b49b-db3fac8d1314" alt=""><figcaption></figcaption></figure>

## 2. Connect Xero

### Find Xero&#x20;

Find the Xero integration card, and click “Connect”.

This will reveal a bottom sheet with integration-specific details:

<figure><img src="https://lh7-us.googleusercontent.com/qAYv2QqqmyYDlez715PYgZOo75b2wSxApAmpEOFsimRdH4q6joNngWlTYAdN_ssD-KWIYWp78LsYcYP71Yn5TjYsOLzT81CfaxAnuAju_iYGvlVQObSPw13diNGxdWOfF0KFtno8frdcvVAV0D7gocQ" alt=""><figcaption></figcaption></figure>

### Connect

Click the blue “Connect now” button to begin the connection process:

<figure><img src="https://lh7-us.googleusercontent.com/68uq4mFa2AlQuxuzl6KuE-8Yn_LRm61An5WYXVEWROyiJVrz2Zh1ro87JBCONvdRnJXV7j4ifwD4C1adryi-oUOb3kaC-kDoiLZ302PZ6UGVD3CaxeuZuqRItNqf2KL6UqdXXMmDQMWuFU1vBp4VOnU" alt=""><figcaption></figcaption></figure>

This will redirect you to login with your associated Xero login credentials. Enter your Xero login details:

<figure><img src="https://lh7-us.googleusercontent.com/-MMWdg0WvzNxgdO8IhJyKEDYAeN-77WLH8d20uAONml7uq0rKTUFD6dQ4wmaZi4xvSjL6igxyIyGdTp7dz5HMQn3599UWojpsh4yG959Vg8c3YZt_tkHPlTmDDK0nZHxjJc7djV8BvPdEgsu3ZLFou0" alt=""><figcaption></figcaption></figure>

Select a Xero organisation you wish to connect to your StayOnHire account and click “Allow Access”. This will take you to your Xero setup page:

<figure><img src="https://lh7-us.googleusercontent.com/aKmNMR9MLeWnqh1fX64GSeElbOy40b6mb3PnE3nFKSpvOy5jQG1TA7jN7ily6Qh7Y7VaeOsPVi2ydQ6L85V-mpcBIh0AbE9vEjumS61UQmLdEbl8uYhmXLyse4_vSMfCSvyJQs_v42M9Ox07RyCEnVQ" alt=""><figcaption></figcaption></figure>

{% hint style="success" %}
Only one Xero organisation can be connected to a StayOnHire account at a time. To disconnect a Xero integration, refer to the [Xero Disconnect / Re-Connect](/integrations/xero/disconnect-reconnect) guide.
{% endhint %}

### Configure

You will be redirected back to StayOnHire to begin the configuration of your Xero integration.

Review the summary page and click the blue “Next” button:

<figure><img src="https://lh7-us.googleusercontent.com/VV7wJI8oTz_Mcfrp6a6aCClxIdPTewuhJfwsiWNU4HOsTrRXdCEkR_lTH4597Vgt6t5cSwh7gD9Q0JFEg9Rp3SdQzyO3sZ10pIArGhgr-sSIO4LKjUxZumUEhHbPIKic2WfbLja5KKh1_yB1JwKSsas" alt=""><figcaption></figcaption></figure>

Confirm the Xero Organisation you wish to configure and click “Save & Next”:

{% hint style="success" %}
Only one StayOnHire organisation can be connected to your Xero integration at a time.&#x20;
{% endhint %}

<figure><img src="https://lh7-us.googleusercontent.com/aw8RuiaFbtm6fb0BcsNmWw-bzeqTw_wZy7BwHwEYVATrPSqvVDqfZlZZRQOytYpbwm5BqJ9LogerH7XnXiBqO4-U8fF6N5XqIL293Uyeix7QM9FydfBaWG1q7tWNSgM_KSod4lHy24p0x0FfRfUaylg" alt=""><figcaption></figcaption></figure>

Review which Xero resources you want to be integrated with your account.&#x20;

By default contacts, tax rates and accounts will be toggled on:

<figure><img src="https://lh7-us.googleusercontent.com/9mr0-gOO01L_6AU-5Zll1pQzQ8H_VocZWy7b_35LmcbCwhP7PgQS_cWJHqnTSqLmOjoTjt3R_yfaxUuq-x87XQ_1BldHssr6lj5QtWSYNiFMDt7zPYSdy7l47ikUE4OTQVidx7haHIYoX_oQxTyHDhs" alt=""><figcaption></figcaption></figure>

We recommend syncing invoices and payments.&#x20;

To turn these on, double-click the blue toggle next to each Xero resource and switch the sync direction to “StayOnHire sends & receives”.

Click “Save & Next”.

<figure><img src="https://lh7-us.googleusercontent.com/rxyo1HQB1EneToIpgPtyiAd77SSoKbICq3HAzXeVyBwQKHM5s05KBwwA-0-O_MiDh6cq1deQB_M3lrYMPB5g6cR1d-tBzCtVccPR0d64_o97O2NbxPOQGU5ePb74wTAXti30mkYy-Idv16rw157AuAo" alt=""><figcaption></figcaption></figure>

Review sync triggers and click “Finish”:

<figure><img src="https://lh7-us.googleusercontent.com/YlReyd5RWDxxvxifA4YsDbZNdIDP-6xH3jRphbWh6Aq3z9rf2FMw0lsImckFva4QGDVwdzmqpnvBugZa-8p1RTiCb-DupuwnXceFSMgRHDTtAZKp7Vj3wQh79nmzznzh3DOKOdfYuHCJrXpKwtIQG7c" alt=""><figcaption></figcaption></figure>

This will navigate you to your Xero settings page, where you can make changes at a later date if required:

<figure><img src="https://lh7-us.googleusercontent.com/oldmtm3-5-Zd5cf3rRHth-qk78GxZBeb-cvU9OImYSQXCrMR2H54rd97fNGvVAqljVKX96oj5w-YXu8qCKMyRg8giNAgBLfKx9Ep7gS6AlSlgP_0IR5AV6T157KeDcZ0LdyILvKyouE_psO6T0TlhL8" alt=""><figcaption></figcaption></figure>

Congratulations, your Xero integration has now been connected!

To access this page again, simply navigate to Settings > Integrations > Xero

<figure><img src="https://lh7-us.googleusercontent.com/7HtShiQPn_PPUGC1sOqIuizhquF6leWCltdmK1EScL2XmLy6l-aBKhoxG-wD9oahzxavMj5UPPit8G7AX1ewBMnoFvoLhQPwzFsByhx5_AGxqCGZtpqMxOvnkQWvFXZRzs5rW2dVS5kdXkszeHOT-Og" alt=""><figcaption></figcaption></figure>

## 3. Testing your Connection

### Data Imports

A simple and effective starting point to see if your integration is working correctly is to navigate to the 'Accounting' page of your StayOnHire settings. This will show us Xero data importing to your account:

&#x20;[app.stayonhire.com/org/accounting](https://app.stayonhire.com/org/accounting)

<figure><img src="https://50563950-files.gitbook.io/~/files/v0/b/gitbook-x-prod.appspot.com/o/spaces%2F-Lzplo2osBdXGzFtPu2f%2Fuploads%2FyQSFec2pUYH3oprjfMEb%2FScreenshot%202024-05-03%20at%202.51.23%E2%80%AFPM.png?alt=media&amp;token=3c94f9c3-bc79-456e-8536-909c9904a1bd" alt=""><figcaption></figcaption></figure>

Click the 'Manage Tax Rates' option:

<figure><img src="https://50563950-files.gitbook.io/~/files/v0/b/gitbook-x-prod.appspot.com/o/spaces%2F-Lzplo2osBdXGzFtPu2f%2Fuploads%2FGkXub3vUooIysQxEdPNH%2FScreenshot%202024-05-07%20at%203.10.18%E2%80%AFPM.png?alt=media&amp;token=8f8613ab-2317-44e2-a8e3-05476daaa7ab" alt=""><figcaption></figcaption></figure>

This will open a page showing tax rates now imported to StayOnHire.&#x20;

*Note:* Tax Rates are only imported from Xero, and cannot be edited. For a detailed breakdown of how this works, view the [Tax Rates](/integrations/xero/tax-rates) support page.

<figure><img src="https://50563950-files.gitbook.io/~/files/v0/b/gitbook-x-prod.appspot.com/o/spaces%2F-Lzplo2osBdXGzFtPu2f%2Fuploads%2FTE9sVxZQ8wiewzEE6dCu%2FScreenshot%202024-05-07%20at%203.16.04%E2%80%AFPM.png?alt=media&amp;token=1022c920-2ea3-4eda-adbe-ed67a31979bf" alt=""><figcaption></figcaption></figure>

The same process can be followed to view your 'Chart of Accounts' importing to StayOnHire:

*Note:* Accounts are only imported from Xero, and cannot be edited. For a detailed breakdown of how this works, view the [Accounts](/integrations/xero/accounts) support page.

<figure><img src="https://50563950-files.gitbook.io/~/files/v0/b/gitbook-x-prod.appspot.com/o/spaces%2F-Lzplo2osBdXGzFtPu2f%2Fuploads%2FkQ27ZYndbIsY9HPzbnaG%2FScreenshot%202024-05-07%20at%203.21.54%E2%80%AFPM.png?alt=media&amp;token=2a3fb5ae-2961-4f2d-a338-ae2c995e1fc4" alt=""><figcaption></figcaption></figure>

Lastly, this can be viewed on our Contacts page:

[app.stayonhire.com/contacts/all](https://app.stayonhire.com/contacts/all)

*Note:* Contacts can be managed in both Xero and StayOnHire depending on your configuration. For a detailed breakdown of how this works, view the [Contacts](/integrations/xero/contacts) support page.

<figure><img src="https://50563950-files.gitbook.io/~/files/v0/b/gitbook-x-prod.appspot.com/o/spaces%2F-Lzplo2osBdXGzFtPu2f%2Fuploads%2FtZgay34siSYXHiGxmyOn%2FScreenshot%202024-05-07%20at%203.24.47%E2%80%AFPM.png?alt=media&amp;token=0323eae7-5239-4957-a636-70b771bd69fb" alt=""><figcaption></figcaption></figure>

## 4. Confirm Billing Settings

This is now the optimal time to review your billing setup in StayOnHire.&#x20;

### Default Revenue Account

Most businesses have a default revenue account in Xero, likely '200 Sales':

| Code | Name  | Type    | Tax Rate            | Description                              |
| ---- | ----- | ------- | ------------------- | ---------------------------------------- |
| 200  | Sales | Revenue | GST on Income (10%) | Income from any normal business activity |

Depending on the complexity of your business, you may still be using this account of have a new one. Now is the time to set the default in StayOnHire:

Head to [Settings > Advanced > Accounting](https://app.stayonhire.com/org/accounting) to see an option called 'Default revenue account':

<figure><img src="https://50563950-files.gitbook.io/~/files/v0/b/gitbook-x-prod.appspot.com/o/spaces%2F-Lzplo2osBdXGzFtPu2f%2Fuploads%2F913iTS5LFtvTr51CPjxW%2FScreenshot%202024-05-07%20at%203.48.23%E2%80%AFPM.png?alt=media&amp;token=1a65045c-6d58-4fa6-930a-6667a687fa28" alt=""><figcaption></figcaption></figure>

Clicking this field will allow us to search all current accounts in StayOnHire and select a default:

<figure><img src="https://50563950-files.gitbook.io/~/files/v0/b/gitbook-x-prod.appspot.com/o/spaces%2F-Lzplo2osBdXGzFtPu2f%2Fuploads%2F0k1HyiZjUNoqstiv1E98%2FScreenshot%202024-05-07%20at%203.48.50%E2%80%AFPM.png?alt=media&amp;token=1bffbcbc-1d6c-4c51-b55d-11fc54c5bbde" alt=""><figcaption></figcaption></figure>

### Invoice Configuration

For new users, we recommend reviewing your invoicing setup detailed in the [StayOnHire Invoices](/billing/invoicing), before proceeding to read details of how [Xero Invoicing](/integrations/xero/invoices#overview) works.


# Contacts

This page focusses on the functionality and behaviour of contact data syncing between StayOnHire and Xero once connected. Ideal for both new and experienced users.

## Overview

For the best experience, we recommend having your Xero integration set as below for your contacts sync behaviour and direction:

* Xero Resource: Contacts "Toggled on"
* Sync Direction: "StayOnHire sends & receives"
* StayOnHire Edibility: "Can be edited"

<figure><img src="https://50563950-files.gitbook.io/~/files/v0/b/gitbook-x-prod.appspot.com/o/spaces%2F-Lzplo2osBdXGzFtPu2f%2Fuploads%2FfcE5UuWXqcuzPaipANoG%2FScreenshot%202024-05-07%20at%204.19.02%E2%80%AFPM%206.png?alt=media&amp;token=8866e870-24ce-4c69-8fe0-4fbadc9f24cf" alt=""><figcaption><p>This configuration page is accessible in the settings of your StayOnHire account</p></figcaption></figure>

{% hint style="info" %}
Syncing invoices from StayOnHire to Xero requires contact data be received from your Xero organisation. Without contacts, it would not be possible for Xero to receive a complete, approved invoice from StayOnHire.
{% endhint %}

## Configuration & Setup

To ensure your integration is setup correctly, complete the following checklist:

1. Complete the Xero [Getting Started](/integrations/xero/getting-started) guide

## How it Works

A simple overview of how this will look in your business:

1. Xero and StayOnHire sync contacts based on your [Configuration & Setup](#configuration-and-setup)
2. Xero Contacts sync to also be your Billing Contact in StayOnhire
3. StayOnHire invoices are mapped to Xero automatically with relevant contact details for your billing team

## Merging Duplicate Contacts

### Causes

There are some scenarios where you may experience a duplicate or similar contact. The most common causes of these are:

* Your team may have created a new contact for one that already exists.\
  *i.e. Consider a quick spelling mistakes made in haste when building a job in StayOnHire*<br>
* You integrate Xero after your business has already been using StayOnHire for a while. \
  *i.e. You've been manually creating contacts in StayOnHire (that you always new also existed in your Xero account)*

### Solution

{% hint style="info" %}
The following solution will resolve duplicate contacts if both scenarios:

* Duplicate in StayOnHire and both are synced to Xero&#x20;
* Duplicate in StayOnHire but only one is synced to Xero
  {% endhint %}

#### 1. Select duplicate contact rows

Head to your [Contact](https://app.stayonhire.com/contacts/all) page and select two rows that are duplicates:

<figure><img src="https://50563950-files.gitbook.io/~/files/v0/b/gitbook-x-prod.appspot.com/o/spaces%2F-Lzplo2osBdXGzFtPu2f%2Fuploads%2FzsNgyQoq1FpgeAPoYN1X%2FScreenshot%202024-05-09%20at%2010.00.03%E2%80%AFAM.png?alt=media&amp;token=5ad68d1c-a40d-45fd-ba1c-5b1cc840e35a" alt=""><figcaption></figcaption></figure>

#### 2. Merge selected

{% hint style="info" %}
Only one contact will be kept after merging. It may be useful to transfer key information (such as email, phone etc.) to the contact you wish to keep before completing this step.
{% endhint %}

Click the action button dropdown and select the option 'Merge (2) selected'

<figure><img src="https://50563950-files.gitbook.io/~/files/v0/b/gitbook-x-prod.appspot.com/o/spaces%2F-Lzplo2osBdXGzFtPu2f%2Fuploads%2FvipuqVwu1HAZKyVgRutV%2FScreenshot%202024-05-09%20at%2010.01.17%E2%80%AFAM.png?alt=media&amp;token=a32efa1e-f63b-45d5-a3f9-f3cab13f0990" alt=""><figcaption></figcaption></figure>

You may receive a prompt telling you both exist as separate contacts in your Xero integration:

<figure><img src="https://50563950-files.gitbook.io/~/files/v0/b/gitbook-x-prod.appspot.com/o/spaces%2F-Lzplo2osBdXGzFtPu2f%2Fuploads%2FqyP8FlnZSpkKOGrv0reb%2FScreenshot%202024-05-09%20at%2010.01.36%E2%80%AFAM.png?alt=media&amp;token=a733aa12-7d3b-4dc9-92d0-132c1a9120b4" alt=""><figcaption></figcaption></figure>

Select which contact will become your new primary contact. You will then be presented with a preview of which primary contact details will be kept after the merge:

<figure><img src="https://50563950-files.gitbook.io/~/files/v0/b/gitbook-x-prod.appspot.com/o/spaces%2F-Lzplo2osBdXGzFtPu2f%2Fuploads%2FRxE4bc9gtmavfgwlJm0R%2FScreenshot%202024-05-09%20at%2010.01.57%E2%80%AFAM.png?alt=media&amp;token=976f9cd7-cd2f-48a2-b5df-003d64ec944b" alt=""><figcaption></figcaption></figure>

You will then receive one final confirmation:

<figure><img src="https://50563950-files.gitbook.io/~/files/v0/b/gitbook-x-prod.appspot.com/o/spaces%2F-Lzplo2osBdXGzFtPu2f%2Fuploads%2FrfYTeLXMWiVWBkb9IH1c%2FScreenshot%202024-05-09%20at%2010.02.18%E2%80%AFAM.png?alt=media&amp;token=0bbc318e-6bad-4188-abfe-a1d1fd9abeb8" alt=""><figcaption></figcaption></figure>

Once merged, your unwanted contact will now be merged. This will also be reflected in your Xero integration once the page is refreshed:

<figure><img src="https://50563950-files.gitbook.io/~/files/v0/b/gitbook-x-prod.appspot.com/o/spaces%2F-Lzplo2osBdXGzFtPu2f%2Fuploads%2FsJ1b4CFtPnLUOFlEb0Xj%2FScreenshot%202024-05-09%20at%2010.03.25%E2%80%AFAM.png?alt=media&amp;token=c1546097-4fbb-4d30-ab63-33233c5c5f89" alt=""><figcaption></figcaption></figure>

## Testing your integration

### Confirm StayOnHire Receives

#### 1. Confirm import settings

Check your [integration sync direction](https://app.stayonhire.com/pages/xero-wizard/sync-behaviour) is set to 'StayOnHire **receives**' or StayOnHire sends & **receives**' at a minimum:

<figure><img src="https://50563950-files.gitbook.io/~/files/v0/b/gitbook-x-prod.appspot.com/o/spaces%2F-Lzplo2osBdXGzFtPu2f%2Fuploads%2FtJFuMsGtliHzCiiFjCC2%2FScreenshot%202024-05-09%20at%2010.24.20%E2%80%AFAM.png?alt=media&amp;token=3b6552b2-5f16-4e06-b6d2-0154a2796ecd" alt=""><figcaption></figcaption></figure>

#### 2. Create a new contact in Xero

Navigate to your Xero Contacts page and create a new contact. In the below example, a contact named "AAA Created in Xero" exists in Xero, but has not been received by StayOnHire:

<figure><img src="https://50563950-files.gitbook.io/~/files/v0/b/gitbook-x-prod.appspot.com/o/spaces%2F-Lzplo2osBdXGzFtPu2f%2Fuploads%2FkTLumMtLHj4Ab4th9NPw%2FScreenshot%202024-05-09%20at%2010.34.11%E2%80%AFAM%202.png?alt=media&amp;token=9603d0cb-a55b-47d9-b874-25865ed31de6" alt=""><figcaption></figcaption></figure>

#### 2. Confirm Sync to your Contact page

{% hint style="info" %}
Contacts may be automatically synced from Xero to StayOnHire on the hour (i.e. 1PM. 2PM etc.)&#x20;
{% endhint %}

Once created, go into your StayOnHire [Contacts](https://app.stayonhire.com/contacts/all) page and click the 'sync icon':

<figure><img src="https://50563950-files.gitbook.io/~/files/v0/b/gitbook-x-prod.appspot.com/o/spaces%2F-Lzplo2osBdXGzFtPu2f%2Fuploads%2Fh6kJ78ZQ3IWpOKCCojmF%2FScreenshot%202024-05-09%20at%2010.34.11%E2%80%AFAM.png?alt=media&amp;token=82722e8a-d35f-43e9-96a5-4e1fa61e9244" alt=""><figcaption></figcaption></figure>

If successful, the newly created contact will appear in your StayOnHire account:

<figure><img src="https://50563950-files.gitbook.io/~/files/v0/b/gitbook-x-prod.appspot.com/o/spaces%2F-Lzplo2osBdXGzFtPu2f%2Fuploads%2F6CLPEi00uJBQUbZZfvwD%2FScreenshot%202024-05-09%20at%2010.44.21%E2%80%AFAM.png?alt=media&amp;token=0a1cff75-4610-4029-9c4f-5e12ed662a96" alt=""><figcaption></figcaption></figure>

### Confirm StayOnHire Sends

#### 1. Confirm export settings

Check your [integration sync direction](https://app.stayonhire.com/pages/xero-wizard/sync-behaviour) is set to 'StayOnHire **sends**' or StayOnHire **sends** & receives' at a minimum:

<figure><img src="https://50563950-files.gitbook.io/~/files/v0/b/gitbook-x-prod.appspot.com/o/spaces%2F-Lzplo2osBdXGzFtPu2f%2Fuploads%2FPgwP4qVEGxE7GqQyw2Ua%2FScreenshot%202024-05-09%20at%2010.24.20%E2%80%AFAM.png?alt=media&amp;token=af603b39-2e35-405a-9905-a7c6b966661e" alt=""><figcaption></figcaption></figure>

#### 2. Create a new contact

Navigate to your StayOnHire [Contacts](https://app.stayonhire.com/contacts/all) page and create a new contact:

<figure><img src="https://50563950-files.gitbook.io/~/files/v0/b/gitbook-x-prod.appspot.com/o/spaces%2F-Lzplo2osBdXGzFtPu2f%2Fuploads%2FF48E8VhmPGNqNcYbkRGL%2FScreenshot%202024-05-09%20at%2011.01.33%E2%80%AFAM.png?alt=media&amp;token=f394105a-8b7e-45a5-af30-d7bc735c5899" alt=""><figcaption></figcaption></figure>

In the below example, a contact named "AAA Created in StayOnHire" exists in StayOnHire, but has not been received by Xero:

<figure><img src="https://50563950-files.gitbook.io/~/files/v0/b/gitbook-x-prod.appspot.com/o/spaces%2F-Lzplo2osBdXGzFtPu2f%2Fuploads%2F9tzG9Tw5e4k7PPXTbTAW%2FScreenshot%202024-05-09%20at%2011.06.36%E2%80%AFAM.png?alt=media&amp;token=26eae9ad-edc2-4578-b168-cf91a1cb7e5c" alt=""><figcaption></figcaption></figure>

#### 3. Trigger a sync

From the top right-hand side you your StayOnHire Contacts, click the sync button

<figure><img src="https://50563950-files.gitbook.io/~/files/v0/b/gitbook-x-prod.appspot.com/o/spaces%2F-Lzplo2osBdXGzFtPu2f%2Fuploads%2F2nCPj0WJNaJCwuVR1idw%2FScreenshot%202024-05-09%20at%2011.33.04%E2%80%AFAM.png?alt=media&amp;token=638d9e06-8e27-499e-b150-8109c23c8c53" alt=""><figcaption></figcaption></figure>

You will now see the contact 'Xero 'Contact' field change sync status in StayOnHire.

Upon a refresh of your Xero contacts page, your new contact will also appear here.

<figure><img src="https://50563950-files.gitbook.io/~/files/v0/b/gitbook-x-prod.appspot.com/o/spaces%2F-Lzplo2osBdXGzFtPu2f%2Fuploads%2FqIWAwaPNk02hiOr45eqx%2FScreenshot%202024-05-09%20at%2011.36.53%E2%80%AFAM.png?alt=media&amp;token=a4afcde0-372b-478f-9a3d-489880ab3d10" alt=""><figcaption></figcaption></figure>

#### 4. Open in Xero

Clicking the Xero 'Contact' cell in StayOnHire will also reveal a reference.&#x20;

By clicking this reference link, it will open the Xero contact directly in your Xero account:

<figure><img src="https://50563950-files.gitbook.io/~/files/v0/b/gitbook-x-prod.appspot.com/o/spaces%2F-Lzplo2osBdXGzFtPu2f%2Fuploads%2FnYVfxiEutSSH5q5ra6nF%2FScreenshot%202024-05-09%20at%2011.35.36%E2%80%AFAM.png?alt=media&amp;token=f9d42e0d-4f5e-439f-b27f-fdcc475dbf23" alt=""><figcaption></figcaption></figure>

### Troubleshooting

Common issues relating to contacts not syncing may include:

* Contact information may be invalid to sync \
  *i.e. Contact Name is not unique or their primary billing email address is invalid*

<figure><img src="https://50563950-files.gitbook.io/~/files/v0/b/gitbook-x-prod.appspot.com/o/spaces%2F-Lzplo2osBdXGzFtPu2f%2Fuploads%2FIYHGe5M8wb8GmckBFdLs%2FScreenshot%202024-05-09%20at%201.00.22%E2%80%AFPM.png?alt=media&amp;token=286d87cd-ea52-4f26-a232-0c5c101f08d2" alt=""><figcaption><p>Examples of invalid contact data in your StayOnHIre account</p></figcaption></figure>

If you're unable to resolve a sync error, please contact us via or [live chat support](https://drift.me/stayonhire) or through your StayOnHire representative directly.&#x20;


# Accounts

This page focusses on the functionality and behaviour of account data syncing between StayOnHire and Xero once connected. Ideal for both new and experienced users.

## Overview

For the best experience, we recommend having your Xero integration set as below for your account sync behaviour and direction:

* Xero Resource: Accounts "Toggled on"
* Sync Direction: "StayOnHire receives"
* StayOnHire Edibility: "Cannot be edited"

<figure><img src="https://50563950-files.gitbook.io/~/files/v0/b/gitbook-x-prod.appspot.com/o/spaces%2F-Lzplo2osBdXGzFtPu2f%2Fuploads%2FFf5Jpo7nXyZ63icOxjCs%2FScreenshot%202024-05-07%20at%204.19.02%E2%80%AFPM%204.png?alt=media&amp;token=3f331ede-7fca-4d50-b0c7-deda22323f44" alt=""><figcaption><p>This configuration page is accessible in the settings of your StayOnHire account</p></figcaption></figure>

## Configuration & Setup

To ensure your integration is setup correctly, complete the following checklist:

1. Complete the Xero [Getting Started](/integrations/xero/getting-started) guide

## How it Works

A simple overview of how this will look in your business:

1. StayOnHire imports accounts from your Xero account
2. Accounts can be set on newly drafted invoices
3. Invoices sent from StayOnHire will have accounts mapped for Xero to receive

## Testing your integration

### Confirm StayOnHire Receives

As detailed in your [integration setup](https://app.stayonhire.com/pages/xero-wizard/sync-behaviour), accounts are locked to 'StayOnHire receives' and 'Cannot be edited':

<figure><img src="https://50563950-files.gitbook.io/~/files/v0/b/gitbook-x-prod.appspot.com/o/spaces%2F-Lzplo2osBdXGzFtPu2f%2Fuploads%2Fi1xAkjN9vxrjsXBNcsWD%2FScreenshot%202024-05-07%20at%204.19.02%E2%80%AFPM%204.png?alt=media&amp;token=241f132a-194a-4fce-8a1e-daa0ea34a530" alt=""><figcaption></figcaption></figure>

#### Manual sync from the settings page

With this in mind, navigate to [Settings > Accounting](https://app.stayonhire.com/org/accounting) and click the 'Manage Chart of Accounts' option:

<figure><img src="https://50563950-files.gitbook.io/~/files/v0/b/gitbook-x-prod.appspot.com/o/spaces%2F-Lzplo2osBdXGzFtPu2f%2Fuploads%2FA29xsqgBpeRcQ9QfOHNZ%2FScreenshot%202024-05-09%20at%201.20.56%E2%80%AFPM%202.png?alt=media&amp;token=b53e7c02-c847-4a22-8430-a309233546ff" alt=""><figcaption></figcaption></figure>

Accounts imported from Xero should fill this table as pictured below.&#x20;

If you've recently added a new account in Xero and would like to see it in your StayOnHire account, click the sync icon on the top right-hand side of the page:

<figure><img src="https://50563950-files.gitbook.io/~/files/v0/b/gitbook-x-prod.appspot.com/o/spaces%2F-Lzplo2osBdXGzFtPu2f%2Fuploads%2F8EuWHzEFvwhX6siZPBTq%2FScreenshot%202024-05-09%20at%201.22.18%E2%80%AFPM.png?alt=media&amp;token=7ebf0d94-435a-485e-89d8-e7f5b99658bd" alt=""><figcaption></figcaption></figure>

### Confirm StayOnHire Sends

StayOnHire **does not send** accounts to Xero in any circumstance or configuration.

Xero is your source of truth for accounting-related data like accounts.

Our goal is to help your scheduling team execute jobs and have your billing team use this integration to send approved invoices to Xero, to remove the manual data entry and potential for human error.


# Tax Rates

This page focusses on the functionality and behaviour of tax rate data syncing between StayOnHire and Xero once connected. Ideal for both new and experienced users.

## Overview

For the best experience, we recommend having your Xero integration set as below for your tax rate sync behaviour and direction:

* Xero Resource: Tax Rates "Toggled on"
* Sync Direction: "StayOnHire receives"
* StayOnHire Edibility: "Cannot be edited"

<figure><img src="https://50563950-files.gitbook.io/~/files/v0/b/gitbook-x-prod.appspot.com/o/spaces%2F-Lzplo2osBdXGzFtPu2f%2Fuploads%2FaitD1GCcWdPcemisTIAB%2FScreenshot%202024-05-07%20at%204.19.02%E2%80%AFPM%205.png?alt=media&amp;token=ec306803-8ee2-4474-a177-a00263ae17a8" alt=""><figcaption><p>This configuration page is accessible in the settings of your StayOnHire account</p></figcaption></figure>

## Configuration & Setup

To ensure your integration is setup correctly, complete the following checklist:

1. Complete the Xero [Getting Started](/integrations/xero/getting-started) guide

## How it Works

A simple overview of how Xero tax rates will look in your business:

1. StayOnHire imports tax rates from your Xero account
2. Tax Rates can be set on newly drafted invoices
3. Invoices sent from StayOnHire will have tax rates mapped for Xero to receive

## Testing your integration

### Confirm StayOnHire Receives

As detailed in your [integration setup](https://app.stayonhire.com/pages/xero-wizard/sync-behaviour), tax rates are locked to 'StayOnHire receives' and 'Cannot be edited':

<figure><img src="https://50563950-files.gitbook.io/~/files/v0/b/gitbook-x-prod.appspot.com/o/spaces%2F-Lzplo2osBdXGzFtPu2f%2Fuploads%2F6nZVIyOb52g3p3H93Cti%2FScreenshot%202024-05-07%20at%204.19.02%E2%80%AFPM%205.png?alt=media&amp;token=34ee8410-742f-43d8-9aaf-c27760048ce4" alt=""><figcaption></figcaption></figure>

#### Manual sync from the settings page

With this in mind, navigate to [Settings > Accounting](https://app.stayonhire.com/org/accounting) and click the 'Manage Tax Rates' option:

<figure><img src="https://50563950-files.gitbook.io/~/files/v0/b/gitbook-x-prod.appspot.com/o/spaces%2F-Lzplo2osBdXGzFtPu2f%2Fuploads%2Fh3j31LdJoD99sYAlvR1v%2FScreenshot%202024-05-09%20at%201.20.56%E2%80%AFPM.png?alt=media&amp;token=cbbf9a34-dd78-4cf9-bcc7-02b10a72e984" alt=""><figcaption></figcaption></figure>

Tax Rates imported from Xero should fill this table as pictured below.&#x20;

If you've recently added a new tax rate in Xero and would like to see it in your StayOnHire account, click the sync icon in the top right hand side of the page:

<figure><img src="https://50563950-files.gitbook.io/~/files/v0/b/gitbook-x-prod.appspot.com/o/spaces%2F-Lzplo2osBdXGzFtPu2f%2Fuploads%2FAaLjGfw6OWAYQ44zSgc8%2FFrame%20152%20(1).png?alt=media&amp;token=b77e07ae-5405-4b4d-9345-8285ac157f2b" alt=""><figcaption></figcaption></figure>

### Confirm StayOnHire Sends

StayOnHire **does not send** tax rates to Xero in any circumstance or configuration.

Xero is your source of truth for accounting-related data like tax rates.

Our gaol is to help your scheduling team execute jobs, and have your billing team use this integration to send approved invoices to Xero, in order to remove the manual data entry and potential for human-error.


# Invoices

This page focusses on the functionality and behaviour of invoice data syncing between StayOnHire and Xero once connected. Ideal for both new and experienced users.

***

{% hint style="info" %}
This page is specifically for syncing invoices with Xero. For a walkthrough of invoicing functionality and setup in StayOnHire, please visit the [Invoicing](/billing/invoicing) guide.
{% endhint %}

## Overview

For the best experience, we recommend having your Xero integration set as below for your invoice sync behaviour and direction:

* Xero Resource: Invoices "Toggled on"
* Sync Direction: "StayOnHire sends"
* StayOnHire Edibility: "Can be edited"

<figure><img src="https://50563950-files.gitbook.io/~/files/v0/b/gitbook-x-prod.appspot.com/o/spaces%2F-Lzplo2osBdXGzFtPu2f%2Fuploads%2F27L3wc2qK11fz0rep0vf%2FScreenshot%202024-05-07%20at%204.19.02%E2%80%AFPM%207.png?alt=media&amp;token=4a82fca5-fcad-4906-970d-2d614d53091d" alt=""><figcaption><p>This configuration page is accessible in the settings of your StayOnHire account</p></figcaption></figure>

{% hint style="info" %}
Syncing invoices from StayOnHire to Xero requires contact, tax rate and account data be received from your Xero organisation. Without these, it would not be possible for Xero to receive a complete, approved invoice from StayOnHire after being approved.
{% endhint %}

## Configuration & Setup

To ensure your integration is setup correctly, complete the following checklist:

1. Complete the Xero [Getting Started](/integrations/xero/getting-started) guide
2. Complete the StayOnHire [Getting Started](/billing/invoicing/getting-started/configure-and-setup) invoicing guide&#x20;

## How it Works

A simple overview of how this will look in your business:

1. Build and execute jobs/hires in StayOnHire
2. Auto-draft invoices with equipment & billable items in StayOnHire
3. Review and approve draft invoices in StayOnHire
4. Approved invoices sync to Xero

## Testing your integration

{% hint style="danger" %}
The following steps will generate a new invoice in your Xero account once completed. Please consult your accountant or bookkeeper to ensure this does not cause unnecessary  confusion or complication for your team.
{% endhint %}

To test an invoice sync to your Xero account, follow the below steps:

### Confirm StayOnHire sends

#### 1. Create a Standard Invoice

From the 'Create' button in the top right-hand side of your page, select 'Invoice':

<figure><img src="https://50563950-files.gitbook.io/~/files/v0/b/gitbook-x-prod.appspot.com/o/spaces%2F-Lzplo2osBdXGzFtPu2f%2Fuploads%2Fjff2n8oOVw6lXmB8uAQy%2FScreenshot%202024-05-08%20at%204.44.56%E2%80%AFPM.png?alt=media&amp;token=4ca951f1-5e6b-4a1a-b135-a8bfe562952c" alt=""><figcaption></figcaption></figure>

Leave the type tab set to 'Standard' and select a client contact (ideally a not-important contact), then click 'Create':

<figure><img src="https://50563950-files.gitbook.io/~/files/v0/b/gitbook-x-prod.appspot.com/o/spaces%2F-Lzplo2osBdXGzFtPu2f%2Fuploads%2FEnBbRjNqauKSjjx7C7Hq%2FScreenshot%202024-05-08%20at%204.51.40%E2%80%AFPM.png?alt=media&amp;token=8d55c7b1-ad71-4960-aea1-c654685904fb" alt=""><figcaption></figcaption></figure>

#### 2. Approve & Sync

Add invoice row details, such as description, quantity, price, account an tax rate, before approving teh invoice from the blue primary action button in the top-right hand side:

{% hint style="danger" %}
*Important:* Invoices with a total of 0.00 will **not** sync to your Xero integration, and will not work for the purpose of testing your Xero integration.
{% endhint %}

<figure><img src="https://50563950-files.gitbook.io/~/files/v0/b/gitbook-x-prod.appspot.com/o/spaces%2F-Lzplo2osBdXGzFtPu2f%2Fuploads%2F4SZJlHt4qV3Y2oGn8PDu%2FScreenshot%202024-05-08%20at%204.55.27%E2%80%AFPM.png?alt=media&amp;token=30aeef82-544c-4f5e-8284-001aa21686d1" alt=""><figcaption></figcaption></figure>

#### 3. Open in Xero

Once approved, your invoice's 'Sync Status (Xero)' field will now start syncing your newly approved invoice to Xero:

<figure><img src="https://50563950-files.gitbook.io/~/files/v0/b/gitbook-x-prod.appspot.com/o/spaces%2F-Lzplo2osBdXGzFtPu2f%2Fuploads%2FCHI7XRL9fy6UPk8XNqmK%2FScreenshot%202024-05-09%20at%201.07.51%E2%80%AFPM.png?alt=media&amp;token=16ebefd8-86ec-4cbc-b667-6b0aabe4d312" alt=""><figcaption></figcaption></figure>

#### Sync Success

If successful, a green tick icon will appear alongside the ability to 'Open in Xero'.

<figure><img src="https://50563950-files.gitbook.io/~/files/v0/b/gitbook-x-prod.appspot.com/o/spaces%2F-Lzplo2osBdXGzFtPu2f%2Fuploads%2FukFzJ7Ha2ksUZturaosp%2FScreenshot%202024-05-09%20at%201.10.11%E2%80%AFPM.png?alt=media&amp;token=bfa154d6-2da5-400a-8038-0422d8b0e360" alt=""><figcaption></figcaption></figure>

#### Sync Error

If unsuccessful, a red warning symbol will appear alongside the ability to 'Retry Sync' manually.

<figure><img src="https://50563950-files.gitbook.io/~/files/v0/b/gitbook-x-prod.appspot.com/o/spaces%2F-Lzplo2osBdXGzFtPu2f%2Fuploads%2FlYDmpN3TPX59QnsAFqup%2FScreenshot%202024-05-09%20at%208.47.27%E2%80%AFAM.png?alt=media&amp;token=f1b155de-466d-4dfd-8795-d8cf092ef86e" alt=""><figcaption></figcaption></figure>

Error messages will vary based on the issue of your account.&#x20;

If you're unable to resolve a sync error, please contact us via or [live chat support](https://drift.me/stayonhire) or through your StayOnHire representative directly.&#x20;

### Confirm StayOnHire receives

StayOnHire **does not receive** new invoices from Xero in any circumstances.&#x20;

Our gaol is to help your scheduling team execute jobs, and have your billing team use this integration to send approved invoices to Xero, in order to remove the manual data entry and potential for human-error.


# Recording Payments

This page focusses on the functionality and behaviour of invoice payment records syncing between StayOnHire and Xero once connected. Ideal for both new and experienced users.

## Overview

For the best experience, we recommend having your Xero integration set as below for recording invoice payment sync behaviour and direction:

* Xero Resource: Payments "Toggled on"
* Sync Direction: "StayOnHire sends & receives"
* StayOnHire Edibility: "Can be edited"

<figure><img src="https://50563950-files.gitbook.io/~/files/v0/b/gitbook-x-prod.appspot.com/o/spaces%2F-Lzplo2osBdXGzFtPu2f%2Fuploads%2FfNkPYP6zT7QjkIXRFlvJ%2FScreenshot%202024-05-07%20at%204.19.02%E2%80%AFPM%203.png?alt=media&amp;token=1af05606-91ab-4182-931a-44adfa855a51" alt=""><figcaption><p>This configuration page is accessible in the settings of your StayOnHire account</p></figcaption></figure>

## Configuration & Setup

To ensure your integration is set correctly, complete the following checklist:

1. Complete the Xero [Getting Started](/integrations/xero/getting-started) guide

## How it Works

A simple overview of how Xero recording invoice payments will look in your business:

1. An invoice is synced between StayOnHire and Xero&#x20;
2. Payments recorded on these invoices will be updated in both Xero and StayOnHire, including amounts paid, account etc.
3. Outstanding invoices and amounts due remain consistent between your StayOnHire and Xero accounts and all active jobs

## Testing your integration

{% hint style="danger" %}
The following steps will record an invoice in your Xero account once completed. Please consult your accountant or bookkeeper to ensure this does not cause unnecessary confusion or complications for your team.
{% endhint %}

To test an invoice sync to your Xero account, follow the below steps:

### Confirm StayOnHire Receives

#### 1. Add a payment in Xero

Find an invoice that has synced between your StayOnHire and Xero accounts.&#x20;

Add a payment using the standard Xero user interface button:

<figure><img src="https://50563950-files.gitbook.io/~/files/v0/b/gitbook-x-prod.appspot.com/o/spaces%2F-Lzplo2osBdXGzFtPu2f%2Fuploads%2FzJmRHosXzoIXD95xH16L%2FScreenshot%202024-05-09%20at%201.57.45%E2%80%AFPM.png?alt=media&amp;token=3efaa269-07b4-4f88-aac2-e956b1a25f2b" alt=""><figcaption></figcaption></figure>

#### 2. Sync invoice&#x20;

Manually sync the invoice to see the new payment reflected in StayOnHire:

{% hint style="info" %}
Invoice payments made in Xero will automatically sync every hour on the round hour (i.e 1PM, 2PM etc.) if not manually triggered as pictured below.
{% endhint %}

<figure><img src="https://50563950-files.gitbook.io/~/files/v0/b/gitbook-x-prod.appspot.com/o/spaces%2F-Lzplo2osBdXGzFtPu2f%2Fuploads%2FE82QIia0QMeLFtfFleui%2FScreenshot%202024-05-09%20at%202.07.43%E2%80%AFPM.png?alt=media&amp;token=ef1e3af5-2329-47ef-8c0c-cd6538a7f113" alt=""><figcaption></figcaption></figure>

### Confirm StayOnHire Sends

#### 1. Add a payment in StayOnHire

Find an invoice that has synced between your StayOnHire and Xero accounts.

From your StayOnHire account, record a payment:

<figure><img src="https://50563950-files.gitbook.io/~/files/v0/b/gitbook-x-prod.appspot.com/o/spaces%2F-Lzplo2osBdXGzFtPu2f%2Fuploads%2FCoRhXsyXgrLbupmJBKLO%2FScreenshot%202024-05-09%20at%202.11.56%E2%80%AFPM.png?alt=media&amp;token=b87d471b-1c24-4888-9a98-9aadf700a6aa" alt=""><figcaption></figcaption></figure>

#### 2. Refresh your Xero invoice page

New payments added in StayOnHire will now be updated in both your Xero and StayOnHire accounts:

<figure><img src="https://50563950-files.gitbook.io/~/files/v0/b/gitbook-x-prod.appspot.com/o/spaces%2F-Lzplo2osBdXGzFtPu2f%2Fuploads%2F8LR4ipx0RJ0n71poXJNO%2FScreenshot%202024-05-09%20at%202.13.29%E2%80%AFPM.png?alt=media&amp;token=309baa57-0c2f-4516-99a4-e5497df28201" alt=""><figcaption></figcaption></figure>

## Payment History

To view a history of payments in StayOnHire, click the 'Payment Status' field at the top of any of your approved invoices and select the option 'View payment history':

<figure><img src="https://50563950-files.gitbook.io/~/files/v0/b/gitbook-x-prod.appspot.com/o/spaces%2F-Lzplo2osBdXGzFtPu2f%2Fuploads%2Fs6rNddc6HVRifJYUHCtY%2FScreenshot%202024-05-09%20at%202.15.53%E2%80%AFPM.png?alt=media&amp;token=94286725-69e2-4b07-9270-d012ec4e0573" alt=""><figcaption></figcaption></figure>

A bottom sheet detailing payment logs will display payment details:

<figure><img src="https://50563950-files.gitbook.io/~/files/v0/b/gitbook-x-prod.appspot.com/o/spaces%2F-Lzplo2osBdXGzFtPu2f%2Fuploads%2FKGkDYvrg7WcQrGNWBzP3%2FScreenshot%202024-05-09%20at%202.17.09%E2%80%AFPM.png?alt=media&amp;token=b4430356-c104-42b2-95e6-c1355c10f758" alt=""><figcaption></figcaption></figure>


# Troubleshooting

The section is for people who want to understand what exactly is happening your StayOnhire app when something with an existing Xero integration is not performing like it should.

## 1. Activity Logs

### Xero Integration Logs

To view a log of actions happening between your StayOnHire and Xero account, open the Xero support page 'Activity Logs' from your Xero page:

<figure><img src="https://lh7-us.googleusercontent.com/g2Vi-PiZ9hTtG6ZCkMD9OukJoFhnp8QsZ-fE4PYTPSBs-Eqb5hQua25fJrKB64c9HJYGAUPUHhOphjMapAOy4wTqmcV5p1rf7m9DcVKgA4QNKYOsTV-svST_bsOlkzrB1HdgYdZNtcorL0MwOA1FTZE" alt=""><figcaption></figcaption></figure>

This will display a log of actions happening between the users account and their Xero account:

<figure><img src="https://lh7-us.googleusercontent.com/UqSauiCnDEb5tkuCKOHgJOknTpCeR69yf9vPT9yhVA4BmtQ2gqu47crOo4UySOUnGwzvEiEFRu3AGKmar1m6_20vM5CMaRSVyhMb_aT0C55Yv90DlaueM8nM1dVhXotyqlX72sySau_qkd59uSQZinA" alt=""><figcaption></figcaption></figure>

## 2. Error Logs

### Realtime Errors

For actions that occur in your application, a bottom sheet timeline of logs will appear with an error message, stating the problem.

The popup will appear automatically but can also be found by clicking opening your StayOnHire main menu and clicking 'Background Sync Logs'.


# Disconnect / Reconnect

A short guide on how to remove or reconnect a Xero integration with StayOnHire. The section is for those looking to remove an existing connection.

## 1. Go to Xero Integration

Navigate to [Settings > Integrations > Xero > Authentication](https://app.stayonhire.com/org/integration/xero/)

<figure><img src="https://lh7-us.googleusercontent.com/gK4EFXqPcFngzb22vb6Tq4cm112AWbQSPePAaAjhXu93L3hV4IAkSYu8YsJBIHWJoqOWuAtfv6xtBOHB8l4nvOoXM01da0H6lMCGkKcXAIW61empdcT6r6204yBjjLfzsvjBS_NBlMLcfS8iNhoCr1c" alt=""><figcaption></figcaption></figure>

## 2. Revoke authentication

Click “Permanently delete connection”

<figure><img src="https://lh7-us.googleusercontent.com/22Uw4vaQndXfIxOHt7UG_5EL2nDb-H_59Tui5sEgcYlOG0HTVpOs7Hs9G3k5lQyDHiJ0fHojsUTgsaUdboZODthhaOEnLHvOHzWzXfYkWOU_9rOL8BBVHLFcVcadjnrl1cGYmvQVfaESr68sOSDpGOE" alt=""><figcaption></figcaption></figure>

This will remove your account connection with Xero.

## 3. Deleting Leftover Data

This disconnection process will not remove imported data (such as accounts, tax rates, contacts etc.), but rather remove any live connection to your Xero account.

To delete all reference data remaining, navigate to each relevant page (i.e. Tax Rates in the settings page), select all and delete all.

## 4. Re-connection

A StayOnHire account can be re-connected back to the same Xero organisation at a later date.

The reconnection will keep any historically mapped data and not duplicate or overwrite it.

If connecting a new Xero organisation to your StayOnHire account, we recommend deleting leftover Tax Rates and Accounts before proceeding to prevent any unnecessary duplicate data (such as two '200 Sales' accounts, one from your previous Xero organisation and one from your newly connected integration).


# Brand Assets & Guidelines

Welcome to the official brand kit for StayOnHire. These assets ensure our documentation remains consistent with our core platform.

## Visual Identity&#x20;

StayOnHire uses a high-visibility, industrial-professional aesthetic. The goal is to blend the reliability of the construction sector with the clean efficiency of a modern SaaS platform.

StayOnHire positions itself as a modern, efficiency-driven partner for the construction and equipment rental industry. The brand identity balances technological innovation (bright, active colors) with industrial reliability (dark, grounded foundations). The overall aesthetic is "Clean SaaS" — minimizing clutter to focus on data and action.

## Logos

{% hint style="info" %}
**Usage guidelines - please read**

When applying the StayOnHire logo please follow these simple rules:

* Stick to StayOnhire brand colors
* Scale the logo uniformly
* Ensure the logo is legible (re. size and surrounding space)
* Don't skew or rotate the logo
  {% endhint %}

### Wordmark

Use the logos with green whenever possible. Use the other logos only when background colors or patterns would interfere with the full color primary logo.

{% tabs %}
{% tab title="GREEN + WHITE " %}

<figure><img src="https://50563950-files.gitbook.io/~/files/v0/b/gitbook-x-prod.appspot.com/o/spaces%2F-Lzplo2osBdXGzFtPu2f%2Fuploads%2FancUWd0O4oRlZWswOUdW%2Ffavicon-with-wh-text-stayonhire.svg?alt=media&amp;token=15c70a12-9ed6-4ad3-bc2c-8ec54d686195" alt=""><figcaption><p>Primary Brand</p></figcaption></figure>
{% endtab %}

{% tab title="GREEN + BLACK" %}

<figure><img src="https://50563950-files.gitbook.io/~/files/v0/b/gitbook-x-prod.appspot.com/o/spaces%2F-Lzplo2osBdXGzFtPu2f%2Fuploads%2F3g4fk6rRnb3BlAE2hOXp%2Ffavicon-with-blk-text-stayonhire.svg?alt=media&amp;token=d66565f5-cea9-4432-b9df-29f128f8518e" alt=""><figcaption><p>Primary Brand</p></figcaption></figure>
{% endtab %}

{% tab title="WHITE" %}

<figure><img src="https://50563950-files.gitbook.io/~/files/v0/b/gitbook-x-prod.appspot.com/o/spaces%2F-Lzplo2osBdXGzFtPu2f%2Fuploads%2F9uxe1i7BMd0gz8SNpS1s%2Fstayonhire_gradient_logo.svg?alt=media&amp;token=9d471b45-9a46-4957-9461-488d3200a948" alt=""><figcaption><p>Primary Brand</p></figcaption></figure>
{% endtab %}

{% tab title="BLACK" %}

<figure><img src="https://50563950-files.gitbook.io/~/files/v0/b/gitbook-x-prod.appspot.com/o/spaces%2F-Lzplo2osBdXGzFtPu2f%2Fuploads%2F89UHCgsr1471ykh0uq1C%2Fstayonhire_gradient_logo_blk.svg?alt=media&amp;token=7f8c4f85-a11f-4e2a-8738-f7b929cc7b63" alt=""><figcaption><p>Primary Brand</p></figcaption></figure>
{% endtab %}
{% endtabs %}

{% tabs %}
{% tab title="GREEN + WHITE " %}

<figure><img src="https://50563950-files.gitbook.io/~/files/v0/b/gitbook-x-prod.appspot.com/o/spaces%2F-Lzplo2osBdXGzFtPu2f%2Fuploads%2FhHmaA2sLhEoCImscIAV6%2FFieldActions_FullWordmark_White.svg?alt=media&amp;token=6bd78e95-bea9-4bda-9d61-3f3d6e0342a8" alt="" width="360"><figcaption><p>Secondary Sub Brand / Feature</p></figcaption></figure>
{% endtab %}

{% tab title="GREEN + BLACK" %}

<figure><img src="https://50563950-files.gitbook.io/~/files/v0/b/gitbook-x-prod.appspot.com/o/spaces%2F-Lzplo2osBdXGzFtPu2f%2Fuploads%2FWmYcFd3Gz9nNrmJjeDKi%2FFieldActions_FullWordmark_Black.svg?alt=media&amp;token=4a6a3bd9-4b38-4054-9fe7-9d087de3d235" alt="" width="360"><figcaption><p>Secondary Sub Brand / Feature</p></figcaption></figure>
{% endtab %}
{% endtabs %}

### Mark

Use these logos only when background colors or patterns would interfere with the full color primary logo.

{% tabs %}
{% tab title="GREEN + WHITE " %}

<div align="center"><figure><img src="https://50563950-files.gitbook.io/~/files/v0/b/gitbook-x-prod.appspot.com/o/spaces%2F-Lzplo2osBdXGzFtPu2f%2Fuploads%2Fgwym4OVZQP1vBKg6sn1K%2FMark_Green_512x512.svg?alt=media&amp;token=92e2998e-9470-4d3c-882d-6042219e2d3c" alt="" width="128"><figcaption><p>StayOnHire Office</p></figcaption></figure></div>
{% endtab %}
{% endtabs %}

{% tabs %}
{% tab title="GREEN + WHITE " %}

<figure><img src="https://50563950-files.gitbook.io/~/files/v0/b/gitbook-x-prod.appspot.com/o/spaces%2F-Lzplo2osBdXGzFtPu2f%2Fuploads%2FazrmJcEQmzFeC0Wo26TD%2FMark_FA_Green_512x512.svg?alt=media&amp;token=dbda809a-d66f-471c-b81e-9cf679e107c2" alt="" width="128"><figcaption><p>Field Actions</p></figcaption></figure>
{% endtab %}
{% endtabs %}

### Icon

Use these logos only when background colors or patterns would interfere with the full color primary logo or when you will be providing the cropping.

{% tabs %}
{% tab title="GREEN + WHITE " %}

<figure><img src="https://50563950-files.gitbook.io/~/files/v0/b/gitbook-x-prod.appspot.com/o/spaces%2F-Lzplo2osBdXGzFtPu2f%2Fuploads%2Fr8W0Bvz9FQnbb0mNnTt0%2FMark_Green_512x512_Square.svg?alt=media&amp;token=c7da8753-997d-441b-a46a-49729f6f96ff" alt="" width="128"><figcaption><p>StayOnHire Office</p></figcaption></figure>
{% endtab %}
{% endtabs %}

{% tabs %}
{% tab title="GREEN + WHITE " %}

<figure><img src="https://50563950-files.gitbook.io/~/files/v0/b/gitbook-x-prod.appspot.com/o/spaces%2F-Lzplo2osBdXGzFtPu2f%2Fuploads%2F6vGJtfUT349ZkRbPnVGB%2FMark_FA_Green_512x512_Square.svg?alt=media&amp;token=b05b2c4c-f7ea-461f-8d50-a1761c9e4de0" alt="" width="128"><figcaption><p>Field Actions</p></figcaption></figure>
{% endtab %}
{% endtabs %}

{% tabs %}
{% tab title="GRADIENT" %}

* Acheived via a linear gradient from the top-right to the bottom-left'
* \#48BE14 - 100% opacity - 25% from the bottom left
* \#A8DC19 - 100% opacity - 100% top right

<figure><img src="https://50563950-files.gitbook.io/~/files/v0/b/gitbook-x-prod.appspot.com/o/spaces%2F-Lzplo2osBdXGzFtPu2f%2Fuploads%2FiXfwYkaj9lqP4g5fcbWA%2FScreenshot%202026-01-02%20at%203.27.54%E2%80%AFpm.png?alt=media&amp;token=84cc01c8-b8e7-4afa-87ab-033b55a79549" alt=""><figcaption><p>Visualisation of how gradient is achieved</p></figcaption></figure>

<figure><img src="https://50563950-files.gitbook.io/~/files/v0/b/gitbook-x-prod.appspot.com/o/spaces%2F-Lzplo2osBdXGzFtPu2f%2Fuploads%2FZJ5b2EgBuPeEJjHMMmw0%2FGradient%20Green%20Background.svg?alt=media&amp;token=1f35a806-d5af-46c9-b3be-b2fdd51fa9e4" alt="" width="384"><figcaption><p>Download as SVG</p></figcaption></figure>
{% endtab %}
{% endtabs %}

### Splash Background Vector

Use this vector when scaling splash screens as the logo background. This contrast compliments the green, white and main user interface elements of StayOnHire's apps.

{% tabs fullWidth="false" %}
{% tab title="SPLASH VECTOR" %}

<div align="center"><figure><img src="https://50563950-files.gitbook.io/~/files/v0/b/gitbook-x-prod.appspot.com/o/spaces%2F-Lzplo2osBdXGzFtPu2f%2Fuploads%2Fjk83uSHlfHAPjg13ylBA%2FSplash%20Background.svg?alt=media&amp;token=279f79cc-0ee6-4e2a-a748-c3a8354d4e02" alt="" width="375"><figcaption><p>Contrast white, green and StayOnHire's user interface</p></figcaption></figure></div>
{% endtab %}

{% tab title="PORTRAIT EXAMPLE" %}

<figure><img src="https://50563950-files.gitbook.io/~/files/v0/b/gitbook-x-prod.appspot.com/o/spaces%2F-Lzplo2osBdXGzFtPu2f%2Fuploads%2FND7Xz4RFErhy9iVBEnYf%2Fapple-splash-1170-2532.jpg?alt=media&amp;token=a9b5f0e9-2117-4136-b4f8-39ff2ed0e625" alt="" width="375"><figcaption><p>Portait mobile device</p></figcaption></figure>
{% endtab %}

{% tab title="LANDSCAPE EXAMPLE" %}

<figure><img src="https://50563950-files.gitbook.io/~/files/v0/b/gitbook-x-prod.appspot.com/o/spaces%2F-Lzplo2osBdXGzFtPu2f%2Fuploads%2FW4btdkhWoYT8QepVFxY4%2Fapple-splash-2778-1284.jpg?alt=media&amp;token=877cedb1-9fbf-4425-ac4f-1407762132d6" alt=""><figcaption><p>Landscape mobile device</p></figcaption></figure>
{% endtab %}
{% endtabs %}

## Colours

#### Main palette

**Website & Marketing (The "Brand" Face)**&#x20;

The marketing identity is designed to be high-energy and authoritative, utilizing a vibrant Action Green hero section to signify growth and operational efficiency.&#x20;

We prioritizes high-contrast typography and clear call-to-actions, such as the Website Primary Action Button (#2D75FF), to guide potential users toward conversion.&#x20;

<figure><img src="https://50563950-files.gitbook.io/~/files/v0/b/gitbook-x-prod.appspot.com/o/spaces%2F-Lzplo2osBdXGzFtPu2f%2Fuploads%2FTLMSdmhj6WaDneiPxcLm%2FScreenshot%202026-01-02%20at%204.34.22%E2%80%AFpm.png?alt=media&amp;token=43157459-81ef-46c0-b4a3-121cb2b0af4f" alt=""><figcaption><p>Example: Primary action buttons and H1 text</p></figcaption></figure>

<table data-card-size="large" data-view="cards"><thead><tr><th align="center"></th><th align="center"></th><th data-hidden data-card-cover data-type="image">Cover image</th></tr></thead><tbody><tr><td align="center">#2D75FF<br>Website Primary Action</td><td align="center"><em>Usage:</em> Primary call-to-action buttons, logo icon, success states, and highlighting key value propositions.</td><td><a href="https://50563950-files.gitbook.io/~/files/v0/b/gitbook-x-prod.appspot.com/o/spaces%2F-Lzplo2osBdXGzFtPu2f%2Fuploads%2FQ2YR3TPKipGLcLiqRjcs%2FWebsite%20-%20Primary%20Action%20buttons%202D75FF.svg?alt=media&amp;token=7f23dd56-fe47-4b34-b0dd-6af33d1eed95">Website - Primary Action buttons 2D75FF.svg</a></td></tr></tbody></table>

**App & Software (The "Utility" Face)**

The software interface shifts toward a 'Utility First' philosophy, prioritizing data density and long-term legibility.&#x20;

The color palette transitions to a grounded Deep Slate sidebar for navigation, while the main workspace uses a clean Canvas Grey background to reduce eye strain during extended use.&#x20;

To manage complex scheduling, the app utilizes a secondary palette of muted pastels for Gantt chart 'job blocks,' ensuring that status indicators and text remain clear and actionable without overwhelming the user.

<figure><img src="https://50563950-files.gitbook.io/~/files/v0/b/gitbook-x-prod.appspot.com/o/spaces%2F-Lzplo2osBdXGzFtPu2f%2Fuploads%2Feoxb88fNOraVGn8kqUAA%2FScreenshot%202026-01-02%20at%204.37.09%E2%80%AFpm.png?alt=media&amp;token=12616c9f-a9fc-4b72-b810-90d98cb6f142" alt=""><figcaption><p>Example: Action buttons in top right, alongside calendar colour events</p></figcaption></figure>

<table data-view="cards"><thead><tr><th align="center"></th><th align="center"></th><th data-hidden data-card-cover data-type="image">Cover image</th></tr></thead><tbody><tr><td align="center"><strong>#186ACC</strong><br>APP Primary Action Buttons</td><td align="center"><em>Usage:</em> Primary call-to-action buttons, logo icon, success states, and highlighting key value propositions.</td><td><a href="https://50563950-files.gitbook.io/~/files/v0/b/gitbook-x-prod.appspot.com/o/spaces%2F-Lzplo2osBdXGzFtPu2f%2Fuploads%2FVtllHHZ7Bg6XB396ri2b%2FWebsite%20-%20Primary%20Action%20buttons%202D75FF.svg?alt=media&amp;token=434ff0c1-9a9a-49f2-bc21-3353087feade">Website - Primary Action buttons 2D75FF.svg</a></td></tr><tr><td align="center"><strong>#E8F0FA</strong><br>APP Secondary Action Buttons</td><td align="center"><em>Usage:</em> Secondary call-to-action buttons</td><td><a href="https://50563950-files.gitbook.io/~/files/v0/b/gitbook-x-prod.appspot.com/o/spaces%2F-Lzplo2osBdXGzFtPu2f%2Fuploads%2FgVeojYvjmfRbvtmxpfwe%2FWebsite%20-%20Primary%20Action%20buttons%202D75FF-1.svg?alt=media&amp;token=fd48d48e-e66e-46f4-af05-6fcb086b47b9">Website - Primary Action buttons 2D75FF-1.svg</a></td></tr><tr><td align="center"><strong>#D8D8D8</strong> - Fill<br><strong>#BDBDBD</strong> - Border</td><td align="center"><em>Usage:</em> Job and calendar event colour</td><td><a href="https://50563950-files.gitbook.io/~/files/v0/b/gitbook-x-prod.appspot.com/o/spaces%2F-Lzplo2osBdXGzFtPu2f%2Fuploads%2FPKND4pjfMdbyLixMy5XM%2FSILVER%202.svg?alt=media&amp;token=566edd76-767e-48c6-9b3c-51876ffcd4df">SILVER 2.svg</a></td></tr><tr><td align="center"><strong>#B1D4FC</strong> - Fill<br><strong>#81B8FA</strong> - Border</td><td align="center"><em>Usage:</em> Job and calendar event colour</td><td><a href="https://50563950-files.gitbook.io/~/files/v0/b/gitbook-x-prod.appspot.com/o/spaces%2F-Lzplo2osBdXGzFtPu2f%2Fuploads%2FhWKvMQ4qTb8E3FUGBYDz%2FBLUE%202.svg?alt=media&amp;token=7d34f054-6dc0-46ad-9053-b7691f91ceb2">BLUE 2.svg</a></td></tr><tr><td align="center"><strong>#75D1F0</strong> - Fill<br><strong>#52C4EB</strong> - Border</td><td align="center"><em>Usage:</em> Job and calendar event colour</td><td><a href="https://50563950-files.gitbook.io/~/files/v0/b/gitbook-x-prod.appspot.com/o/spaces%2F-Lzplo2osBdXGzFtPu2f%2Fuploads%2F1gDkUdMe3u0HodZQzYlV%2FLIGHT%20BLUE%202.svg?alt=media&amp;token=ff32e47f-b387-4dd9-956e-5fff15c96782">LIGHT BLUE 2.svg</a></td></tr><tr><td align="center"><strong>#62DAC0</strong> - Fill<br><strong>#46D2B4</strong> - Border</td><td align="center"><em>Usage:</em> Job and calendar event colour</td><td><a href="https://50563950-files.gitbook.io/~/files/v0/b/gitbook-x-prod.appspot.com/o/spaces%2F-Lzplo2osBdXGzFtPu2f%2Fuploads%2FIq96yjFiZH0QUAiK7w5o%2FTURQUOISE%202.svg?alt=media&amp;token=1576ba69-9320-4a07-b311-12d0689064ca">TURQUOISE 2.svg</a></td></tr><tr><td align="center"><strong>#90E098</strong> - Fill<br><strong>#6FD679</strong> - Border</td><td align="center"><em>Usage:</em> Job and calendar event colour</td><td><a href="https://50563950-files.gitbook.io/~/files/v0/b/gitbook-x-prod.appspot.com/o/spaces%2F-Lzplo2osBdXGzFtPu2f%2Fuploads%2FZrFPMRb7eJAljZpHTQE8%2FGREEN%202.svg?alt=media&amp;token=43e721e1-f81b-4769-b735-42da3ec3ec23">GREEN 2.svg</a></td></tr><tr><td align="center"><strong>#FFDA8F</strong> - Fill<br><strong>#FFCA63</strong> - Border</td><td align="center"><em>Usage:</em> Job and calendar event colour</td><td><a href="https://50563950-files.gitbook.io/~/files/v0/b/gitbook-x-prod.appspot.com/o/spaces%2F-Lzplo2osBdXGzFtPu2f%2Fuploads%2FRqPkpzG2B8Uc669k94EK%2FYELLOW%202.svg?alt=media&amp;token=74efafe7-8edc-4cb1-926b-f9b1c7c170bf">YELLOW 2.svg</a></td></tr><tr><td align="center"><strong>#FFB79D</strong> - Fill<br><strong>#FF946F</strong> - Border</td><td align="center"><em>Usage:</em> Job and calendar event colour</td><td><a href="https://50563950-files.gitbook.io/~/files/v0/b/gitbook-x-prod.appspot.com/o/spaces%2F-Lzplo2osBdXGzFtPu2f%2Fuploads%2Fu7Q99KZFuDhXlEdUJkyE%2FORANGE%202.svg?alt=media&amp;token=ec20495e-8dcb-4d8d-8c0f-d37d8cc73b19">ORANGE 2.svg</a></td></tr><tr><td align="center"><strong>#FFBCCC</strong> - Fill<br><strong>#FF88A4</strong> - Border</td><td align="center"><em>Usage:</em> Job and calendar event colour</td><td><a href="https://50563950-files.gitbook.io/~/files/v0/b/gitbook-x-prod.appspot.com/o/spaces%2F-Lzplo2osBdXGzFtPu2f%2Fuploads%2FhKqHbBMVSg0x7bNE7QfP%2FPINK%202.svg?alt=media&amp;token=fea3cfd4-ab02-482e-b07a-089d29a489a4">PINK 2.svg</a></td></tr><tr><td align="center"><strong>#FFBAE8</strong> - Fill<br><strong>#FF87D6</strong> - Border</td><td align="center"><em>Usage:</em> Job and calendar event colour</td><td><a href="https://50563950-files.gitbook.io/~/files/v0/b/gitbook-x-prod.appspot.com/o/spaces%2F-Lzplo2osBdXGzFtPu2f%2Fuploads%2F9aO94i7x8aMOUsJUJTWi%2FLIGHT%20PINK%202.svg?alt=media&amp;token=939b837f-b3f6-40af-a054-ee4f72b4f76e">LIGHT PINK 2.svg</a></td></tr><tr><td align="center"><strong>#E4D1FD</strong> - Fill<br><strong>#C49DFA</strong> - Border</td><td align="center"><em>Usage:</em> Job and calendar event colour</td><td><a href="https://50563950-files.gitbook.io/~/files/v0/b/gitbook-x-prod.appspot.com/o/spaces%2F-Lzplo2osBdXGzFtPu2f%2Fuploads%2Fi6Ls2wwkNICSCq6iSnbs%2FPURPLE%202.svg?alt=media&amp;token=c50d32d9-d6bc-4ac2-b129-3d59f80c2b64">PURPLE 2.svg</a></td></tr></tbody></table>

## Typography

**Website & Marketing (The "Brand" Face)**&#x20;

<figure><img src="https://50563950-files.gitbook.io/~/files/v0/b/gitbook-x-prod.appspot.com/o/spaces%2F-Lzplo2osBdXGzFtPu2f%2Fuploads%2FphlAuX4rIDm7nYFeDJp3%2FScreenshot%202026-01-02%20at%203.02.57%E2%80%AFpm.png?alt=media&amp;token=5cf23a02-87d3-40d9-8267-b29359408dd0" alt=""><figcaption><p><a href="https://fonts.google.com/specimen/Montserrat">https://fonts.google.com/specimen/Montserrat</a></p></figcaption></figure>

* *Font:* Montserrat
* *Characteristics:* Rounded, friendly, and modern. It makes the "heavy" industry topics feel accessible and easy to manage.
* *Usage:* Hero banners ("Streamline Operations"), feature titles, and major announcements.

**App & Software (The "Utility" Face)**

<figure><img src="https://50563950-files.gitbook.io/~/files/v0/b/gitbook-x-prod.appspot.com/o/spaces%2F-Lzplo2osBdXGzFtPu2f%2Fuploads%2F8FYVF5lO5UTSx7nLs1qZ%2FScreenshot%202026-01-02%20at%203.11.02%E2%80%AFpm.png?alt=media&amp;token=2a01e447-d110-4864-a7b6-cc357b6e7c46" alt=""><figcaption><p><a href="https://fonts.google.com/specimen/Arimo">https://fonts.google.com/specimen/Arimo</a></p></figcaption></figure>

* Interface Font: Inter or Roboto.
* *Why:* These fonts are designed specifically for user interfaces. They have a tall x-height, making them legible at small sizes (like in the sidebar or Gantt chart tags in your screenshot) and handle numbers/data very well.
* *Usage:* All text inside the login portal, dashboards, and data tables.

## Tone of Voice

**Voice: The "Efficient Partner"**

StayOnHire speaks like a knowledgeable project manager. We understands the chaos of construction/rental and offers a calm, organized solution.

* Direct: Uses active verbs (*Streamline, Manage, Organise*). Avoids flowery language.
* Solution-Oriented: Focuses on the *outcome* (saving time, reducing error) rather than just the features.
* Professional yet Accessible: It avoids overly complex jargon, making the software feel inviting to users who might be used to pen-and-paper methods.

**Tone Guidelines**

* Do: Be clear, concise, and encouraging.
  * *Example:* "Organize your business. Execute jobs and projects."
* Don't: Be playful, whimsical, or overly aggressive.
  * *Avoid:* "Crush the competition!" or "The coolest app for hire."

**Key Brand Messaging Pillars**

* Simplicity: "Migrate off spreadsheets."
* Control: "Prevent double-bookings."
* Scale: "Scale fleets and labour."


# Socials & Links

Social media account and useful links

## Accounts

### Facebook Meta

{% embed url="<https://www.facebook.com/stayonhire/>" %}

### Instagram

{% embed url="<https://www.instagram.com/stayonhire/>" %}

### YouTube

{% embed url="<https://www.youtube.com/@stayonhire>" %}

<figure><img src="https://50563950-files.gitbook.io/~/files/v0/b/gitbook-x-prod.appspot.com/o/spaces%2F-Lzplo2osBdXGzFtPu2f%2Fuploads%2F4OMyb8oRjYpYPcy3dK5E%2FYouTube%20Thumbnail%20-%20Test%20Features.svg?alt=media&amp;token=2bbd4221-4aa7-4b95-a7c1-3bfc52f0d7fe" alt=""><figcaption><p>SVG Thumbnail for YouTube videos</p></figcaption></figure>

### LinkedIn

{% embed url="<https://au.linkedin.com/company/stayonhire>" %}

### X

{% embed url="<https://x.stayonhire.com>" %}

## Ad Campaign Media

### Full Job & Fleet Visibility

Facebook and Instagram Ad Campaign Assets

{% tabs %}
{% tab title="1080x1080 1:1 Feeds, Steams" %}

<figure><img src="https://50563950-files.gitbook.io/~/files/v0/b/gitbook-x-prod.appspot.com/o/spaces%2F-Lzplo2osBdXGzFtPu2f%2Fuploads%2FThcbXyFk7JnVpEU4OwMS%2F1080x1080%201_1%20Feeds%2C%20Steams.svg?alt=media&amp;token=a9890496-865c-40de-a98d-9d136ff18646" alt="" width="375"><figcaption></figcaption></figure>
{% endtab %}

{% tab title="1080x1920 9:16 Stories Reels Apps" %}

<figure><img src="https://50563950-files.gitbook.io/~/files/v0/b/gitbook-x-prod.appspot.com/o/spaces%2F-Lzplo2osBdXGzFtPu2f%2Fuploads%2FRO6v10ptsuovvvyD1YKB%2F1080x1920%209_16%20Stories%20Reels%20Apps.svg?alt=media&amp;token=252a70b2-f455-495f-8a11-7d07b03fe59f" alt="" width="375"><figcaption></figcaption></figure>
{% endtab %}

{% tab title="1080x1920 9:16 Stories Reels Apps" %}

<figure><img src="https://50563950-files.gitbook.io/~/files/v0/b/gitbook-x-prod.appspot.com/o/spaces%2F-Lzplo2osBdXGzFtPu2f%2Fuploads%2F6PvlwY5JT4PFN3lXF9Ne%2F1080x1920%209_16%20Stories%20Reels%20Apps-1.svg?alt=media&amp;token=b7dd52c4-c17f-44da-8393-781058b1846f" alt="" width="375"><figcaption></figcaption></figure>
{% endtab %}

{% tab title="1200x1500 4:5 FB Portrait - Full job and Fleet Visibility" %}

<figure><img src="https://50563950-files.gitbook.io/~/files/v0/b/gitbook-x-prod.appspot.com/o/spaces%2F-Lzplo2osBdXGzFtPu2f%2Fuploads%2F602Pm5nDPw5OaSY1qgHF%2F1200x1500%204_5%20FB%20Portrait%20-%20Full%20job%20and%20Fleet%20Visibility-1.svg?alt=media&amp;token=3d6b1f24-d7f0-42a1-8b97-1772bba4c5e3" alt="" width="375"><figcaption></figcaption></figure>
{% endtab %}
{% endtabs %}


# Web & Email

Social media account and useful links

## Web

### Support & Demos

#### Calendly

<https://calendly.com/dylan-hrurukvit>

{% embed url="<https://calendly.com/dylan-hrurukvit>" %}

### Email

#### Promo Banners

<figure><img src="https://50563950-files.gitbook.io/~/files/v0/b/gitbook-x-prod.appspot.com/o/spaces%2F-Lzplo2osBdXGzFtPu2f%2Fuploads%2FIAea9xUn4zOHEJHDV0rT%2FSwitch%20email%20abnner.svg?alt=media&amp;token=cd14bfad-86d7-4b40-a6f9-d568acdebd77" alt="" width="375"><figcaption><p>Make the switch Promo</p></figcaption></figure>

<figure><img src="https://50563950-files.gitbook.io/~/files/v0/b/gitbook-x-prod.appspot.com/o/spaces%2F-Lzplo2osBdXGzFtPu2f%2Fuploads%2FmeTbClQMIMeSyWWn7GMY%2FEmail%20referral.svg?alt=media&amp;token=3ff8ee2a-9e92-487c-af1f-12fae509193f" alt="" width="375"><figcaption><p>Referral Promo</p></figcaption></figure>


# Product Updates

Release notes for StayOnHire are published on the main website. This page indexes them so you can find a specific change from inside the documentation. Each entry links to the full write-up, including screenshots and video where available.

If you are looking for how something works *today* rather than when it changed, the rest of this documentation is the better starting point.

## 2023

| Date         | Update                                                                                                                   | Type           |
| ------------ | ------------------------------------------------------------------------------------------------------------------------ | -------------- |
| 27 June 2023 | [StayOnHire Field App — iOS and Android installation](https://www.stayonhire.com/updates/install-mobile-app-ios-android) | Usability & UI |

## 2022

| Date             | Update                                                                                                      | Type          |
| ---------------- | ----------------------------------------------------------------------------------------------------------- | ------------- |
| 25 November 2022 | [Asset Positions in StayOnHire](https://www.stayonhire.com/updates/asset-positions)                         | Major feature |
| 15 November 2022 | [Asset Categories](https://www.stayonhire.com/updates/asset-categories)                                     | Minor feature |
| 1 November 2022  | [Introduction to Asset Attachments](https://www.stayonhire.com/updates/introduction-to-asset-attachments)   | Minor feature |
| 15 October 2022  | [Testing New Features in StayOnHire](https://www.stayonhire.com/updates/testing-new-features-in-stayonhire) | Support       |

## 2021

| Date             | Update                                                                                                                            | Type           |
| ---------------- | --------------------------------------------------------------------------------------------------------------------------------- | -------------- |
| 23 February 2021 | [Feature Requests and Ticket Progress Tracking](https://www.stayonhire.com/updates/feature-requests-and-ticket-progress-tracking) | Usability & UI |
| 21 February 2021 | [Functional Equipment Allocations Table](https://www.stayonhire.com/updates/functional-equipment-allocations-table)               | Major feature  |
| 16 February 2021 | ['Auto Not Ready' Status](https://www.stayonhire.com/updates/auto-not-ready-status)                                               | Minor feature  |